As I was kneading the dough, a child’s giggle reached my ears from the kitchen. “Look, Mom! I’m making a snake!” This playful moment sparked the inspiration for these delightful Halloween Snake Breadsticks. With a crispy exterior that gives way to a soft, chewy center, this fun recipe is perfect for both kids and adults. Not only are they an exciting addition to your Halloween festivities, but they also serve as a healthier appetizer option, making them a guilt-free snack! Imagine serving these spooky creations at your next gathering, encouraging creativity and laughter while keeping everyone happily munching. Are you ready to whip up some snake-tastic treats that will steal the show?
Why Are These Snake Breadsticks So Fun?
Unique Presentation: These spooky snake breadsticks are sure to be the star attraction at your Halloween gathering, delighting kids and adults alike.
Healthier Option: With an approximate 184 calories per serving, they make for a satisfying, guilt-free party snack in comparison to sugary alternatives.
Interactive Fun: Involve the kids in the kitchen; shaping the dough into snakes is a creative and enjoyable activity for all ages.
Versatile Pairing: Serve them with a variety of dips like garlic mayo or homemade BBQ sauce to cater to diverse tastes.
Make Ahead: Enjoy the convenience of preparing them in advance; they stay fresh in an airtight container for up to three days!
Imagine the laughter and joy as your guests enjoy these delicious treats while making wonderful memories!
Snake Breadsticks Ingredients
• Here’s everything you’ll need to create these delightful Snake Breadsticks!
For the Dough
- Dried Active Yeast – Essential for dough rising; you can substitute with instant yeast if needed.
- Warm Water – Activates the yeast; aim for a temperature of around 110°F (45°C).
- Olive Oil – Adds moisture and enhances flavor; melted butter can be used for a richer version.
- Plain Flour – The primary structure of the breadsticks; feel free to switch to bread flour for more chewiness.
- Salt – Balances flavors and is crucial for yeast activation.
For Decoration
- Olives (chopped small) – These become snake eyes; black beans can also work as a fun substitute.
- Orange Pepper (bell pepper) – Used for the snake tongue; you can opt for red or yellow peppers for similar effects.
- Food Colour Gel (green) – Adds a spooky hue to your Snake Breadsticks; any color can work for different themes.
- Water (for mixing) – This combines with the food color.
- Sesame or Nigella Seeds – A decorative touch that contributes texture and flavor; poppy seeds are a great alternative.
Dive into making these charming Snake Breadsticks, and watch the smiles grow!
Step‑by‑Step Instructions for Spooky Halloween Snake Breadsticks
Step 1: Prepare Dough
In a mixing bowl, combine 1 cup of warm water (110°F or 45°C) with 2 teaspoons of dried active yeast. Stir gently until the yeast is bubbly, signaling that it’s activated, then blend in 2 tablespoons of olive oil. This mixture forms the base of your snake breadsticks, ensuring they rise beautifully.
Step 2: Combine Ingredients
Sift 3 cups of plain flour and 1 teaspoon of salt into a large mixing bowl to ensure a smooth dough. Gradually mix the flour and salt with the yeast and oil mixture using a dough hook on low speed, until combined. The dough should start to pull away from the sides of the bowl, forming a cohesive ball.
Step 3: Knead Dough
If kneading by hand, transfer the dough to a floured surface and knead for about 10 minutes until smooth and elastic. If you used a dough hook, continue mixing until the dough is well-combined. Once ready, place the dough in a greased bowl, cover it with a damp cloth, and let it rise in a warm place for about 1 hour, or until it doubles in size.
Step 4: Shape Breadsticks
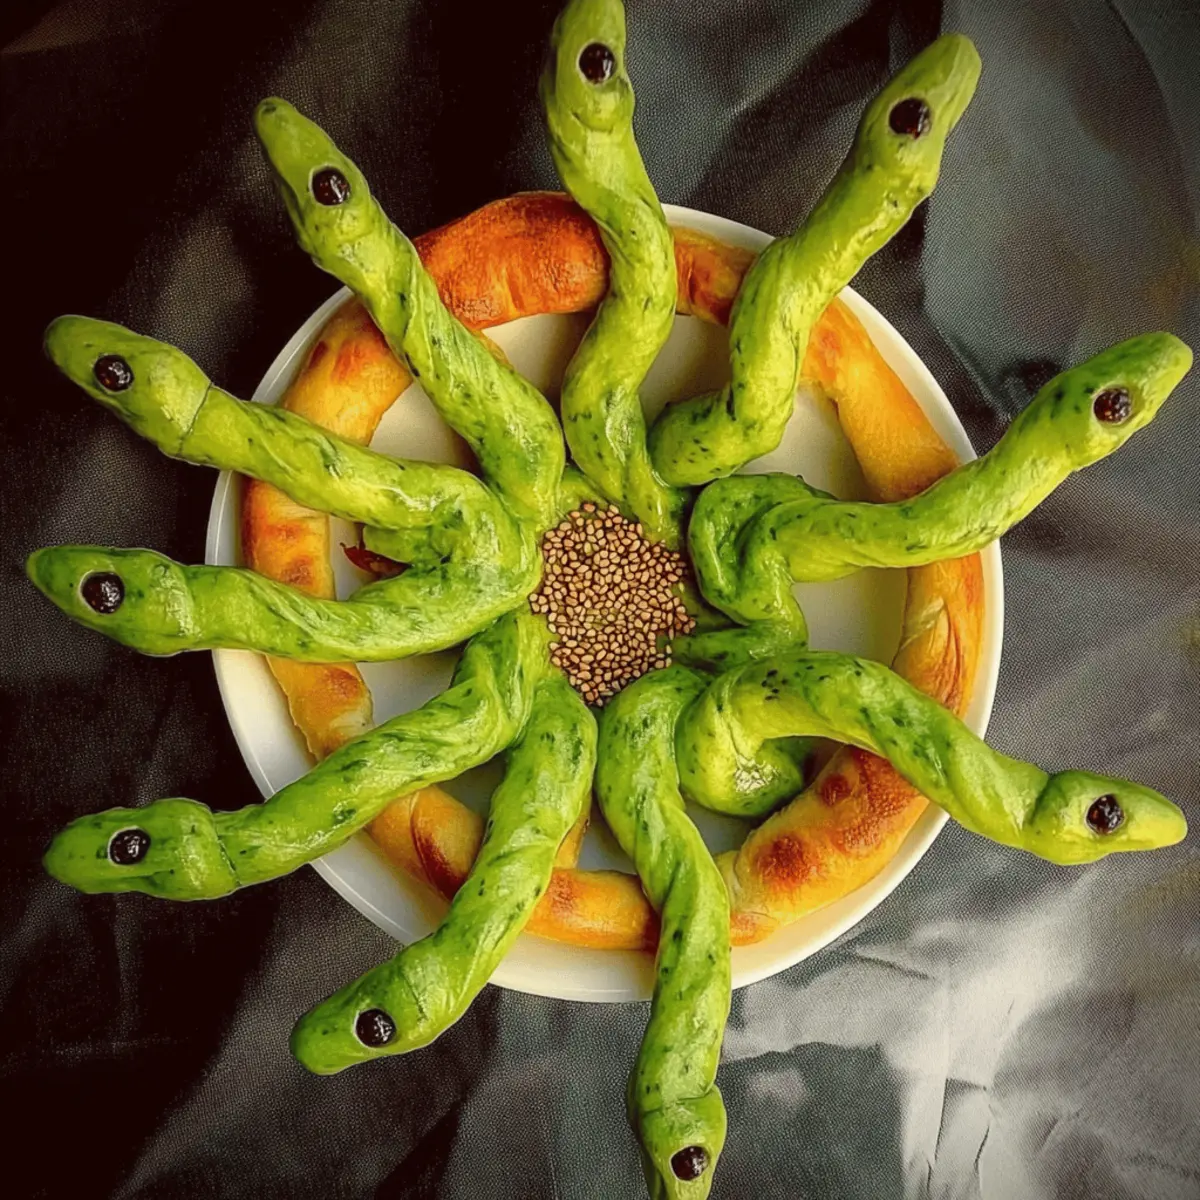
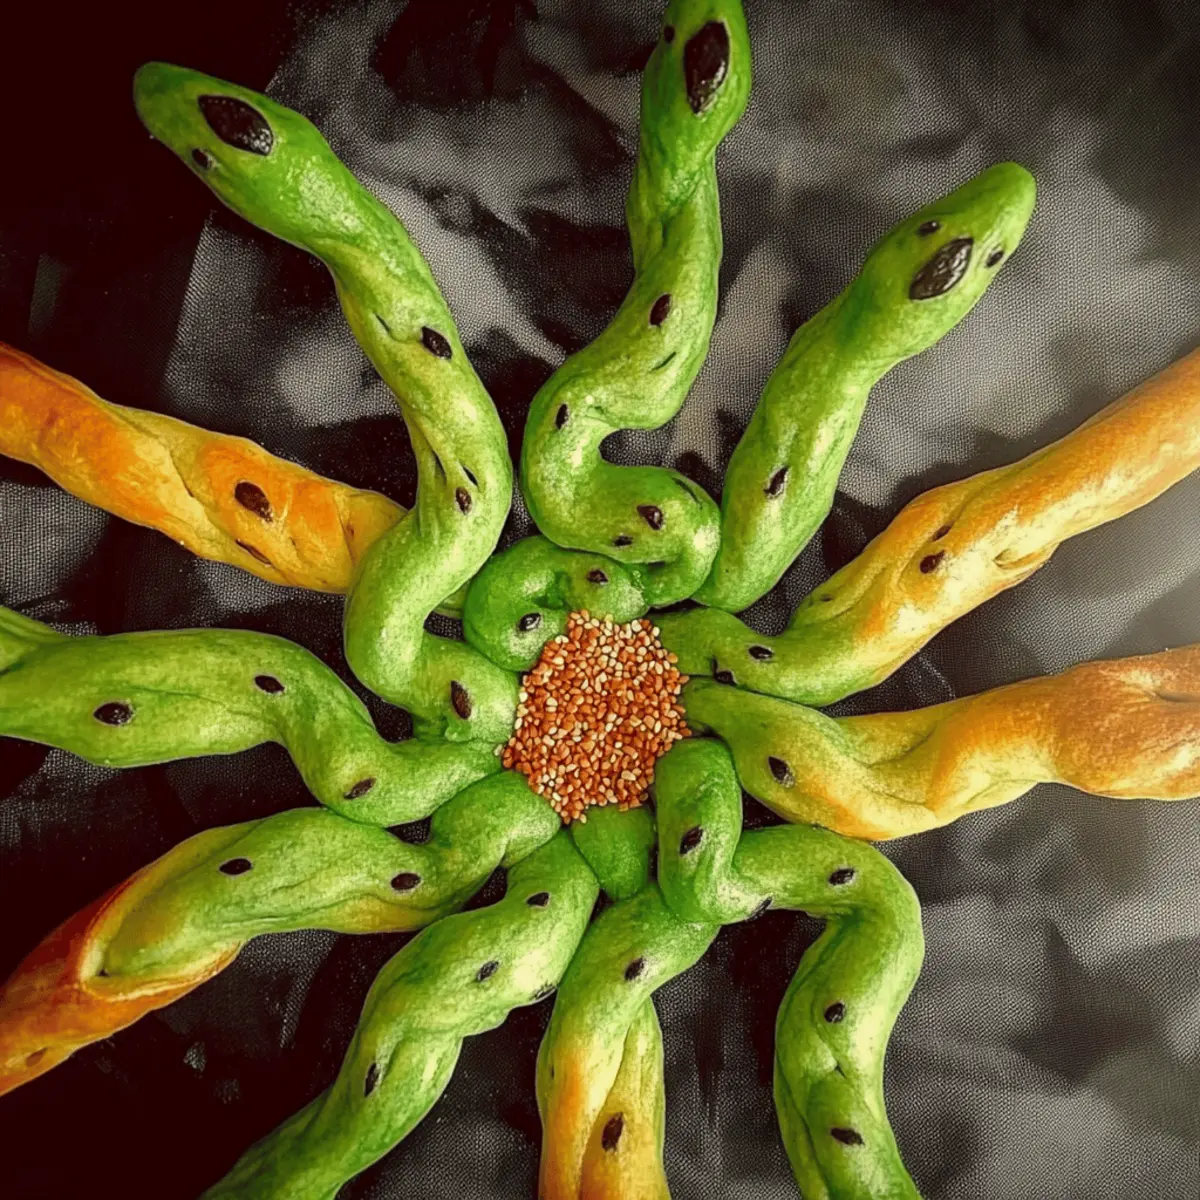
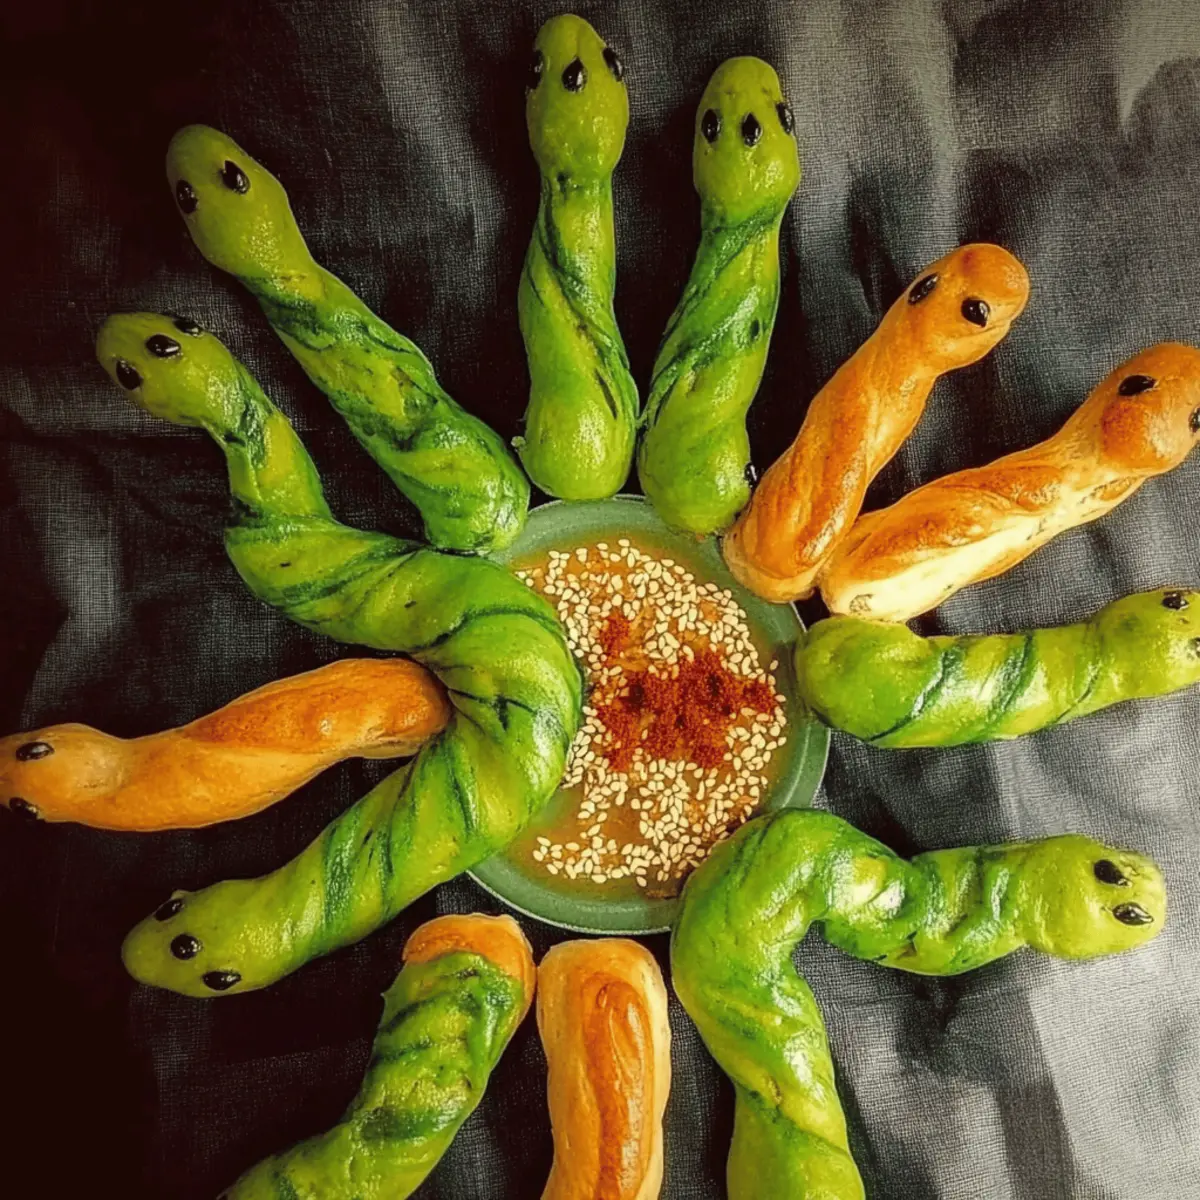
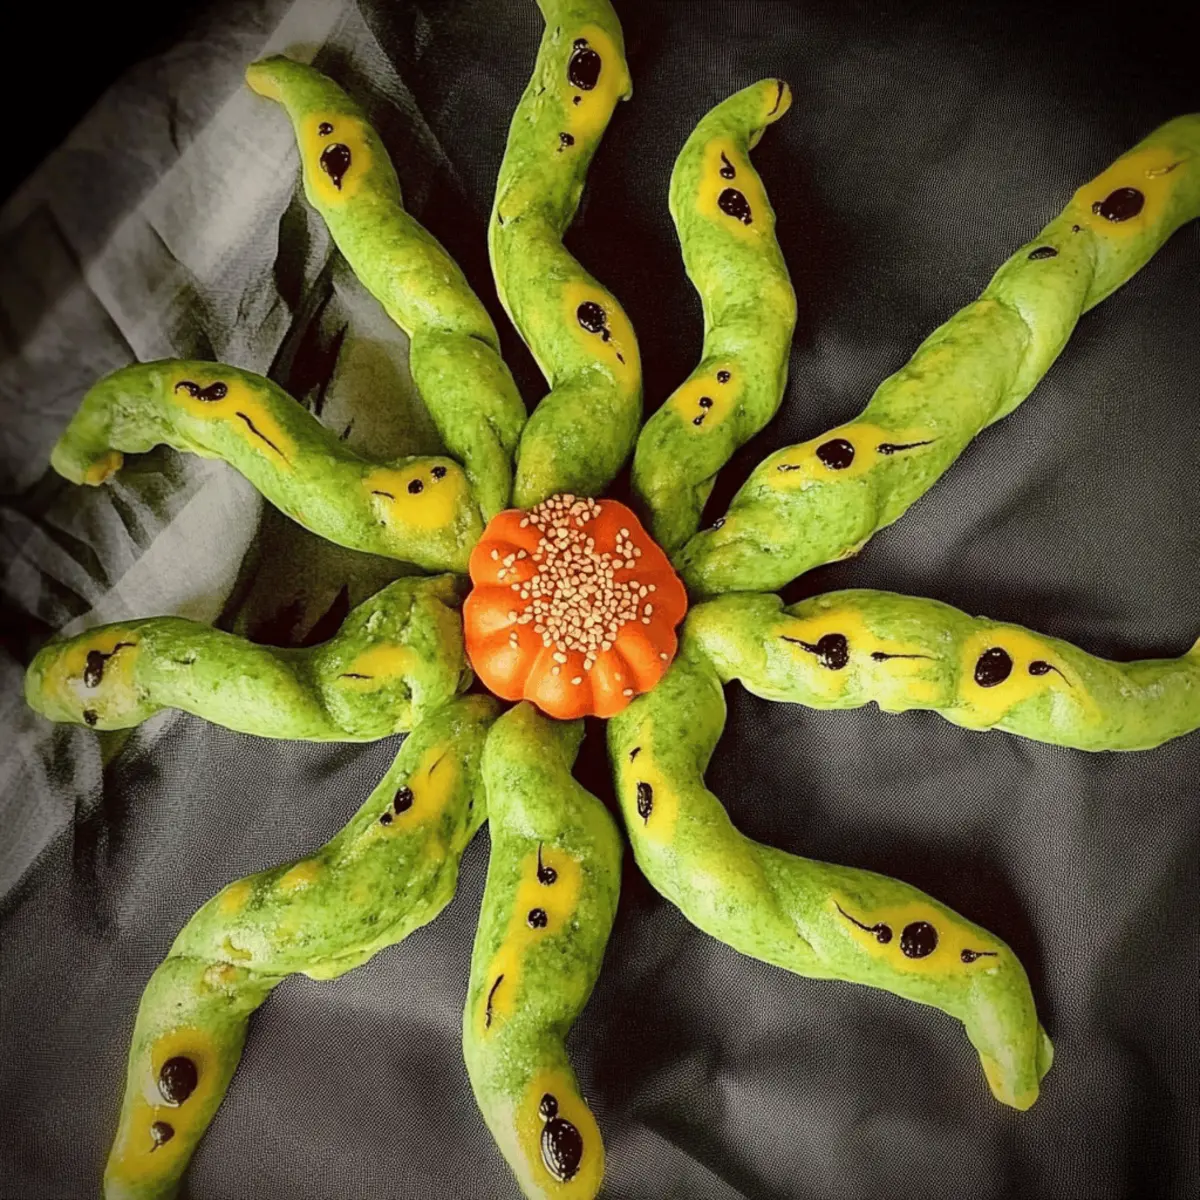
After the dough has risen, gently punch it down to release air. Divide the dough into 50g pieces, rolling each piece on a floured surface into snake shapes; make the heads thicker and taper the tails. This playful shaping of your snake breadsticks will add to the excitement of your Halloween gathering.
Step 5: Wrap and Bake
Carefully wrap each snake-shaped piece around wooden kebab sticks, ensuring they maintain their forms. Place them on a baking tray lined with parchment paper, leaving some space between each. Preheat your oven to 200°C (425°F) and bake the breadsticks for 15 minutes until golden-brown and crispy on the outside.
Step 6: Coloring
While the snake breadsticks are baking, mix a few drops of green food color gel with a tablespoon of water in a small bowl. Once the breadsticks are out of the oven, brush this colorful mixture over them for a fun, spooky look. If desired, sprinkle sesame or nigella seeds on top before returning them to the oven for an additional 5 minutes.
Step 7: Finish and Serve
Allow the spooky snake breadsticks to cool slightly after baking. Gently twist and remove the kebab sticks, creating space for fun decorations. Poke small holes with a toothpick for the eyes and tongues using chopped olives and orange peppers. Serve these delightful creations warm, and watch them vanish at your Halloween party!
How to Store and Freeze Snake Breadsticks
Airtight Container: Store baked breadsticks in an airtight container at room temperature for up to 2-3 days to maintain their crispy texture.
Freezer: If you’d like to keep your snake breadsticks longer, wrap them individually in plastic wrap and place them in a freezer-safe bag for up to 2 months.
Reheating: When ready to enjoy, thaw at room temperature and reheat in the oven at 180°C (350°F) for about 10 minutes until crispy again.
Avoiding Moisture: To prevent sogginess, avoid placing the breadsticks in a damp area or with other moist foods when storing.
Expert Tips for Snake Breadsticks
• Perfect Dough: Ensure your water is warm (not hot) at about 110°F; this activates the yeast without killing it, giving you fluffy snake breadsticks.
• Kneading Technique: Knead the dough thoroughly for about 10 minutes to develop gluten; this ensures a chewy texture and prevents dense breadsticks.
• Creative Presentation: Let kids personalize their snakes by adding different toppings like seeds or coloring; this keeps them engaged and makes the breadsticks even more fun!
• Avoiding Sticking: When shaping and wrapping, lightly flour your surface and kebab sticks to prevent sticking, ensuring easy removal later.
• Parental Supervision: For safety, supervise children when using sharp objects like skewers, making the baking experience enjoyable yet cautious.
Make Ahead Options
These spooky Halloween Snake Breadsticks are perfect for meal prep, saving you valuable time on party day! You can prepare the dough up to 24 hours in advance. Simply mix and knead the dough, then let it rise as directed. After the first rise, shape your breadsticks and refrigerate them on the baking tray, covered with plastic wrap to prevent them from drying out. When you’re ready to bake, remove them from the fridge, let them come to room temperature for about 30 minutes, then bake as instructed. By prepping these snake breadsticks ahead of time, you’ll enjoy fun, fresh, and delicious treats with minimal effort, making your Halloween celebration even more enjoyable!
Snake Breadsticks Variations & Substitutions
Feel free to explore these delightful twists and swaps to personalize your snake breadsticks experience!
- Dairy-Free: Substitute olive oil with coconut oil for a unique flavor and a lactose-free option.
- Spicy Kick: Add red pepper flakes or diced jalapeños to the dough for a fiery surprise in every bite.
- Herbed Delight: Mix in dried herbs like oregano or thyme into the dough for an aromatic flavor boost.
- Cheesy Version: Incorporate shredded mozzarella or cheddar cheese into the dough for a gooey, cheesy surprise inside.
- Whole Wheat: Use whole wheat flour instead of plain for a heartier, healthier alternative that packs in more nutrients.
- Colorful Fun: Experiment with different food coloring (like purple or blue) to match your party theme and excite both kids and adults.
These variations will turn a simple recipe into an impressive festive highlight. And if you’re looking for delicious dips, consider serving the snake breadsticks alongside a tasty homemade BBQ sauce or some smooth garlic mayo for an added flavor punch! Enjoy your cooking adventure!
What to Serve with Halloween Snake Breadsticks
Imagine a table filled with delightful treats that not only please the eye but also excite the taste buds during your Halloween gatherings!
- Garlic Mayo: The creamy richness of garlic mayonnaise is the perfect dip, adding a delightful twist that balances the breadsticks’ flavors.
- Homemade BBQ Sauce: A smoky and sweet BBQ sauce complements the playful nature of the snake breadsticks, perfect for dipping and spreading.
- Creamy Hummus: This smooth, healthy dip brings a fresh taste, making it a wonderful contrast to the crispy breadsticks.
- Spicy Ketchup: Adding a fun kick to your Halloween festivities, spicy ketchup gives the classic sauce a tantalizing twist guests will love!
- Roasted Veggies: Pair your snake breadsticks with a colorful platter of roasted vegetables, adding vibrant flavors and healthiness to the feast.
- Cheesy Fondue: For a festive gathering, serve with cheesy fondue for a gooey experience that everyone can enjoy as they dip their breadsticks.
- Pumpkin Soup: A warm bowl of pumpkin soup creates a cozy, comforting experience when dipped with snake breadsticks, enhancing the fall vibes.
- Apple Cider: For a refreshing non-alcoholic option, serve chilled apple cider alongside for an extra festive touch.
- Chocolate Dipped Apples: As a dessert option, chocolate-dipped apples offer a sweet contrast, rounding out your menu with a playful finish.
Celebrate the season with these mouthwatering pairings, and watch your guests enjoy every last bite!
Halloween Snake Breadsticks Recipe FAQs
How do I know if my yeast is active?
To check if your dried active yeast is active, mix it with warm water (around 110°F or 45°C) and let it sit for about 5 to 10 minutes. If it becomes foamy and bubbly, your yeast is ready to use! If it doesn’t froth up, it’s best to start over with fresh yeast.
How should I store leftover snake breadsticks?
Keep your baked snake breadsticks in an airtight container at room temperature for up to 2-3 days. This helps maintain their crispy texture! If you’re in a warmer environment, it’s best to consume them sooner, as moisture can make them go stale faster.
Can I freeze my snake breadsticks?
Absolutely! To freeze your snake breadsticks, wrap them individually in plastic wrap and place them in a freezer-safe bag. They can stay that way for up to 2 months. When you’re ready to enjoy, just thaw them at room temperature, then reheat in the oven at 180°C (350°F) for about 10 minutes until they’re crispy again.
What if my dough doesn’t rise?
If your dough hasn’t risen, it could be due to two main reasons: the yeast was inactive or the environment was too cold. Make sure you proof the yeast in warm water and let the dough rise in a warm spot—ideal temperatures are crucial for proper rising. If it’s cold, you can try turning the oven on for a minute, then turning it off before placing the dough inside to rise.
Are these snake breadsticks suitable for kids?
Yes, they are! Shape the dough into snakes together as a fun activity, but please supervise when using kebab sticks or sharp objects. You can also encourage them to add their favorite toppings when decorating, making baking an enjoyable and creative experience for everyone.
Can I substitute any ingredients to make these healthier?
Definitely! You can use whole wheat flour instead of plain flour for added nutrients and fiber, or try using less olive oil if you prefer a lighter dough. It’s all about making it fit your dietary preferences while keeping that playful spirit in your baking!
Creepy Snake Breadsticks for a Fun Halloween Snack
Ingredients
Equipment
Method
- Combine warm water and dried active yeast in a mixing bowl and stir gently until bubbly.
- Blend in olive oil. This is the base for the breadsticks.
- Sift flour and salt into a large mixing bowl, then combine with the yeast and oil mixture using a dough hook...
- If kneading by hand, transfer to a floured surface and knead for about 10 minutes until smooth.
- Place dough in a greased bowl, cover, and let it rise in a warm place for about 1 hour, until doubled.
- Divide the dough into 50g pieces and roll into snake shapes, making heads thicker and tails tapered.
- Wrap each piece around wooden kebab sticks, place on a parchment-lined baking tray.
- Preheat oven to 200°C (425°F) and bake for 15 minutes until golden-brown.
- Mix food color gel with water and brush over the baked sticks, then sprinkle with seeds if desired.
- Bake for an additional 5 minutes, let cool slightly, and gently twist off kebab sticks.
- Use toothpicks to poke holes for the eyes and tongues with chopped olives and orange peppers.