The moment I pulled these cookies from the oven, a nostalgic wave washed over me, evoking memories of bustling family kitchens filled with laughter and the sweet scent of homemade treats. Melt-in-Your-Mouth Chocolate Thumbprint Cookies quickly became my go-to recipe whenever I wanted to whip up something special without spending all day in the kitchen. Not only are they easy to prepare, but the rich, buttery shortbread pairs perfectly with a luscious chocolate topping, making them a true crowd-pleaser. Plus, with endless variations for the chocolate filling, you can cater to every taste—from classic milk chocolate to the bold richness of dark chocolate. Ready to discover a delightful treat that will transport you back to simpler times? Let’s dive into this easy, scrumptious cookie adventure!
Why Are These Cookies So Irresistible?
Melt-in-your-mouth goodness: The combination of buttery shortbread and smooth chocolate creates an experience that’s simply unforgettable.
Versatility at its finest: With various chocolate options, you can easily personalize each batch, whether you prefer classic milk chocolate or a decadent dark chocolate twist.
Quick and easy: This recipe is perfect for busy days, allowing you to create a delightful treat in no time without sacrificing flavor or quality.
Nostalgic comfort: Each bite transports you to cherished moments and brings the warmth of home baking right into your kitchen. For more delicious chocolate ideas, check out our Soft Chewy Chocolate and Chocolate Protein Pudding recipes!
Crowd-pleaser: Whether for after-school snacks or gatherings, these cookies are sure to impress family and friends alike.
Chocolate Thumbprint Cookie Ingredients
For the Cookie Dough
- Butter – Provides richness and moisture; ensure it’s at room temperature for easy creaming.
- Packed Light Brown Sugar – Adds sweetness and moisture; could substitute with granulated sugar for a lighter flavor.
- Egg Yolk – Contributes richness and acts as a binder; avoid using whole eggs to maintain the cookie’s texture.
- Pure Vanilla Extract – Enhances flavor with aromatic notes; could substitute with almond extract for a unique twist.
- All-Purpose Flour – Main structural component for the cookies’ integrity; do not substitute with whole wheat flour as it may change the texture.
- Salt – Balances sweetness; essential for enhancing overall flavor.
For the Chocolate Filling
- Hershey Kisses, Brach’s Chocolate Baking Stars, or Ghirardelli Baking Milk Chocolate Thumbprint Drops – Adds a chocolate touch; choose based on personal preference, ensuring each cookie is a delightful experience!
Step‑by‑Step Instructions for Melt-in-Your-Mouth Chocolate Thumbprint Cookies
Step 1: Preheat and Prepare
Begin by preheating your oven to 375°F (190°C). While the oven is warming up, prepare your cookie sheet by lining it with parchment paper or spraying it lightly with cooking spray. This ensures that your chocolate thumbprint cookies will bake evenly and release easily when finished.
Step 2: Cream the Butter and Sugar
In a mixing bowl, combine the room-temperature butter and packed light brown sugar. Use a hand mixer to cream them together on medium speed until the mixture is light, fluffy, and pale in color, which should take about 2-3 minutes. Once combined, add in the pure vanilla extract and egg yolk, mixing on low speed until fully incorporated.
Step 3: Combine Dry Ingredients
In a separate bowl, whisk together the all-purpose flour and salt until blended. Gradually add this dry mixture to the creamed butter mixture, mixing on low speed until the dough is smooth and holds together. Aim for a firm but malleable texture to ensure the cookies bake perfectly.
Step 4: Shape the Dough
With your hands, roll the cookie dough into 1-inch balls for uniformity. Space each ball 1 inch apart on the prepared cookie sheet to allow for spreading while baking. For consistent sizing, consider using a cookie scoop. This step sets up your chocolate thumbprint cookies for a delightful even bake.
Step 5: Bake and Press
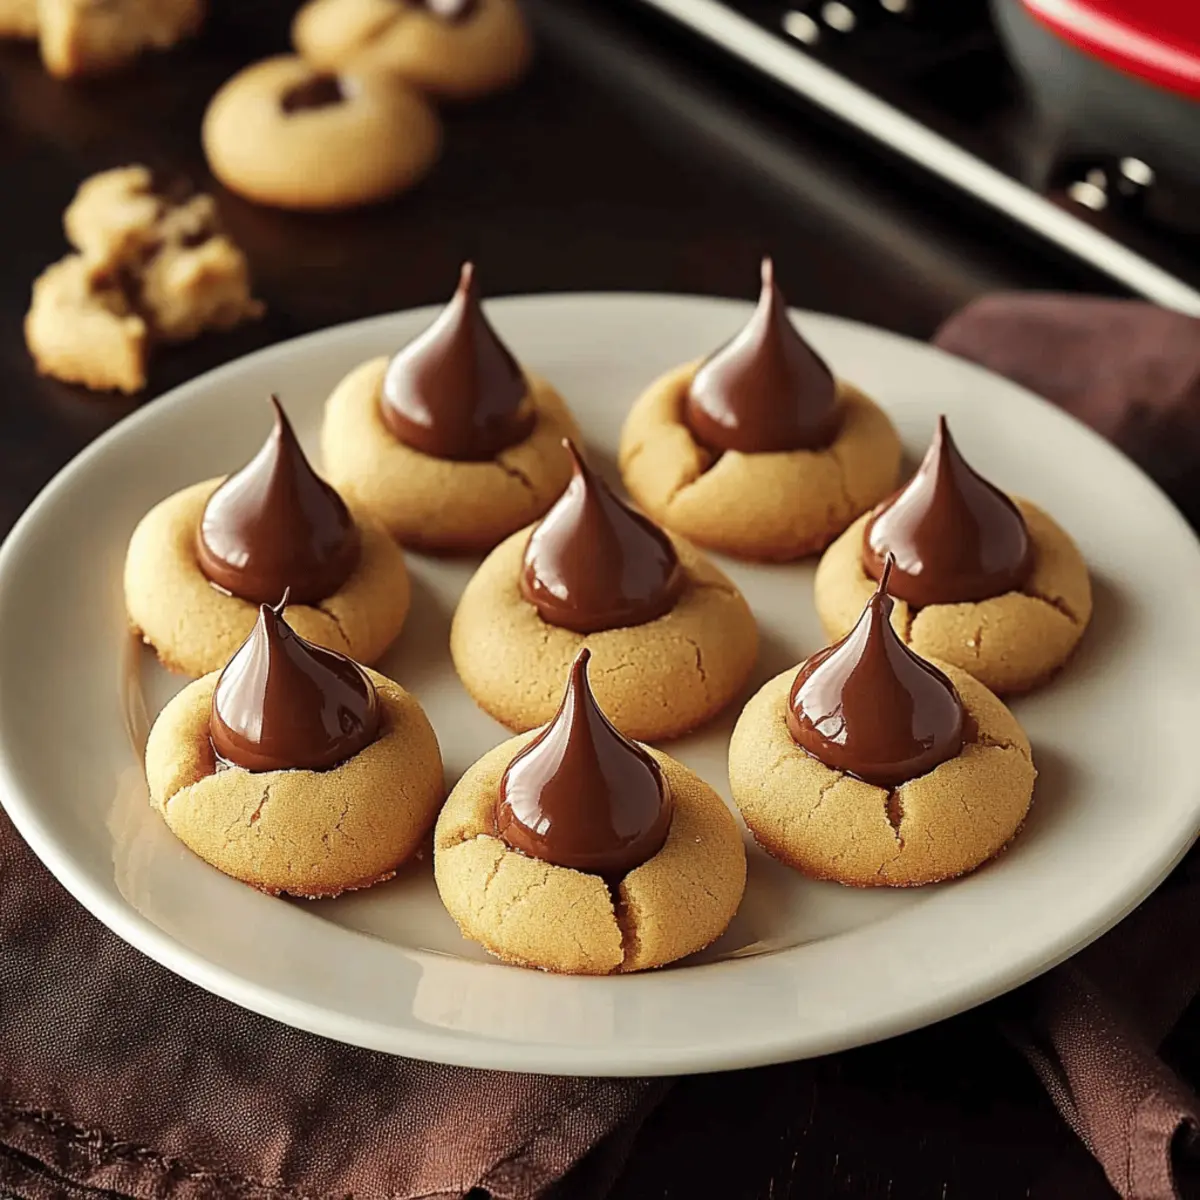
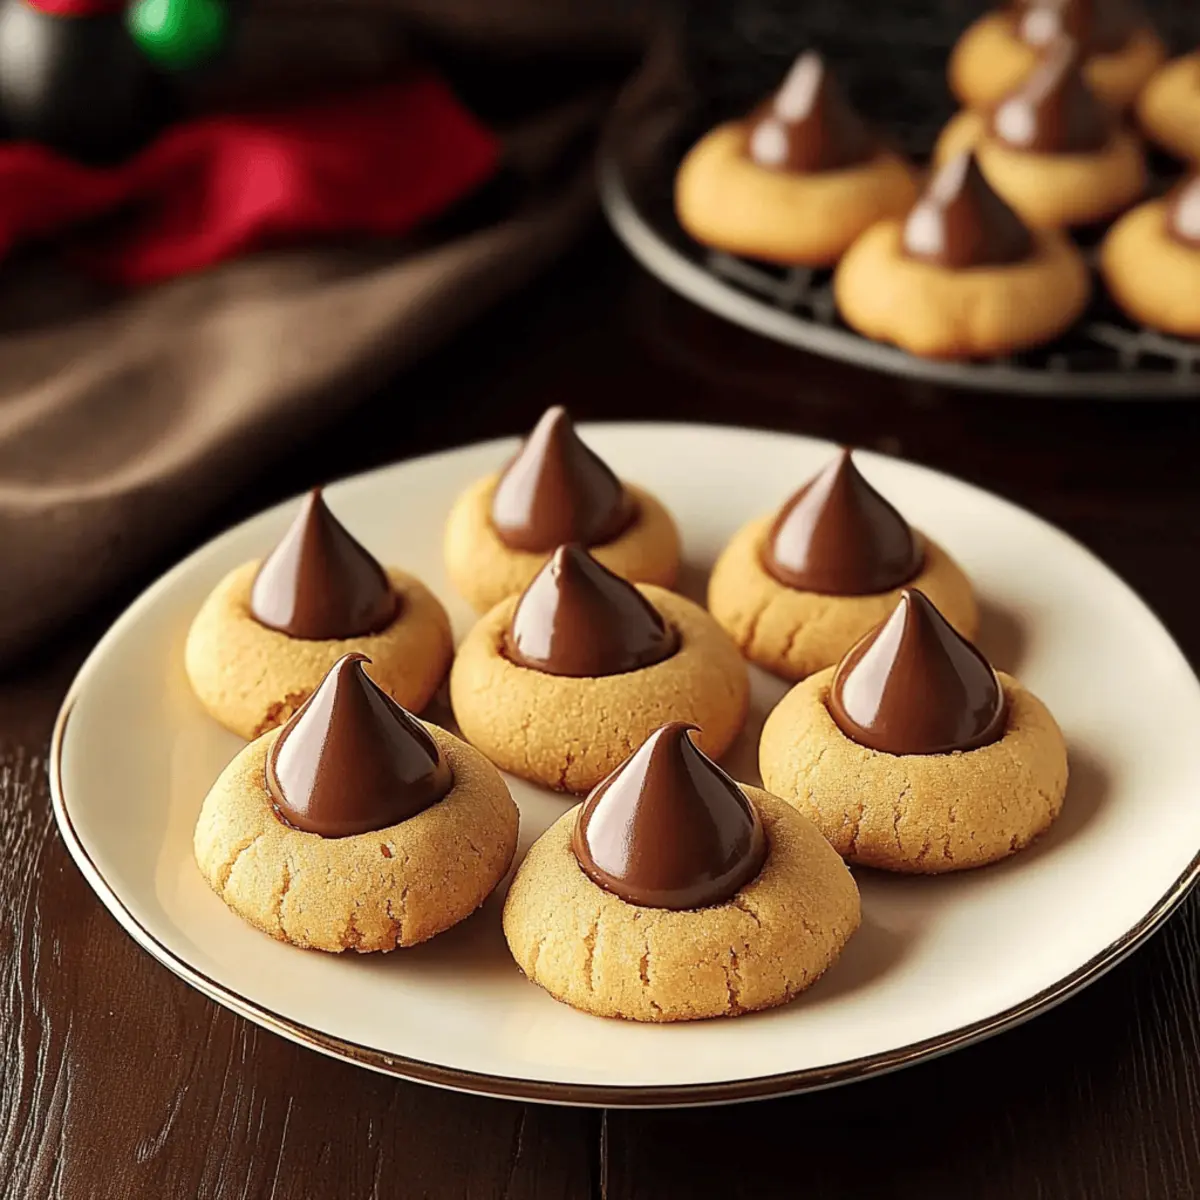
Place the cookie sheet in the preheated oven and bake for 6 minutes. Once you see a slight golden edge forming, carefully remove the cookies from the oven. Immediately press a chocolate piece into the center of each cookie, ensuring it makes a lovely indentation. Return the cookies to the oven for an additional 2-3 minutes until they are set yet still soft.
Step 6: Cool and Store
Once baked, take your chocolate thumbprint cookies out of the oven and let them sit on the cookie sheet for a couple of minutes. Using a spatula, gently transfer them to a cooling rack to cool completely. Once cooled, store the cookies in an airtight container at room temperature to maintain their melt-in-your-mouth texture and delicious flavor.
Expert Tips for Chocolate Thumbprint Cookies
- Room Temperature Butter: Ensure your butter is softened at room temperature for easy creaming, which results in a light and fluffy cookie texture.
- Avoid Overmixing: Mix just until combined to prevent tough cookies. Aim for a soft and malleable dough for the best results.
- Proper Baking Time: Watch closely while baking; the cookies should be set but soft. Overbaking can lead to dry cookies, so set a timer!
- Cool Completely: Allow the cookies to cool fully before storing them. This helps them keep their shape and prevents melted chocolate from sticking together.
- Experiment with Toppings: Feel free to get creative with your chocolate fillings—dark chocolate is an excellent option for a richer flavor in your chocolate thumbprint cookies!
What to Serve with Melt-in-Your-Mouth Chocolate Thumbprint Cookies
Indulging in the warmth of fresh-baked cookies invites the sweet anticipation of delightful pairings that enhance this cherished treat.
-
Creamy Vanilla Ice Cream: The cold creaminess perfectly offsets the buttery warmth of the cookies, creating a delightful temperature contrast. A scoop on top transforms each bite into a decadent dessert experience.
-
Rich Hot Chocolate: This comforting drink complements the chocolatey goodness, embracing the nostalgic vibes while providing an extra dose of sweetness to your treat.
-
Fresh Berries: Juicy strawberries or tart raspberries introduce a burst of freshness, balancing the cookies’ sweetness while adding bright, vibrant flavors to your plate.
-
Milk or Non-Dairy Alternatives: The classic duo never fails! The creamy texture of milk acts as a palate cleanser, enhancing the cookies’ buttery aspects.
-
Coffee or Espresso: A warm, aromatic beverage rounds out your dessert experience, bringing out the depth of flavors in both chocolate and cookie. The pairing creates a cozy moment perfect for any gathering.
-
Nutty Chocolate Spread: Spread a thin layer on top or use as a dipping sauce for an indulgent twist that elevates each bite, allowing chocolate lovers to pursue their passion!
-
Chocolate-Covered Pretzels: The salty crunch pairs well against the sweet cookies, introducing texture and a playful contrast that invites snacking joyfully.
-
Caramel Sauce: Drizzle this sweet delight for an extra layer of flavor that complements the richness of the shortbread and the smooth chocolate topping!
-
Sugar Cookies: For a cookie platter, these softer treats provide a delightful variance in flavors and textures, perfect for sharing at events.
-
Coconut Macaroons: With their chewy texture and sweet bite, these cookies make an irresistible accompaniment, adding a tropical flair to your cookie presentation!
Make Ahead Options
These Chocolate Thumbprint Cookies are ideal for busy home cooks looking to simplify their meal prep! You can prepare the dough up to 3 days in advance and refrigerate it (just wrap it tightly in plastic wrap to prevent drying). When you’re ready to bake, simply roll the dough into balls and bake as directed. If you prefer, you can also bake the cookies ahead of time and store them in an airtight container at room temperature for up to a week. If freezing, just layer them between parchment paper and they’ll retain their deliciousness for up to 3 months. When it’s time to serve, just pop them in the oven for a few minutes to warm up the chocolate topping, and enjoy fresh-from-the-oven cookies with minimal effort!
How to Store and Freeze Chocolate Thumbprint Cookies
Room Temperature: Store cookies in an airtight container at room temperature for up to 1 week to maintain their fresh, melt-in-your-mouth texture.
Fridge: If you prefer, you can refrigerate the cookies in an airtight container for up to 2 weeks. However, be mindful that chilling might alter the cookie’s softness slightly.
Freezer: To freeze chocolate thumbprint cookies, place them in a single layer in an airtight container or freezer bag, separating layers with parchment paper. They can be frozen for up to 3 months.
Reheating: When ready to enjoy, thaw frozen cookies at room temperature or warm them slightly in the oven at 350°F for about 5 minutes to restore their delightful texture.
Chocolate Thumbprint Cookies Variations
Feel free to let your creativity shine by customizing these delightful cookies with your favorite flavors and textures!
- Nutty Delight: Add chopped nuts to the dough for a crunchy texture. Walnuts or pecans pair beautifully with chocolate.
- Dark Chocolate Twist: Swap out milk chocolate for dark chocolate for a rich, intense flavor that chocolate lovers will adore.
- Fruit Fusion: Top cookies with a dollop of raspberry or strawberry jam before adding the chocolate. It offers a sweet and tart contrast!
- Minty Freshness: Incorporate mint extract into the dough for a refreshing twist. Dark chocolate and mint is a classic pairing that never disappoints.
- Coconut Lover: Mix in sweetened shredded coconut into the dough or sprinkle it on top of the chocolate. It adds a tropical twist to your cookies!
- Spicy Touch: For those who enjoy a bit of heat, add a pinch of cayenne pepper to the dough. It’s a surprising and delightful flavor combination.
- White Chocolate Charm: Use white chocolate for the thumbprint filling for a creamy sweetness. It’s a beautiful visual contrast against the shortbread.
- Chocolate Drizzle: Consider drizzling melted chocolate over the cooled cookies for an extra touch of decadence. It brings an appealing design and enhanced flavor!
With these enticing variations, your chocolate thumbprint cookies will always surprise and delight! For an even richer chocolate experience, be sure to try our Soft Chewy Chocolate and Chocolate Protein Pudding recipes for more delightful baking inspiration.

Chocolate Thumbprint Shortbread Cookies Recipe FAQs
How do I choose the right chocolate for my thumbprint cookies?
Absolutely! The choice of chocolate can significantly affect the flavor. I recommend using high-quality options like Hershey Kisses for a classic taste or experimenting with dark chocolate for a richer punch. You can even mix it up with white chocolate or flavored chocolate drops! Just make sure to melt any chocolate you drizzle on top carefully to maintain its smooth consistency.
How should I store my chocolate thumbprint cookies?
To keep your cookies at their best, store them in an airtight container at room temperature for up to 1 week. This helps maintain their melt-in-your-mouth texture. If you’d like them to last even longer, you can refrigerate them for up to 2 weeks, but note that chilling can slightly alter the softness of the cookies.
Can I freeze chocolate thumbprint cookies?
Certainly! To freeze your cookies, first ensure they’re completely cooled. Place them in a single layer in an airtight container or a freezer bag, separating layers with parchment paper to prevent sticking. They can be frozen for up to 3 months. When you’re ready to enjoy them, simply thaw them at room temperature or pop them in a preheated oven at 350°F for about 5 minutes to refresh their delightful texture.
What do I do if my cookies spread too much while baking?
Very common! If your cookies spread too much, check if your butter was too warm or if you didn’t chill the dough long enough. A good tip is to refrigerate the rolled dough balls for about 30 minutes before baking. This will help them maintain their shape and give you beautifully rounded cookies.
Are chocolate thumbprint cookies suitable for a gluten-free diet?
While the traditional recipe uses all-purpose flour, you can absolutely make these cookies gluten-free! Replace all-purpose flour with a 1:1 gluten-free flour blend. Make sure to check that your chocolate fillings are gluten-free as well to accommodate dietary needs.
Can I use a whole egg instead of an egg yolk in this recipe?
I recommend sticking to just the egg yolk for the best texture in your chocolate thumbprint cookies. The yolk adds richness and acts as a binder, while the whites can make your cookies more cake-like. If you want to use a whole egg, consider reducing the flour a little to maintain the perfect balance.

Indulge in Soft and Buttery Chocolate Thumbprint Cookies
Ingredients
Equipment
Method
- Preheat your oven to 375°F (190°C) and prepare your cookie sheet with parchment paper.
- Cream together the room-temperature butter and packed light brown sugar until light and fluffy, about 2-3 minutes.
- Add in vanilla extract and egg yolk, mixing on low until fully integrated.
- In another bowl, whisk together all-purpose flour and salt, then gradually mix into the creamed butter mixture to form a dough.
- Roll the dough into 1-inch balls and place them on the prepared cookie sheet, spaced apart.
- Bake for 6 minutes, then press a chocolate piece into the center of each cookie and bake for an additional 2-3 minutes.
- Allow cookies to cool on the sheet for a couple of minutes before transferring to a cooling rack.