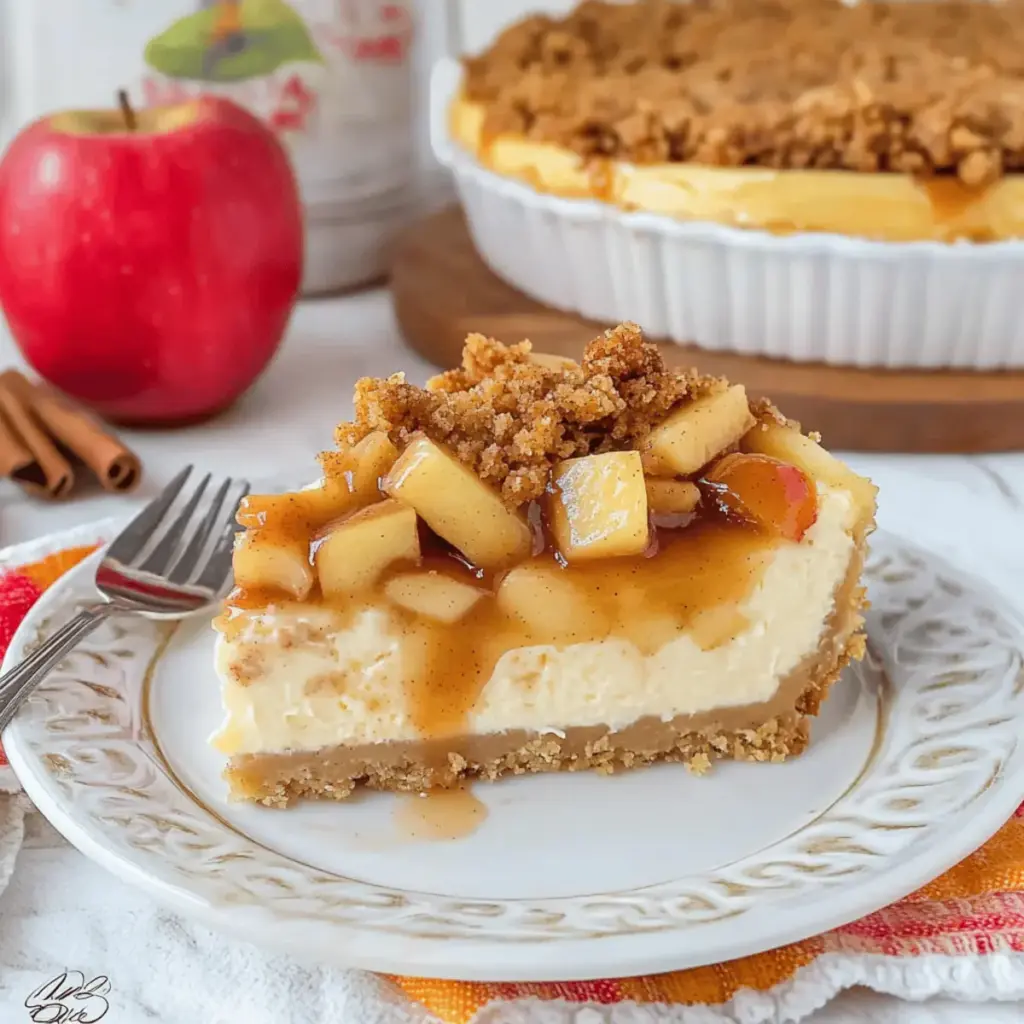
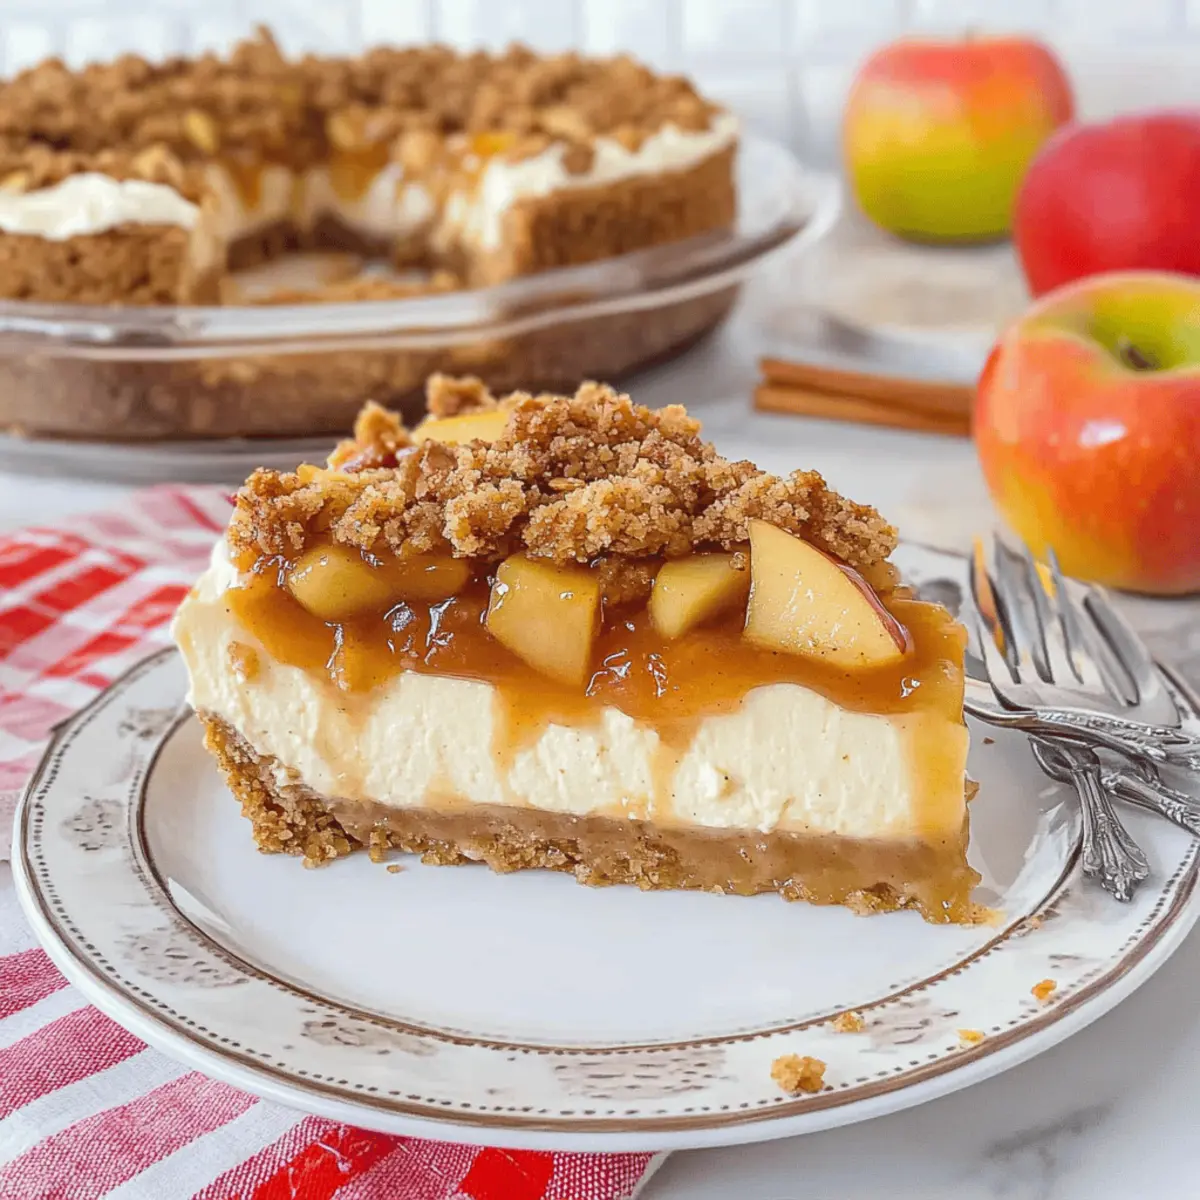
As I stood in my kitchen, the intoxicating aroma of spiced apples wafted through the air, instantly transporting me to my favorite autumn memories. That’s when I decided to combine the best of both worlds and create this Apple Crisp Cheesecake—a delightful fusion that brings together the creamy goodness of cheesecake with the cozy, crunchy topping of apple crisp. This easy cheesecake is the perfect fall dessert, making it ideal for gatherings or a cozy family dinner. In less than 30 minutes of prep time, you’ll have a show-stopping treat that’s not only delicious but also provides a fabulous way to enjoy those seasonal apples. Are you ready to indulge in this comforting dessert that’s sure to win everyone’s heart? Let’s dive in!
Why is this cheesecake a must-try?
Creamy and Crunchy: This Apple Crisp Cheesecake boasts a luscious, creamy filling paired with a crunchy, spiced topping that will make your taste buds dance.
Quick Preparation: In just 30 minutes, you can have this stunning dessert ready for the oven, a perfect time-saver for busy home cooks!
Seasonal Delight: With its warm flavors of cinnamon and apple, it’s the ultimate cozy dessert to celebrate the fall season.
Customizable Options: Whether you use gala apples or mix in seasonal pears, this recipe is versatile to satisfy diverse palates.
Crowd-Pleasing: Perfect for gatherings, this dessert is sure to impress friends and family and leave them asking for seconds—and your recipe!
Pair it with a drizzle of caramel sauce or a dollop of whipped cream for an indulgent treat that is sure to be a hit!
Apple Crisp Cheesecake Ingredients
For the Crust
- Cinnamon Graham Cracker Crumbs – Provides a flavorful crust; can substitute with regular graham cracker crumbs or digestive biscuits.
- Granulated Sugar – Adds sweetness to the crust; reduce sugar for a less sweet option.
- Unsalted Butter – Binds the crust together and adds richness; can be replaced with coconut oil or margarine for a dairy-free version.
For the Cheesecake Filling
- Cream Cheese – The main filling component for a creamy texture; use full-fat for best results or vegan cream cheese as a substitute.
- Light Brown Sugar – Offers deeper sweetness with molasses notes; can be swapped with granulated sugar, though flavor will vary.
- Vanilla Extract – Enhances the flavor profile; try vanilla bean paste for an even richer taste.
- Cinnamon – Provides warmth and spice to the filling; experiment with nutmeg or allspice for variation.
- All-Purpose Flour – Stabilizes the cheesecake filling; substitute with gluten-free flour if needed.
- Large Eggs – Adds structure and creaminess; egg substitutes like flax eggs can be used for a vegan twist.
For the Apple Layer
- Gala Apples – Main fruit component providing tartness and moisture; swap with Granny Smith or Honeycrisp for different flavors.
For the Crumble Topping
- Quick Oats – Adds texture to the crumble topping; rolled oats can be substituted for a chewier texture.
- Additional Light Brown Sugar and Cinnamon – Used to enhance the topping flavor; adjust sugar based on your preference.
This Apple Crisp Cheesecake combines rich flavors and textures, making it the perfect fall dessert to share!
Step‑by‑Step Instructions for Apple Crisp Cheesecake
Step 1: Preheat the Oven
Begin by preheating your oven to 350°F (175°C). This initial step is crucial as it ensures even baking for your Apple Crisp Cheesecake. While the oven warms, prepare your baking environment by placing a shallow pan filled with water on the bottom rack; this will help create a moist atmosphere, preventing cracks in your cheesecake.
Step 2: Prepare the Crust
In a medium bowl, combine cinnamon graham cracker crumbs, granulated sugar, and melted unsalted butter until the mixture resembles wet sand. Press this mixture firmly into the bottom of a 9-inch springform pan, creating an even layer. Bake the crust in the preheated oven for 8-10 minutes or until lightly golden, then set aside to cool slightly as the filling is prepared.
Step 3: Make the Cheesecake Filling
In a large mixing bowl, beat softened cream cheese with light brown sugar and granulated sugar using an electric mixer until creamy and smooth, about 2-3 minutes. Next, blend in the vanilla extract, ground cinnamon, and all-purpose flour until just combined. This will create a delightful base for your Apple Crisp Cheesecake.
Step 4: Incorporate the Eggs
Add the large eggs to your cheesecake mixture one at a time, mixing on low speed after each addition until just combined. Be careful not to overmix, as this can lead to cracks in your finished cheesecake. Your filling should be velvety smooth and well-blended, ready to be poured onto the crust.
Step 5: Pour the Filling
Carefully pour the cheesecake filling over the prepared crust, spreading it evenly with a spatula. The creamy filling should sit just below the top of the crust. Tap the pan gently on the counter to remove any air bubbles, further ensuring a smooth surface for the layers of flavor in your Apple Crisp Cheesecake.
Step 6: Arrange the Apples
In a separate bowl, toss diced Gala apples with additional light brown sugar and ground cinnamon to coat them evenly. Gently arrange these spiced apples on top of the cheesecake batter, ensuring an attractive distribution. This fruity layer will infuse your cheesecake with wonderful flavor as it bakes.
Step 7: Prepare the Crumble Topping
For the crumble, mix quick oats, all-purpose flour, additional light brown sugar, and cinnamon in a bowl. Drizzle melted butter into the mixture and stir until it forms crumbly clumps. Sprinkle this topping generously over the arranged apples, creating a deliciously crunchy layer for your Apple Crisp Cheesecake.
Step 8: Bake the Cheesecake
Place your springform pan carefully into the preheated oven on a middle rack. Bake for 50-55 minutes, or until the center is set but slightly jiggly. The edges should be firm and lightly golden, indicating that your Apple Crisp Cheesecake is almost ready to come out.
Step 9: Cool the Cheesecake
Once baked, remove the cheesecake from the oven and let it cool in the pan for about 5 minutes. Gently run a knife around the edges to loosen the sides, which will prevent sticking. Then transfer it to a wire rack to cool completely, allowing the flavors to meld beautifully.
Step 10: Chill for Perfection
After cooling, cover your Apple Crisp Cheesecake with plastic wrap and refrigerate for at least 6 hours, preferably overnight. Chilling helps the cheesecake achieve its optimal texture, making it easier to slice and enjoy the rich flavors you created.
Step 11: Serve with Delight
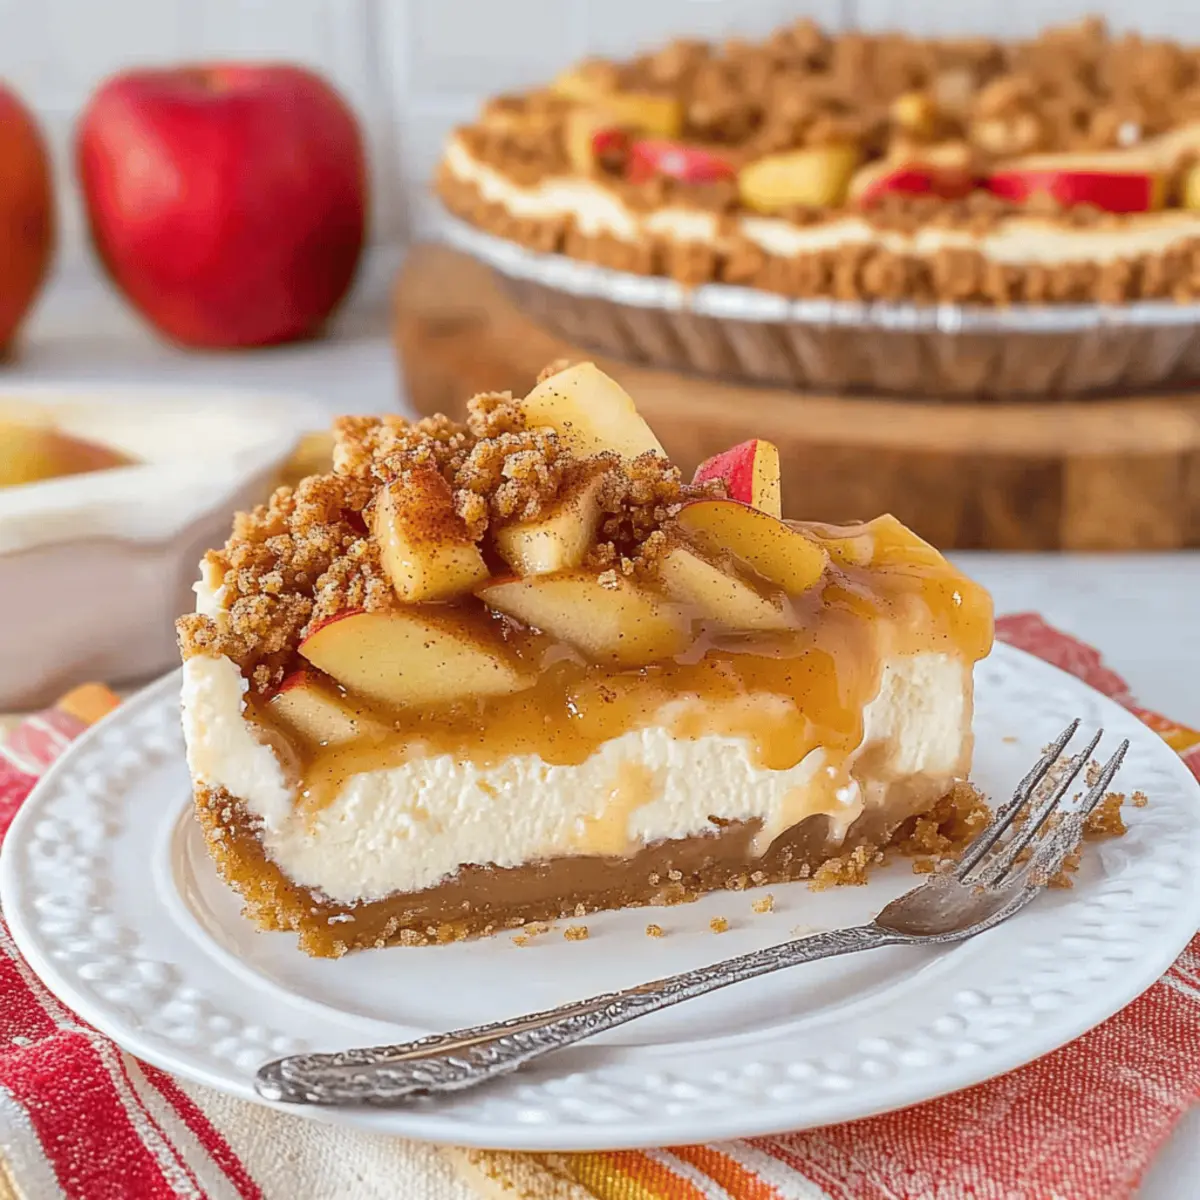
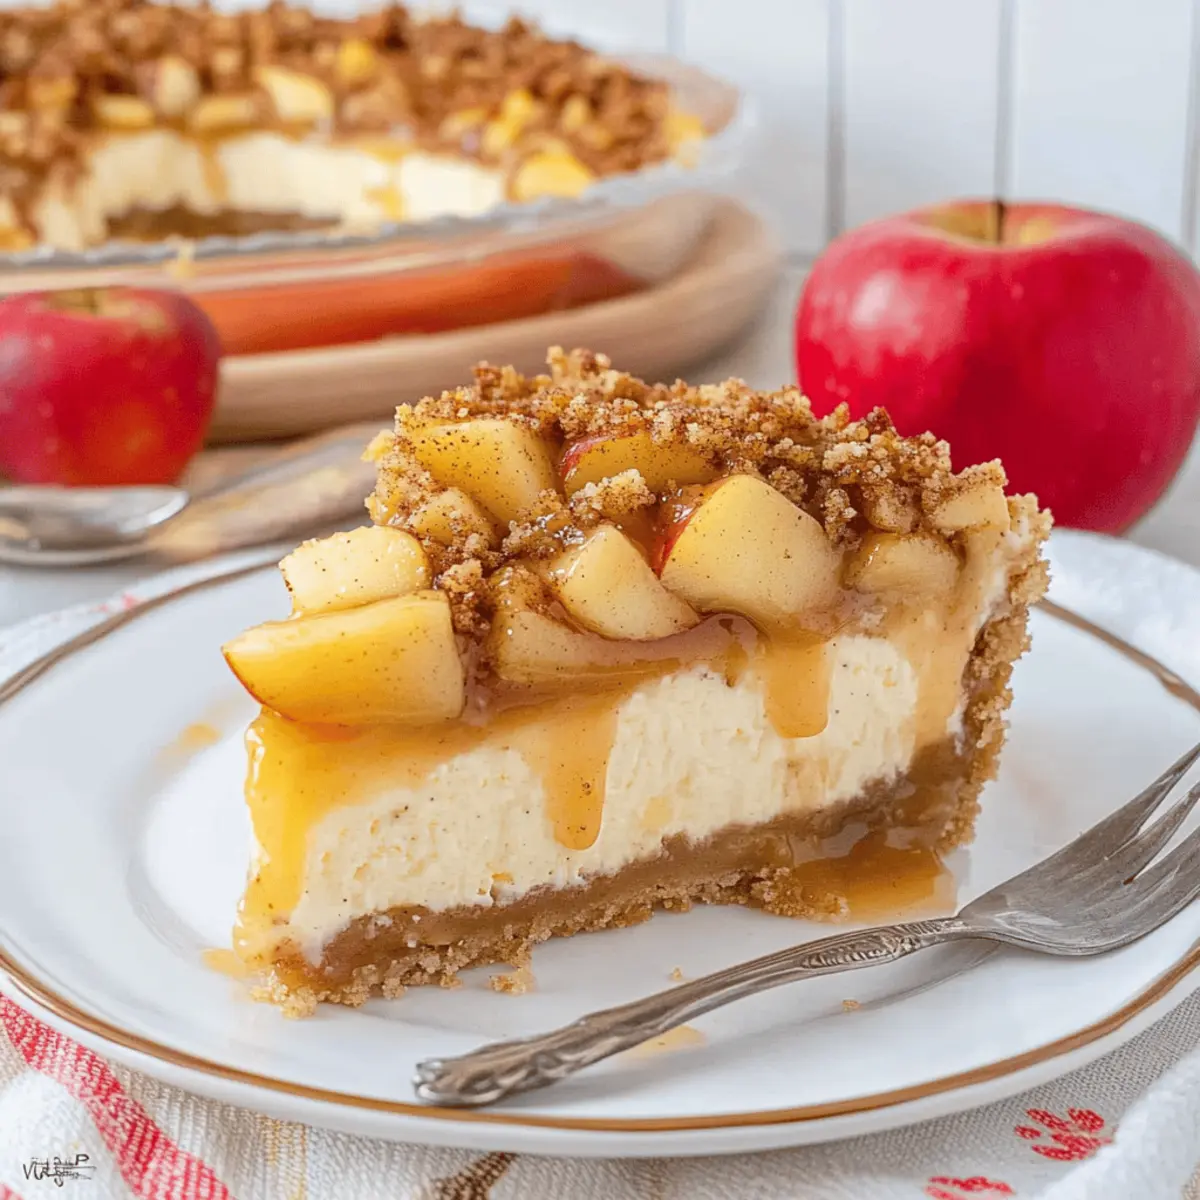
When ready to serve, slice your Apple Crisp Cheesecake into elegant wedges. For an indulgent touch, drizzle with caramel sauce or add a dollop of Cool Whip on top. This dessert is not only a feast for the eyes but also a warm embrace of flavors, perfect for any fall gathering!
Apple Crisp Cheesecake Variations
Invite your creativity into the kitchen by exploring these delightful twists on your Apple Crisp Cheesecake that will tantalize your taste buds!
-
Fruit Swap: Replace gala apples with pears, or use mixed berries for a fresh flavor explosion that celebrates seasonal variety.
-
Spice It Up: Explore different spices like nutmeg or pumpkin pie spice to give your cheesecake an autumn twist that dances on your palate.
-
Gluten-Free: Use almond flour or gluten-free graham crackers to create a crust that everyone can enjoy, making this dessert inclusive for gluten-sensitive friends.
-
Dairy-Free Delight: Substitute coconut oil or vegan butter for the crust and vegan cream cheese in the filling so everyone can indulge without worry.
-
Cinnamon Lovers: Increase the amount of cinnamon in both the filling and the crumble topping for a warm, heartwarming flavor that will wrap you in a cozy hug.
-
Nutty Addition: Add chopped walnuts or pecans to the crumble topping for an extra crunch that complements the smooth filling beautifully.
-
Caramel Surprise: Drizzle caramel sauce over the apple layer before baking for a sweet twist that adds layers of flavor, perfect for caramel lovers.
For an even more delightful experience, consider serving your Apple Crisp Cheesecake with a refreshing Green Apple Mocktail that pairs wonderfully with its warm flavors. Each variation offers a unique adventure, allowing you to craft a dessert that speaks to your heart and taste preferences!
Make Ahead Options
This Apple Crisp Cheesecake is a fantastic option for meal prep enthusiasts looking to ease their busy weeknights! You can prepare the crust and cheesecake filling up to 24 hours in advance; simply cover them tightly with plastic wrap to keep them fresh. Additionally, you can slice the apples and mix them with sugar and cinnamon up to 3 days before baking—just be sure to refrigerate to prevent browning. When ready to bake, layer everything as directed and top with the crumble mixture before popping it in the oven. This way, you’ll achieve that same delectable, freshly-baked taste while saving precious time for your loved ones.
Expert Tips for Apple Crisp Cheesecake
-
Chill Time Matters: Make sure to let the cheesecake chill overnight for the best texture and flavor development. Don’t skip this step!
-
Avoid Overmixing: Mix the eggs in gently, just until combined. Overmixing can lead to cracks in your apple crisp cheesecake.
-
Adjust Baking Time: If using a smaller pan, check for doneness earlier. Each oven is different, so keep an eye on your cheesecake!
-
Prevent Soggy Crust: To keep your crust crispy, make sure it’s fully baked before adding the filling and apples.
-
Crumble Caution: If you prefer a darker topping, check the cheesecake towards the end of baking to prevent burning the crumble topping.
-
Experiment with Apples: Don’t hesitate to try different apple varieties! Mixing or substituting with pears can add a unique twist to your apple crisp cheesecake.
How to Store and Freeze Apple Crisp Cheesecake
- Fridge: Store your Apple Crisp Cheesecake in an airtight container in the refrigerator for up to 1 week. This helps maintain its creamy texture and flavor.
- Freezer: If you need to keep it for longer, slice the cheesecake and wrap individual pieces tightly in plastic wrap, then place them in a freezer-safe container. It can last up to 3 months in the freezer.
- Thawing: To enjoy frozen slices, transfer them to the fridge and let them thaw overnight for the best texture. Avoid microwaving, as it may change the cheesecake’s consistency.
- Reheating: If you prefer serving it warm, gently reheat individual slices in a preheated oven at 300°F (150°C) for about 10-15 minutes.
What to Serve with Apple Crisp Cheesecake
Indulging in a slice of this comforting dessert invites rich flavors and textures, making it the star of the meal.
-
Whipped Cream: A dollop of fresh whipped cream adds a light, airy texture that complements the creaminess of the cheesecake beautifully.
-
Caramel Drizzle: Drizzling caramel sauce over the cheesecake enhances the sweet, spiced flavors, providing a luxurious finish that will delight your taste buds.
-
Vanilla Ice Cream: A scoop of creamy vanilla ice cream melts deliciously over the warm cheesecake, creating a delightful contrast of temperatures and flavors.
-
Coffee: A steaming cup of coffee offers a rich and bold pairing, balancing the sweetness of the cheesecake while enhancing the warm spices.
-
Cranberry Sauce: The tartness of cranberry sauce offsets the sweetness, adding a pop of color and flavor that elevates the entire dessert experience.
-
Spiced Apple Cider: Serve alongside a warm glass of spiced apple cider for a festive fall pairing that echoes the flavors within the cheesecake.
-
Pecan Pie Bars: For a truly decadent treat, offer a small piece of pecan pie alongside a slice of cheesecake, combining rich nutty flavors in a delightful duo.
Elevate your dessert experience by mixing and matching these delicious options—each pairing promises to create memorable moments around the table!
Apple Crisp Cheesecake Recipe FAQs
How do I select the best apples for my cheesecake?
Absolutely! When choosing apples for your Apple Crisp Cheesecake, look for Gala, Granny Smith, or Honeycrisp varieties. You want apples that are firm and slightly crisp, as they’ll retain their texture during baking. Avoid apples with dark spots or those that feel soft to the touch. Freshness is key to bringing out the best flavors in your dessert!
How should I store my cheesecake?
Very! To store your Apple Crisp Cheesecake, keep it in an airtight container in the refrigerator, where it will stay fresh for up to 1 week. This helps preserve the creamy texture. If you won’t finish it within that time, you can freeze it for longer storage!
Can I freeze Apple Crisp Cheesecake?
Yes, you can! To freeze your Apple Crisp Cheesecake, follow these steps: First, slice the cheesecake into individual portions. Wrap each slice tightly in plastic wrap, ensuring no air gets in, as this will help prevent freezer burn. Then, place the wrapped slices in a freezer-safe container. They can be kept in the freezer for up to 3 months. Thaw in the fridge overnight before serving for the best texture!
What should I do if my cheesecake cracks during baking?
Don’t worry; it happens to the best of us! If your cheesecake cracks, it may be due to overmixing or baking it at too high a temperature. To avoid this, ensure you mix the eggs in gently, just until combined. If cracks do occur, you can cover them with the crumble topping or a drizzle of caramel sauce, giving it a rustic look!
Can I make this cheesecake dairy-free?
Definitely! To create a dairy-free version of the Apple Crisp Cheesecake, substitute the cream cheese with a vegan cream cheese alternative. Use coconut oil instead of butter and make sure any additional ingredients you choose, like whipped cream, are also plant-based. Your cheesecake will still be delicious and creamy without the dairy!
Is this cheesecake safe for pets or those with allergies?
Be cautious! The main ingredients of the Apple Crisp Cheesecake, especially cream cheese and sugar, are not suitable for pets, particularly dogs and cats, so keep it away from them. As for allergies, ensure to avoid gluten by using gluten-free flour and crust options, and be aware of any specific allergies relating to nuts or dairy if serving to others.

Apple Crisp Cheesecake: The Ultimate Cozy Fall Dessert
Ingredients
Equipment
Method
- Preheat the oven to 350°F (175°C) and prepare a shallow pan filled with water on the bottom rack.
- In a medium bowl, combine cinnamon graham cracker crumbs, sugar, and melted butter until resembling wet sand. Press into 9-inch springform pan and bake for 8-10 minutes.
- Beat softened cream cheese, light brown sugar, and granulated sugar until creamy. Blend in vanilla, cinnamon, and flour until combined.
- Add eggs one at a time, mixing on low speed until just combined. Avoid overmixing.
- Pour cheesecake filling over the crust, spreading it evenly. Tap the pan to remove air bubbles.
- Toss diced Gala apples with light brown sugar and cinnamon. Arrange spiced apples over cheesecake batter.
- Mix quick oats, all-purpose flour, light brown sugar, and cinnamon. Drizzle melted butter and stir until crumbly. Sprinkle over apples.
- Bake for 50-55 minutes, until the center is set but slightly jiggly.
- Cool in pan for 5 minutes, then run a knife around edges to loosen. Transfer to wire rack to cool completely.
- Cover with plastic wrap and refrigerate overnight for optimal texture.
- Serve slices drizzled with caramel sauce or a dollop of whipped cream.