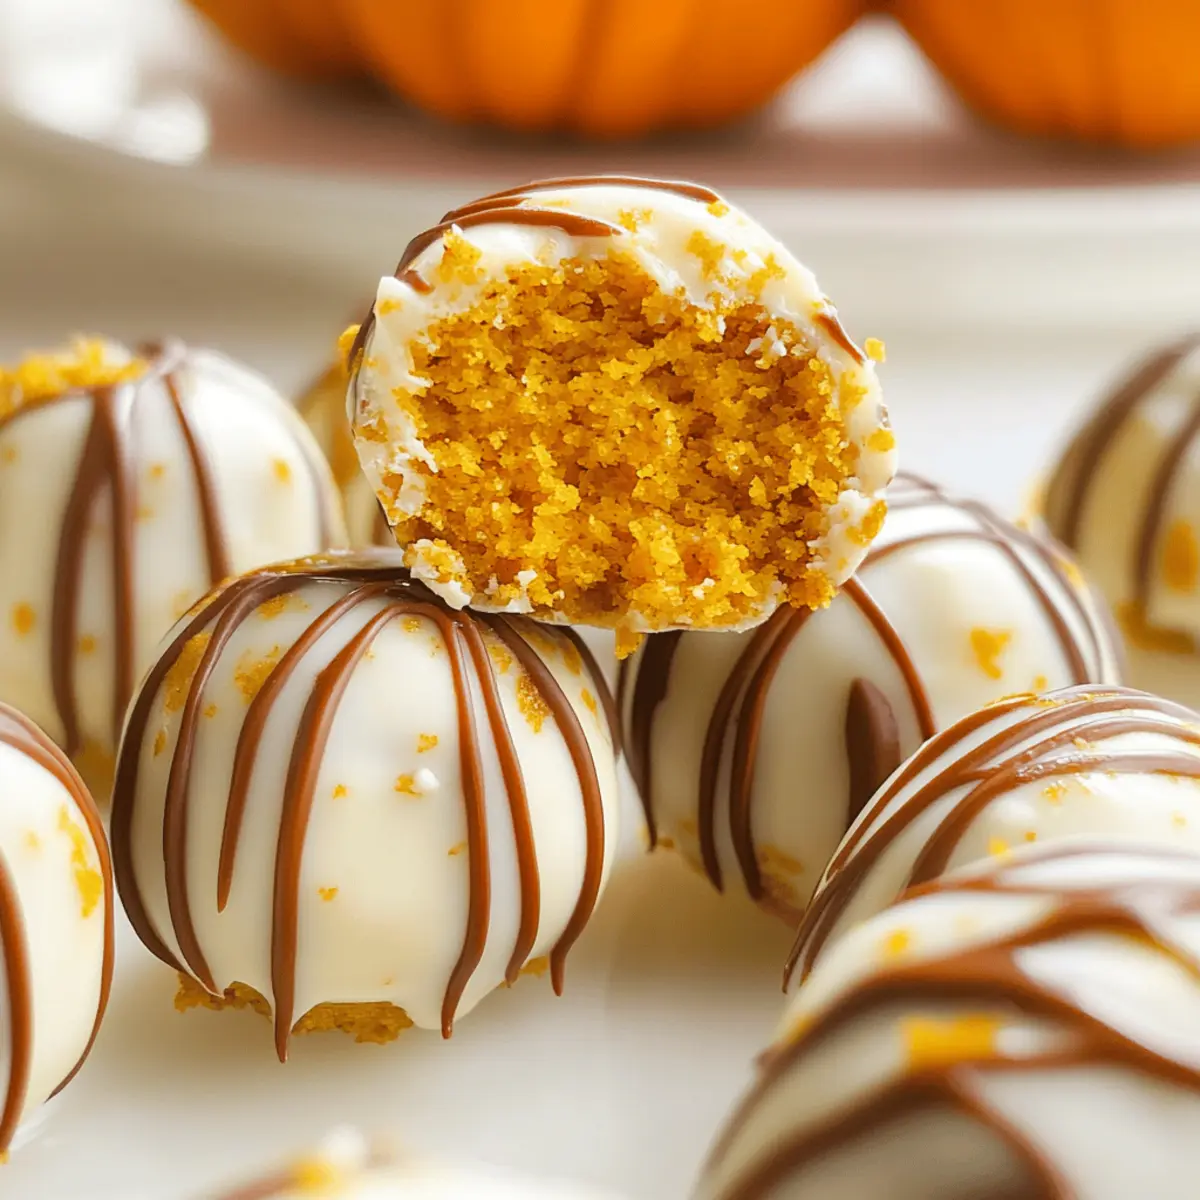
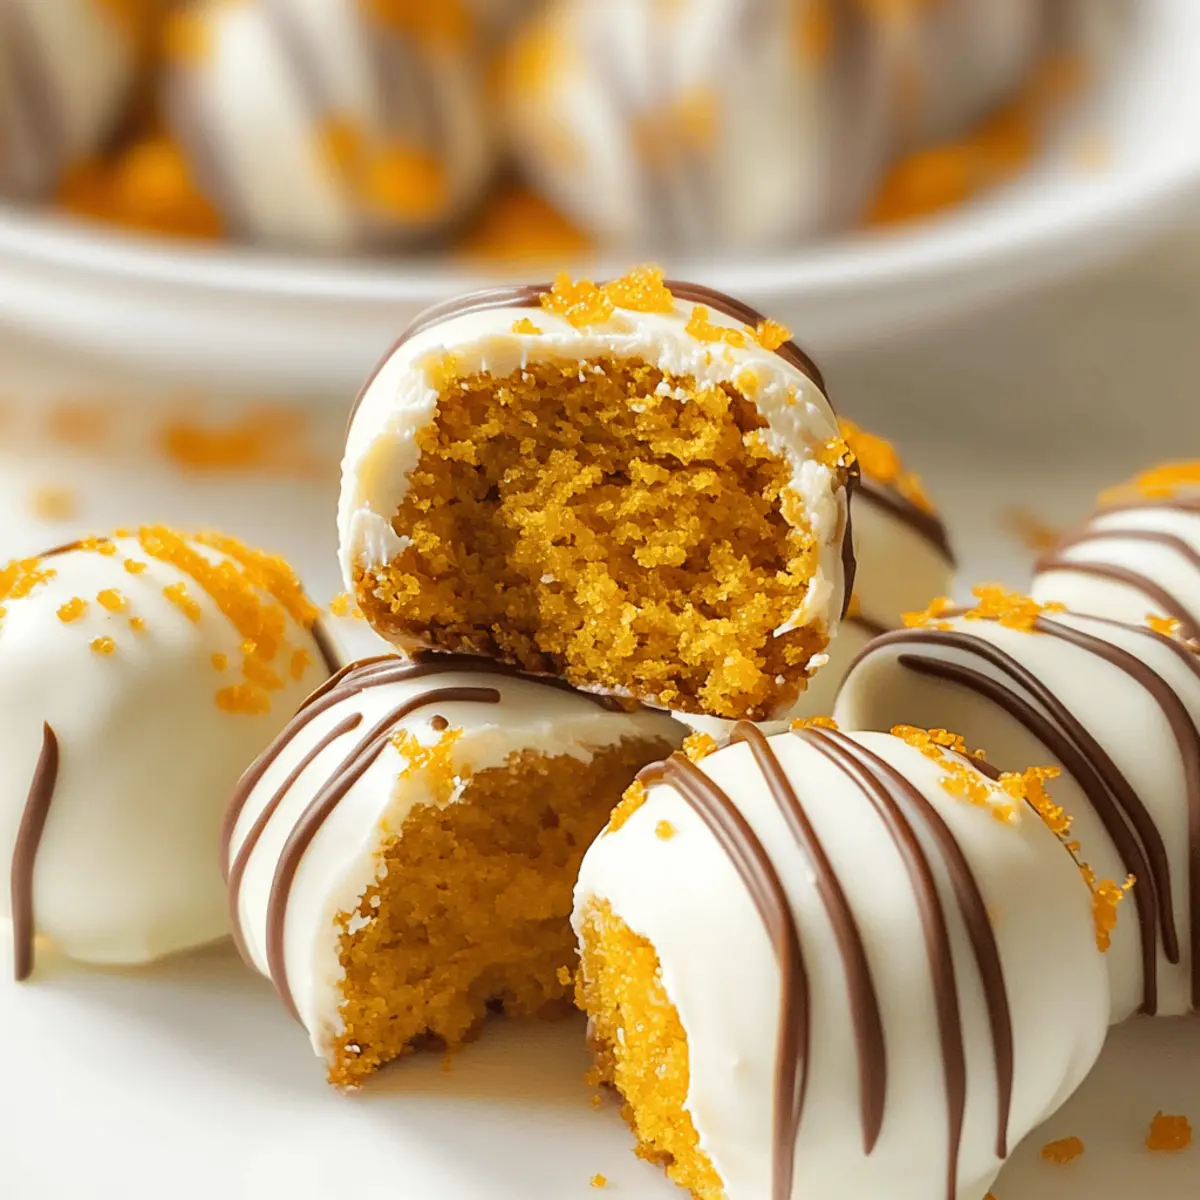
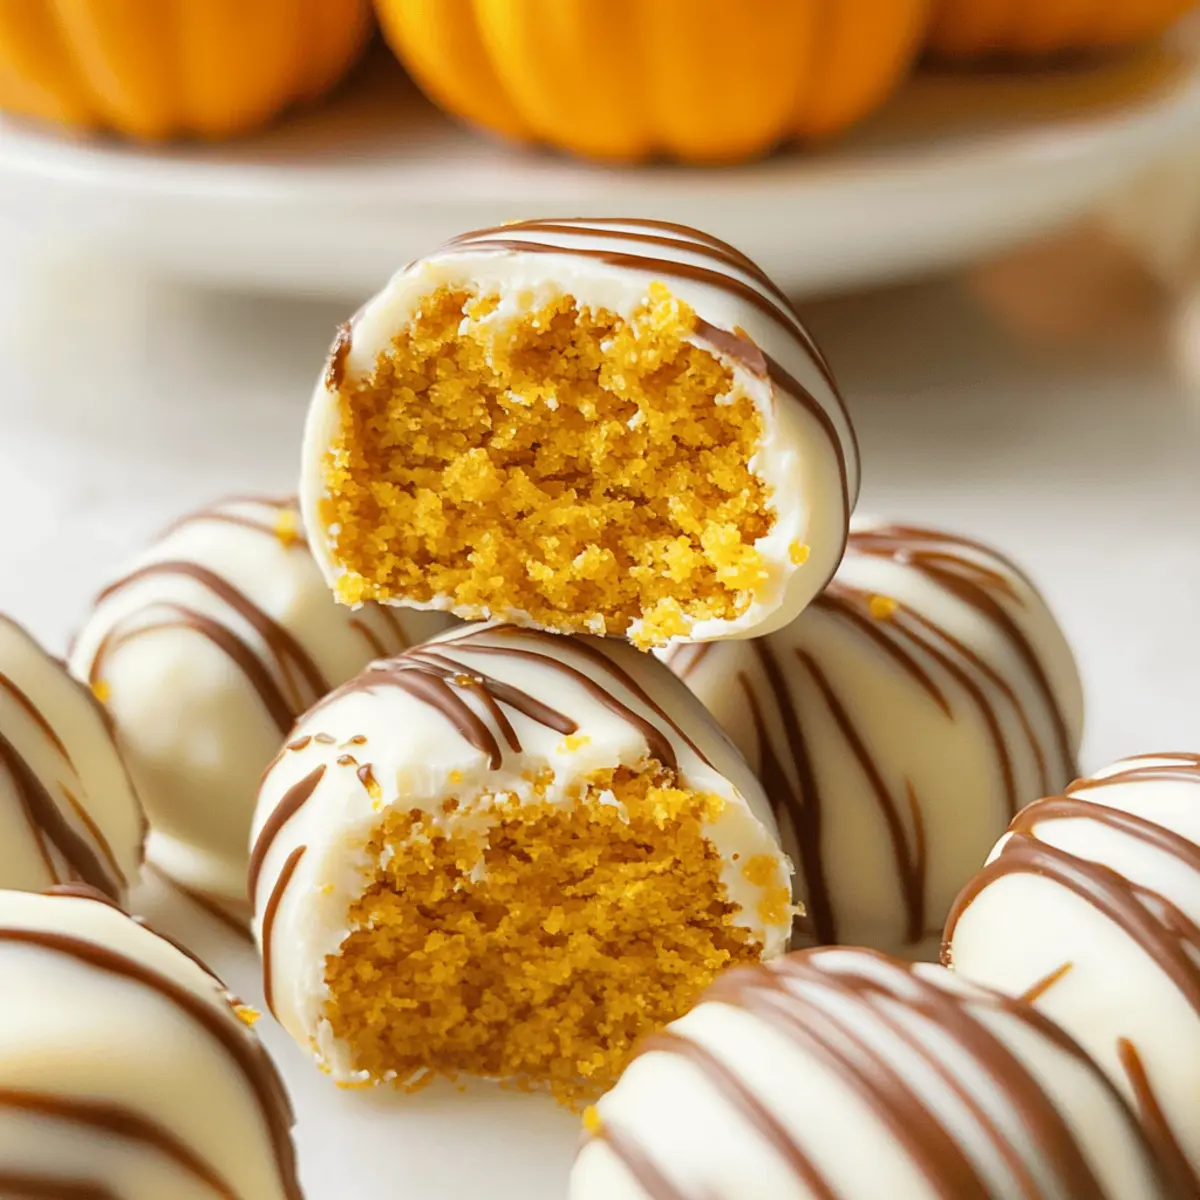
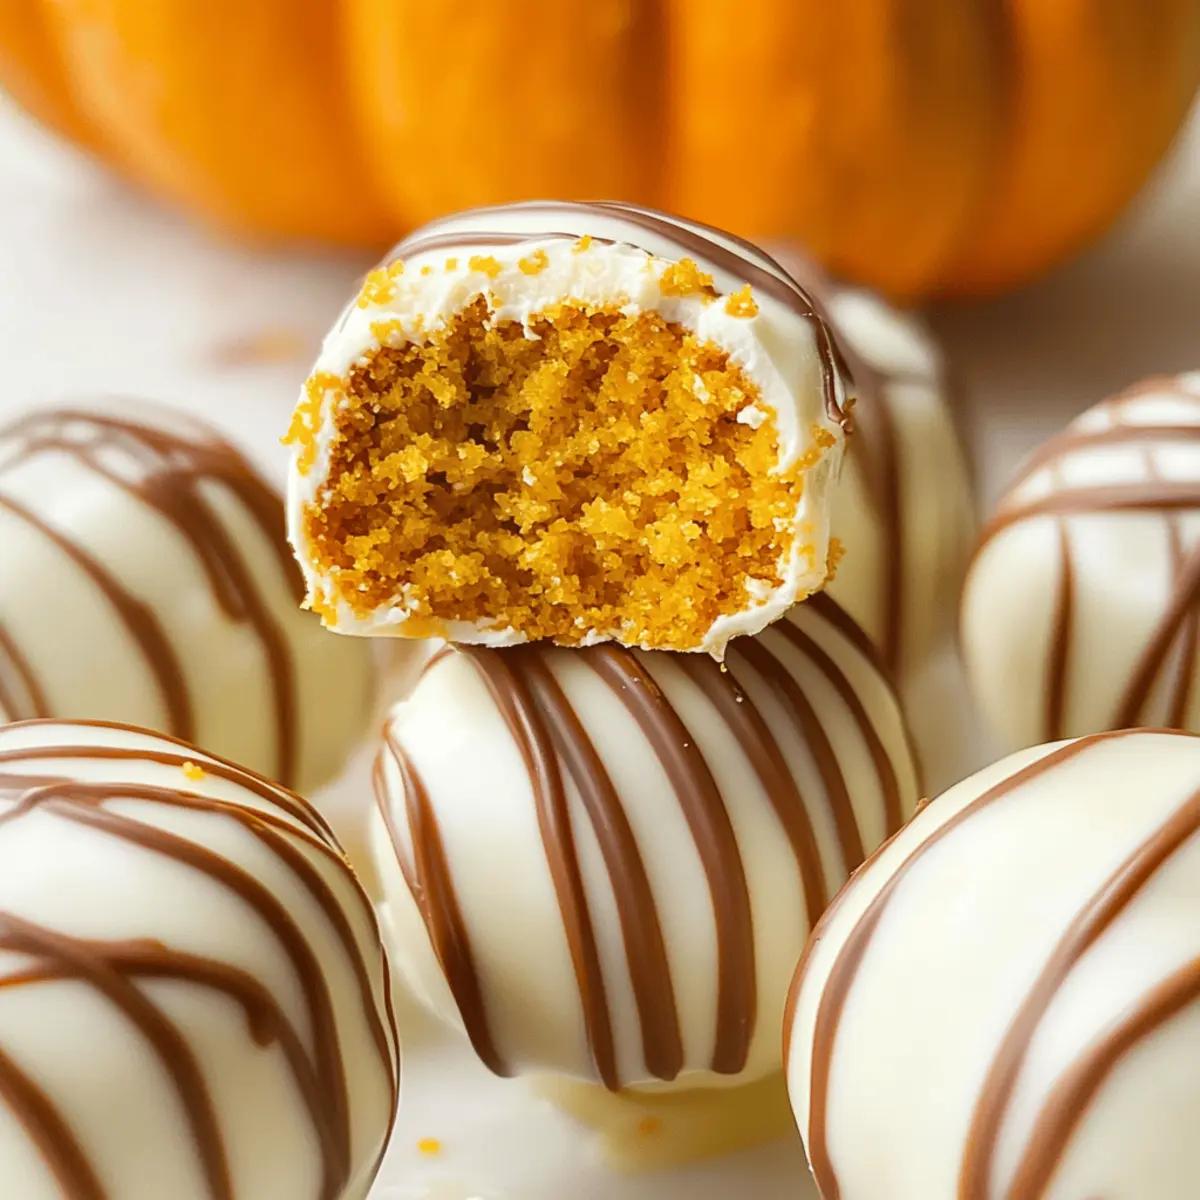
As I watched the leaves turn crisp and golden, the idea struck me: what if I captured the essence of fall in a bite-sized treat? Enter my Moist Pumpkin Cake Pops filled with creamy cream cheese frosting—a delightful way to embrace the season! Not only do these cake pops embody the warm flavors of pumpkin spice, but they also make for an easy dessert that can impress at any gathering, whether it’s a Halloween party or a cozy get-together. Perfect for gift-giving or a sweet indulgence, these little delights promise a velvety texture wrapped in rich chocolatey bliss. Curious to discover how to bring this festive treat to life? Let’s get started!
Why Are These Pumpkin Cake Pops Special?
Irresistible flavors: The blend of pumpkin spice and cream cheese creates a festive taste that’s hard to resist!
Easy to make: With straightforward steps, anyone can whip these up, making them a great project for novice bakers.
Versatile treats: Customize them with different frostings or toppings—perfect for any occasion, from Halloween to Thanksgiving!
Perfectly portioned: These bite-sized delights are easy to share, making them a hit at parties or as gifts.
Moist and tender: Each pop boasts a velvety texture that truly captures the essence of fall in every bite.
Transform your dessert offerings with these delightful Pumpkin Cake Pops, and don’t forget to check out more fall treats for inspiration!
Pumpkin Cake Pops Ingredients
• Here’s everything you need to make moist and delightful Pumpkin Cake Pops!
For the Cake
- Pumpkin Cake – The heart of the pops, providing structure and moisture; you can use a homemade recipe or a convenient boxed cake mix.
For the Frosting
- Cream Cheese – Essential for a creamy and rich flavor in the frosting; make sure it’s at room temperature for effortless mixing.
- Butter – Adds a luxurious smoothness to the frosting; unsalted butter at room temperature works best.
- Confectioners’ Sugar – Sweetens and adds the right texture to your frosting; feel free to adjust the quantity for your preferred level of sweetness.
For the Coating
- White or Milk Chocolate – This will create a delicious outer layer for your pops; opt for chocolate chips or bars, ensuring it’s tempered properly for dipping.
Feel free to get creative with the toppings and variations!
Step‑by‑Step Instructions for Pumpkin Cake Pops
Step 1: Prepare the Cake
Begin by preheating your oven to 350°F (175°C). Grease a 9×13 inch baking pan or line it with parchment paper. Follow the instructions on your chosen pumpkin cake mix or homemade recipe, mixing the ingredients thoroughly until the batter is smooth. Pour the batter into the prepared pan and bake for 25–30 minutes, or until a toothpick inserted in the center comes out clean. Allow cooling completely on a wire rack.
Step 2: Make Frosting
While the pumpkin cake is cooling, take a mixing bowl and beat together 8 ounces of room temperature cream cheese and ½ cup of softened unsalted butter until creamy and well combined. Gradually add confectioners’ sugar, mixing on low speed until fluffy and smooth. This rich cream cheese frosting will provide a delightful filling for your Pumpkin Cake Pops.
Step 3: Crumble Cake
Once your pumpkin cake has cooled completely, carefully transfer it to a large mixing bowl. Use your hands or a fork to crumble the cake into fine pieces, ensuring there are no large chunks remaining. The crumbled texture will help the frosting bind everything together as you prepare to form the cake pops, adding to that delightful Pumpkin Cake Pops experience.
Step 4: Incorporate Frosting
Now, take your prepared cream cheese frosting and gradually mix it into the crumbled pumpkin cake. Use your hands for the best result, kneading the mixture until it’s moist enough to hold together when shaped. You want a consistency glossy and pliable, perfect for forming into balls without any crumbly bits, which is essential for your irresistible Pumpkin Cake Pops.
Step 5: Roll Cake Balls
Shape the mixture into 1.5-inch balls using your hands or a mini ice cream scoop for uniformity. Place each ball on a sheet of parchment paper where they can sit undisturbed. Once all the balls are formed, place them in the freezer for about 10–15 minutes. This will help them firm up, making them easier to dip in chocolate.
Step 6: Melt Chocolate
In the meantime, prepare for the coating! Take a heatproof bowl and add your choice of white or milk chocolate chips. Melt the chocolate in the microwave in 30-second intervals, stirring after each until it’s completely smooth, or use a double boiler over simmering water. This silky melted chocolate is what will beautifully coat your Pumpkin Cake Pops.
Step 7: Dip Cake Balls
Once the cake balls are firm, take a toothpick and insert it into the center of each ball. Hold the ball by the toothpick and dip it into the melted chocolate, ensuring it’s fully coated. Allow any excess chocolate to drip back into the bowl before placing the cake pops back on the parchment paper to set. This will give them a deliciously smooth finish.
Step 8: Finish
After dipping, you can add a touch of flair! While the chocolate coating is still soft, drizzle additional melted chocolate over the top or sprinkle with your favorite nuts or candy decorations. Let the pops cool at room temperature until the chocolate sets completely, creating that perfect Chocolate-covered Pumpkin Cake Pops you can’t resist!
Pumpkin Cake Pops Variations & Substitutions
Feel free to explore these delightful twists to make your Pumpkin Cake Pops even more unique and suited to your taste!
-
Gluten-Free: Use a gluten-free cake mix or homemade gluten-free flour blend to make these treats suitable for gluten-sensitive friends.
-
Dairy-Free: Substitute the cream cheese with a dairy-free cream cheese alternative and use coconut oil instead of butter for a fantastic flavor.
-
Flavor Burst: Add a teaspoon of vanilla extract to the frosting or mix in orange zest for a vibrant and citrusy twist that dances on your palate.
-
Nutty Crunch: Incorporate crushed nuts like walnuts or pecans into the cake mixture or as a topping for the chocolate coating.
-
Spicy Kick: Infuse some cayenne pepper into the chocolate coating for an unexpected, delightful heat that pairs surprisingly well with sweet pumpkin flavors.
-
Decorative Toppings: Drizzle with caramel sauce or use white chocolate to create spider webs for a fun Halloween theme that’s sure to impress.
-
Syrupy Sweet: Use maple syrup instead of sugar in the frosting to amplify that cozy, fall flavor profile – it brings a delightful richness!
-
Non-Chocolate Coating: If you prefer a lighter touch, opt for candy melts in pastel colors for a whimsical look, perfect for festive occasions.
The beauty of these Pumpkin Cake Pops lies in your creative expression! Check out more fall treats for additional inspiration and delightful seasonal flavors!
How to Store and Freeze Pumpkin Cake Pops
Room Temperature: Keep your cake pops at room temperature in an airtight container for up to 3 days to maintain their freshness and texture.
Fridge: For longer storage, place the pumpkin cake pops in an airtight container in the fridge, where they’ll stay fresh for up to a week.
Freezer: To freeze, wrap each cake pop individually in plastic wrap and store them in a freezer-safe bag or container. They can be frozen for up to 2 months.
Reheating: When ready to enjoy, thaw cake pops in the fridge overnight before serving, and never refreeze once thawed for the best taste and texture.
Make Ahead Options
These Moist Pumpkin Cake Pops are a perfect choice for meal prep, allowing you to enjoy their delightful flavors with less stress on busy days. You can prepare the pumpkin cake and make the cream cheese frosting up to 24 hours in advance—just store them separately in airtight containers in the refrigerator to maintain moisture and freshness. When you’re ready to assemble, crumble the pumpkin cake and mix in the frosting to form cake balls. Freeze them for 10-15 minutes to firm up before dipping in chocolate. This way, you’ll have delicious Pumpkin Cake Pops ready to impress without last-minute fuss!
Expert Tips for Pumpkin Cake Pops
-
Room Temperature Ingredients: Ensure the cream cheese and butter are at room temperature for easy mixing in the frosting. This helps create a smooth, fluffy texture.
-
Crumbling Consistency: Crumble the cooled pumpkin cake into fine pieces for the best blending. Avoid large chunks, which may hinder the consistency of the Pumpkin Cake Pops.
-
Even Sizing: Use a mini ice cream scoop to form the cake balls. This ensures uniform size and helps them bake evenly, making for a beautiful presentation!
-
Chilling Time: Don’t skip the chilling step! Freezing the cake balls for 10-15 minutes helps them hold their shape during the chocolate dipping process.
-
Chocolate Tempering: Properly melt your chocolate until smooth, but avoid overheating, as this can affect the coating’s shine and firmness. Keep an eye on your chocolate during melting!
-
Decorative Toppings: Get creative! Consider using colored chocolate or sprinkles to make your Pumpkin Cake Pops stand out at your next fall gathering.
What to Serve with Moist Pumpkin Cake Pops
Savor the flavors of autumn by pairing these delightful treats with complementary side dishes and beverages that enhance their rich, sweet essence.
-
Creamy Mashed Potatoes: The velvety texture of mashed potatoes balances the sweetness of the cake pops and adds a comforting touch to any fall meal.
-
Apple Cider: A warm or chilled glass of apple cider brings out the pumpkin spice notes, making for a cozy, seasonal drink pairing.
-
Pecan Pie: Indulge in the nutty sweetness of pecan pie for a classic dessert combo that creates a delightful harmony of flavors.
-
Spiced Hot Chocolate: Rich and creamy, this drink elevates the dessert experience by providing another layer of chocolatey delight that complements the cake pops.
-
Caramel Drizzle: A simple caramel sauce drizzled over the cake pops adds a delectable richness and an extra touch of fall indulgence.
-
Cinnamon Sugar Doughnuts: The crunchy exterior and soft interior of these doughnuts offer a delightful contrast to the moist cake pops, enhancing the fall vibes.
-
Seasonal Fruit Platter: Fresh apples, pears, and figs with their natural sweetness and crunch refresh the palate and balance the richness of the cake pops.
-
Cheesecake Bites: Mini cheesecake bites provide a creamy, tangy contrast to the sweetness of the pumpkin cake pops, making each bite an exciting experience.
Pumpkin Cake Pops Recipe FAQs
How do I select the best pumpkin for my cake?
Absolutely! When choosing a pumpkin for your cake, look for a small, firm pumpkin; those labeled as “sugar pumpkins” are ideal due to their sweetness and lower moisture content. A pumpkin that feels heavy for its size and has a smooth, unblemished skin will yield the best flavor for your cake.
How should I store leftover Pumpkin Cake Pops?
To keep your Pumpkin Cake Pops fresh, store them in an airtight container at room temperature for up to 3 days. For longer storage, place them in the refrigerator, where they can last for up to a week. Just make sure they are well-wrapped to prevent them from drying out!
Can I freeze my Pumpkin Cake Pops?
Definitely! To freeze your cake pops, wrap each one in plastic wrap and place them in a freezer-safe bag or container. They will retain their deliciousness for up to 2 months. When you’re ready to enjoy them, simply thaw them in your refrigerator overnight. Be cautious not to refreeze them once thawed to maintain the best quality.
What should I do if my cake pops won’t hold their shape?
If your cake pops are crumbling or not holding their shape, it may be due to the mixture being too dry. Try adding a bit more cream cheese frosting to moisten the mixture until it sticks together nicely. Additionally, make sure to chill the balls for 10-15 minutes before coating them to help keep their form during dipping.
Are there any allergy considerations for Pumpkin Cake Pops?
Very much so! Make sure to check for allergies; common allergens in this recipe include gluten (if using regular cake mix) and dairy (from cream cheese and butter). For gluten-free options, use a gluten-free cake mix and ensure all other ingredients are certified gluten-free. Always consult with your guests if you’re serving them to ensure everyone can indulge safely!
Irresistible Pumpkin Cake Pops with Creamy Frosting Delight
Ingredients
Equipment
Method
- Preheat your oven to 350°F (175°C). Grease or line a 9x13 inch baking pan. Follow the instructions on your pumpkin cake mix or recipe, combine ingredients until smooth, pour into the pan, and bake for 25-30 minutes until a toothpick comes out clean. Allow to cool completely.
- Beat together cream cheese and butter until creamy. Gradually add confectioners' sugar, mixing until fluffy and smooth.
- Crumble the cooled pumpkin cake into fine pieces in a large mixing bowl, ensuring there are no large chunks.
- Gradually mix the cream cheese frosting into the crumbled cake using your hands until the mixture holds together.
- Shape the mixture into 1.5-inch balls, place on parchment paper, and freeze for 10-15 minutes to firm up.
- Melt chocolate chips in a bowl in the microwave or double boiler until smooth.
- Insert a toothpick into each cake ball, dip into melted chocolate, allowing excess to drip off, then place on parchment paper to set.
- While chocolate is still soft, decorate with additional melted chocolate or toppings. Let cool until the chocolate sets.