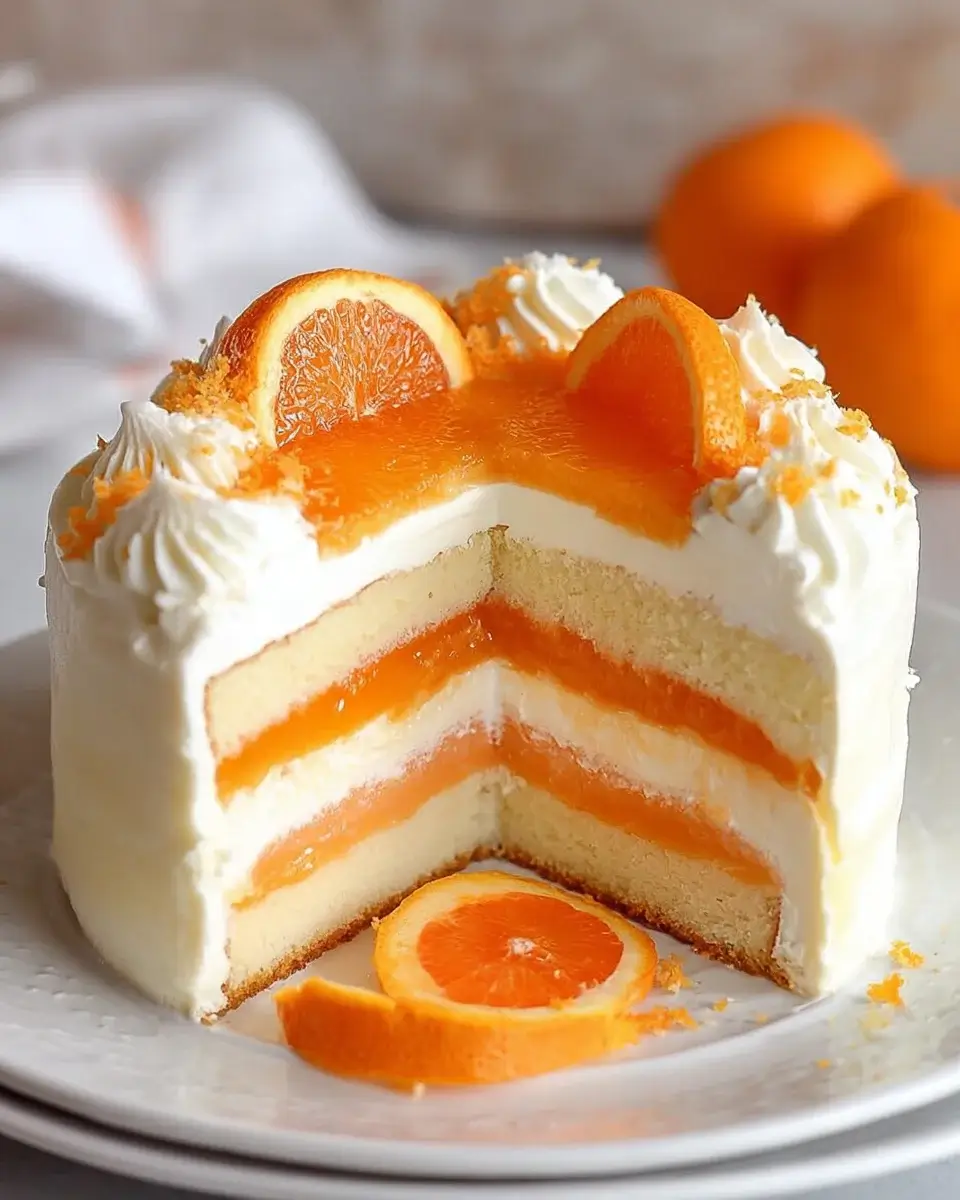
Introduction to Orange Creamsicle Ice Cream Cake
There’s something magical about the combination of orange and cream that takes me back to my childhood. The first time I tasted an Orange Creamsicle Ice Cream Cake, I was instantly transported to summer days filled with laughter and sunshine. This delightful dessert is not just a treat; it’s a quick solution for those busy days when you want to impress your loved ones without spending hours in the kitchen. With its vibrant flavors and creamy texture, this cake is sure to be a hit at any gathering, making it a must-try for anyone looking to bring a little joy to their table.
Why You’ll Love This Orange Creamsicle Ice Cream Cake
This Orange Creamsicle Ice Cream Cake is a game-changer for dessert lovers. It’s incredibly easy to whip up, making it perfect for those last-minute gatherings or family celebrations. The refreshing taste of orange combined with creamy vanilla is a crowd-pleaser that will have everyone asking for seconds. Plus, it’s a no-bake treat, so you can spend less time in the kitchen and more time enjoying the company of your friends and family.
Ingredients for Orange Creamsicle Ice Cream Cake
Gathering the right ingredients is the first step to creating this delightful Orange Creamsicle Ice Cream Cake. Here’s what you’ll need:
- Vanilla Ice Cream: The creamy base that pairs perfectly with the zesty orange flavor.
- Orange Sherbet: Adds a refreshing citrus punch and vibrant color to the cake.
- Heavy Whipping Cream: Essential for making the fluffy frosting that envelops the cake.
- Powdered Sugar: Sweetens the whipped cream and helps achieve that perfect texture.
- Vanilla Extract: Enhances the overall flavor, bringing warmth to the dessert.
- Orange Extract: Intensifies the orange flavor, making each bite a burst of citrus delight.
- Vanilla Cake Mix: The foundation of the cake; you’ll need to follow the package instructions for preparation.
- Orange Juice: A drizzle over the ice cream layer adds moisture and flavor.
- Crushed Orange-Flavored Candies (optional): For a fun garnish that adds a little crunch and extra sweetness.
For those looking to make substitutions, consider using low-fat ice cream and sherbet for a lighter version. You can also layer fresh orange slices between the ice cream and sherbet for added flavor and texture. Exact measurements for each ingredient can be found at the bottom of the article, ready for printing!
How to Make Orange Creamsicle Ice Cream Cake
Creating this Orange Creamsicle Ice Cream Cake is a delightful journey that combines baking and freezing. Follow these simple steps, and you’ll have a stunning dessert that’s sure to impress!
Step 1: Preheat the Oven
Preheating the oven is crucial for baking success. It ensures that your cakes rise evenly and develop that perfect texture. Set your oven to 350°F and let it warm up while you prepare the cake mix. This way, you’ll be ready to pop those cakes in as soon as they’re mixed!
Step 2: Prepare the Cake Mix
Grab your vanilla cake mix and follow the package instructions. Usually, this involves mixing the cake mix with water, eggs, and oil. Stir until smooth, but don’t overmix; a few lumps are okay. This cake will be the sturdy base for your Orange Creamsicle Ice Cream Cake.
Step 3: Bake the Cakes
Pour the batter evenly into two 9-inch round cake pans. Bake them in your preheated oven for about 30 minutes, or until a toothpick inserted in the center comes out clean. Once baked, let the cakes cool in the pans for about 10 minutes. Then, transfer them to wire racks to cool completely. This cooling step is essential to prevent melting your ice cream later!
Step 4: Layer the Ice Cream
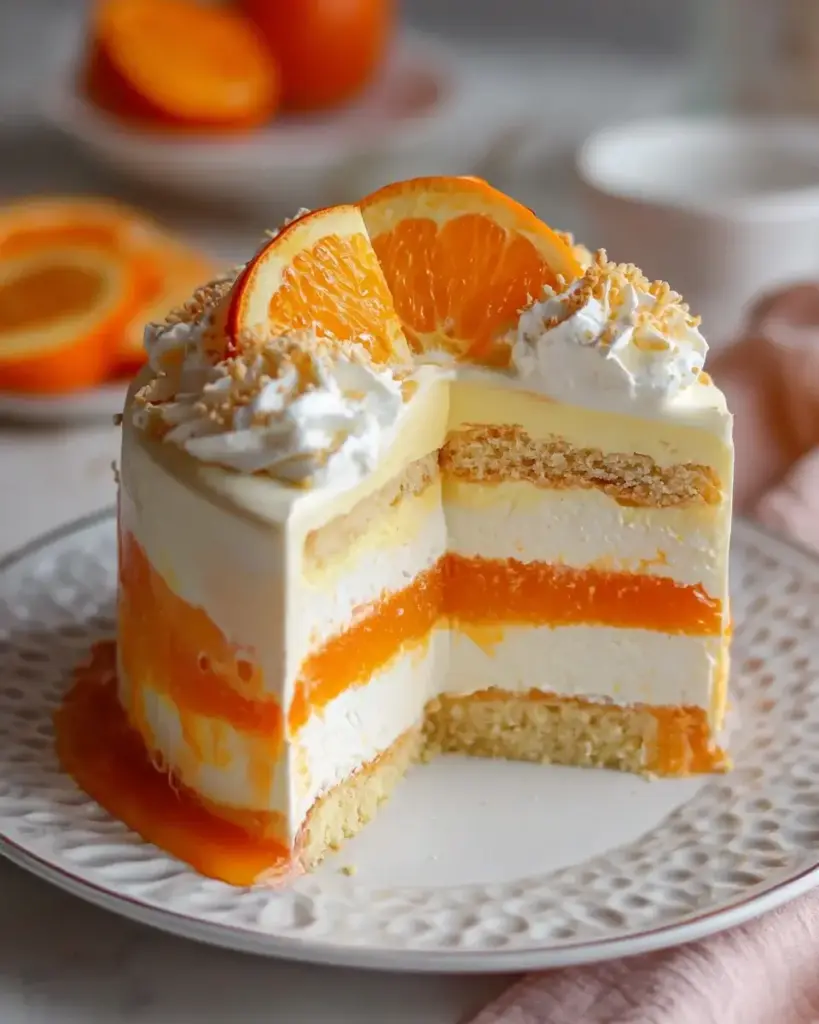
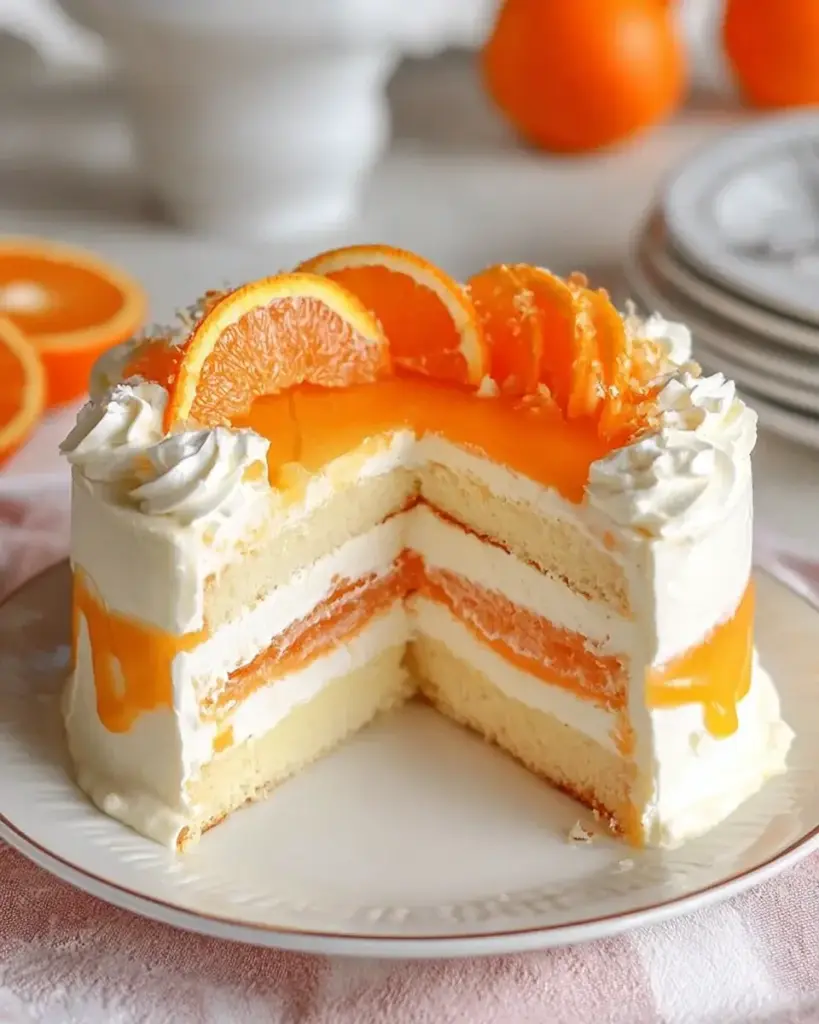
Once the cakes are cool, place one layer on a serving plate. Take your softened vanilla ice cream and spread it evenly over the first cake layer. Make sure to cover it all the way to the edges for a beautiful presentation. This creamy layer is where the magic begins!
Step 5: Add the Orange Sherbet
Next, drizzle some orange juice over the ice cream layer for an extra burst of flavor. Then, carefully spread the orange sherbet on top of the vanilla ice cream. Use a spatula to smooth it out evenly. This vibrant layer adds a refreshing citrus twist that makes this cake truly special.
Step 6: Assemble the Cake
Now it’s time to place the second cake layer on top of the orange sherbet. Gently press it down to ensure it sticks. This creates a beautiful sandwich of flavors that will delight your taste buds. Make sure it’s centered for a nice, even look!
Step 7: Whip the Cream
In a mixing bowl, whip the heavy cream until soft peaks form. This means the cream should hold its shape but still be smooth. Gradually add in the powdered sugar, vanilla extract, and orange extract. Continue whipping until you achieve stiff peaks. This fluffy frosting will be the crowning glory of your cake!
Step 8: Frost the Cake
Spread the whipped cream mixture generously over the top and sides of the entire cake. Use a spatula to create swirls or smooth it out, depending on your style. This creamy layer not only looks fantastic but also adds a rich flavor that complements the orange and vanilla.
Step 9: Freeze the Cake
Finally, cover the cake with plastic wrap and freeze it for at least 4 hours, or until firm. Freezing is essential to set the layers and make slicing easier later. Before serving, let the cake sit at room temperature for about 10 minutes. This will soften it slightly, making it easier to cut those perfect slices!
Tips for Success
- Make sure your ice cream and sherbet are softened for easy spreading.
- Use a serrated knife to slice the cake for clean, even pieces.
- For a fun twist, add a layer of fresh fruit between the ice cream and sherbet.
- Keep the cake covered in the freezer to prevent freezer burn.
- Let the cake sit out for a few minutes before serving for easier slicing.
Equipment Needed
- 9-inch Round Cake Pans: Essential for baking the cake layers. If you don’t have these, use any oven-safe round dish.
- Mixing Bowls: For combining ingredients. A large bowl works best, but any size will do.
- Whisk or Electric Mixer: For whipping cream. A hand whisk can work, but it’ll take longer.
- Spatula: Perfect for spreading ice cream and frosting. A rubber spatula is ideal.
- Plastic Wrap: To cover the cake while freezing. Aluminum foil can be a good substitute.
Variations
- Chocolate Orange Creamsicle: Swap out the vanilla cake mix for chocolate cake mix for a rich twist on the classic flavor.
- Fruit-Infused Layers: Add layers of fresh berries or sliced peaches between the ice cream and sherbet for a fruity surprise.
- Gluten-Free Option: Use a gluten-free cake mix to make this dessert suitable for those with gluten sensitivities.
- Vegan Version: Substitute dairy ice cream and whipped cream with coconut or almond-based alternatives for a plant-based treat.
- Nutty Crunch: Incorporate crushed nuts, like almonds or pistachios, into the whipped cream for added texture and flavor.
Serving Suggestions
- Pair with a scoop of extra orange sherbet for a refreshing touch.
- Serve alongside a light fruit salad for a balanced dessert.
- Drizzle with chocolate or caramel sauce for added indulgence.
- Garnish with fresh mint leaves for a pop of color.
- Enjoy with a chilled glass of sparkling water or lemonade.
FAQs about Orange Creamsicle Ice Cream Cake
Can I make this Orange Creamsicle Ice Cream Cake ahead of time?
Absolutely! This cake can be made a day or two in advance. Just keep it covered in the freezer until you’re ready to serve. It’s a great make-ahead dessert for parties!
What if I can’t find orange sherbet?
No worries! If orange sherbet is hard to find, you can substitute it with another fruity sherbet, like mango or peach. The flavor will change slightly, but it will still be delicious!
How do I store leftovers?
Store any leftover cake in the freezer, covered tightly with plastic wrap. It should stay fresh for up to a week. Just remember to let it sit out for a few minutes before slicing!
Can I use homemade ice cream instead of store-bought?
Definitely! Homemade ice cream can add a personal touch to your Orange Creamsicle Ice Cream Cake. Just ensure it’s softened for easy spreading.
Is this cake suitable for kids?
Yes! This cake is a hit with kids and adults alike. The fun flavors and creamy texture make it a delightful treat for all ages. Just be prepared for the smiles!
Final Thoughts
Creating this Orange Creamsicle Ice Cream Cake is more than just baking; it’s about crafting memories. Each slice brings a burst of nostalgia, reminding me of carefree summer days. The combination of creamy vanilla and zesty orange is a delightful treat that never fails to impress. Whether you’re celebrating a special occasion or simply enjoying a sweet moment with family, this cake is sure to bring smiles all around. So, roll up your sleeves, gather your loved ones, and dive into this refreshing dessert. Trust me, the joy it brings is worth every delicious bite!
Orange Creamsicle Ice Cream Cake: A Refreshing Delight!
Ingredients
Method
- Preheat the oven to 350°F.
- Prepare the vanilla cake mix according to package instructions and bake in two 9-inch round cake pans.
- Allow cakes to cool completely in the pans for about 10 minutes, then transfer to wire racks to cool completely.
- Once the cakes are cooled, place one layer on a serving plate.
- Spread the softened vanilla ice cream evenly over the first cake layer.
- Drizzle the orange juice over the ice cream layer.
- Carefully place the orange sherbet on top of the vanilla ice cream, smoothing it out evenly.
- Place the second cake layer on top of the orange sherbet.
- In a mixing bowl, whip the heavy cream until soft peaks form.
- Gradually add the powdered sugar, vanilla extract, and orange extract, continuing to whip until stiff peaks form.
- Spread the whipped cream mixture over the top and sides of the entire cake.
- If desired, sprinkle crushed orange-flavored candies on top for garnish.
- Cover the cake with plastic wrap and freeze for at least 4 hours, or until firm.
- Before serving, let the cake sit at room temperature for about 10 minutes to soften slightly for easier slicing.
Nutrition
Notes
- For a lighter version, substitute low-fat ice cream and sherbet.
- You can also add a layer of fresh orange slices between the ice cream and sherbet for added flavor and texture.