Introduction to Garlic Herb Dinner Rolls Recipe
Garlic Herb Dinner Rolls are a delightful treat that can elevate any meal. These rolls are soft, fluffy, and bursting with flavor. The combination of garlic and fresh herbs creates a mouthwatering aroma that fills your kitchen, making it hard to resist. Whether you’re hosting a dinner party or enjoying a cozy family meal, these rolls are sure to impress.
What Makes Garlic Herb Dinner Rolls Special?
What sets Garlic Herb Dinner Rolls apart is their unique blend of flavors. The use of fresh garlic and herbs like parsley and rosemary adds a savory touch that complements a variety of dishes. Additionally, the combination of all-purpose and bread flour gives these rolls a perfect texture—light and airy on the inside, with a slightly crispy crust. Each bite is a delightful experience, making them a favorite among bread lovers.
The Perfect Addition to Any Meal
Garlic Herb Dinner Rolls are incredibly versatile. They pair wonderfully with soups, salads, and main courses. Imagine serving them alongside a hearty bowl of minestrone or a fresh garden salad. They also make a great accompaniment to roasted meats or pasta dishes. Plus, they can be enjoyed on their own, dipped in olive oil or butter. No matter the occasion, these rolls are the perfect addition to your dining table.
Ingredients for Garlic Herb Dinner Rolls Recipe
To create the perfect Garlic Herb Dinner Rolls, you’ll need a few simple ingredients. Each component plays a vital role in achieving that soft, fluffy texture and rich flavor. Here’s what you’ll need:
- 2 cups all-purpose flour
- 1 cup bread flour
- 1 packet (2 1/4 teaspoons) instant yeast
- 1 teaspoon salt
- 1 tablespoon sugar
- 3/4 cup warm water (about 110°F)
- 2 tablespoons olive oil
- 3 cloves garlic, minced
- 1 tablespoon fresh parsley, chopped
- 1 tablespoon fresh rosemary, chopped
- 1 tablespoon melted butter (for brushing)
These ingredients are easy to find and can be adjusted based on your preferences. For instance, if you want a cheesy twist, consider adding shredded mozzarella or cheddar cheese to the dough. This will enhance the flavor and make your rolls even more irresistible!
Gather these ingredients, and you’ll be ready to embark on a delightful baking adventure. The combination of garlic and herbs will fill your kitchen with an inviting aroma, making the process all the more enjoyable.
Step-by-Step Preparation of Garlic Herb Dinner Rolls Recipe
Now that you have gathered all your ingredients, it’s time to dive into the step-by-step preparation of your Garlic Herb Dinner Rolls. Following these simple steps will ensure that your rolls turn out perfectly fluffy and flavorful. Let’s get started!
Step 1: Preparing the Dough
Begin by taking a large mixing bowl. In this bowl, combine the all-purpose flour, bread flour, instant yeast, salt, and sugar. Mix these dry ingredients well. This step is crucial as it ensures that the yeast and salt are evenly distributed throughout the flour. A good mix will help your rolls rise beautifully.
Step 2: Kneading the Dough
Next, in a separate bowl, mix the warm water and olive oil. The water should be about 110°F, which is warm but not too hot. Gradually add this mixture to your dry ingredients. Stir until a dough begins to form. Once the dough comes together, it’s time to knead! Transfer the dough to a floured surface and knead it for about 5-7 minutes. You want the dough to be smooth and elastic. This process develops the gluten, which gives the rolls their structure.
Step 3: First Rise
After kneading, place the dough in a greased bowl. Cover it with a clean kitchen towel. Now, let it rise in a warm place for about 1 hour. During this time, the dough should double in size. This first rise is essential for creating light and airy rolls.
Step 4: Shaping the Rolls
Once the dough has risen, it’s time to shape the rolls. Gently punch down the risen dough to release any air bubbles. Then, divide the dough into 12 equal pieces. Shape each piece into a ball. Place these balls in a greased 9×13-inch baking dish. Make sure to leave a little space between each roll, as they will expand during the second rise.
Step 5: Second Rise
Cover the shaped rolls with the kitchen towel again. Let them rise for another 30 minutes. This second rise allows the rolls to become even fluffier. You’ll notice they will puff up nicely, ready for baking!
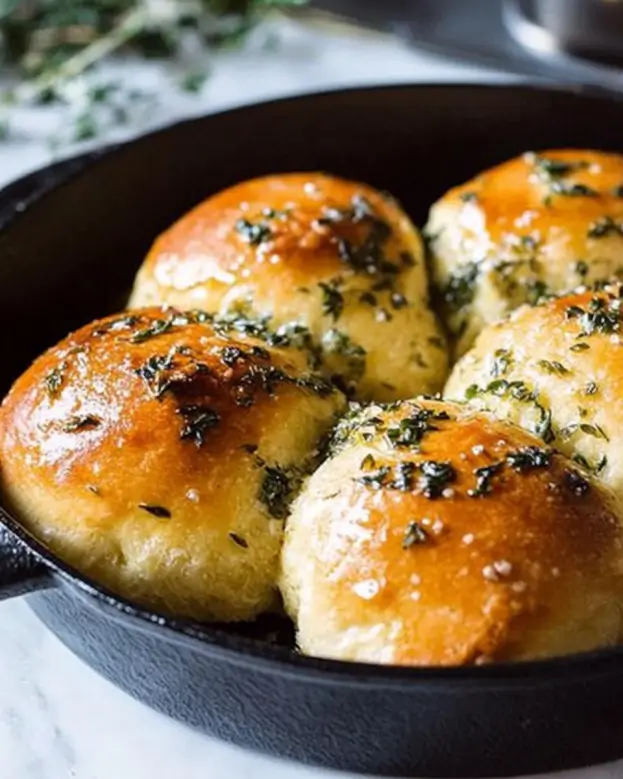
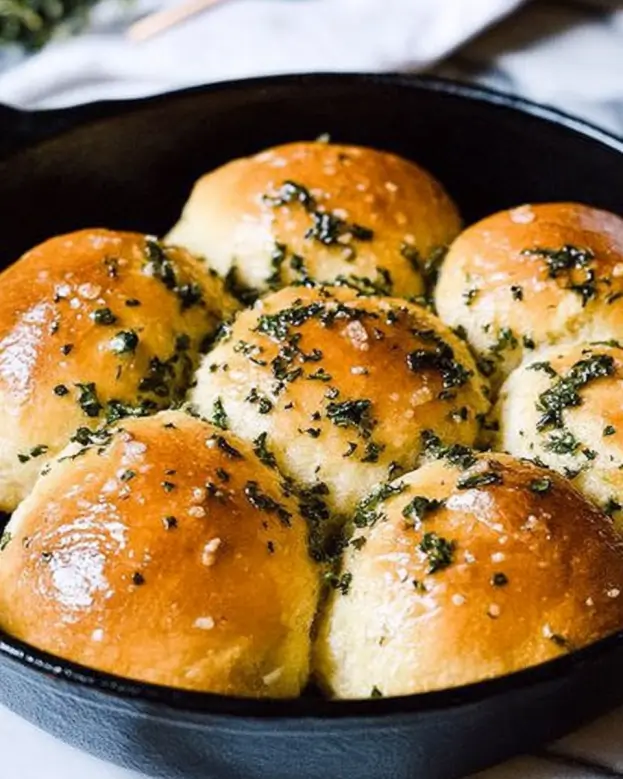
Step 6: Baking the Rolls
While the rolls are rising, preheat your oven to 375°F. Once the second rise is complete, brush the tops of the rolls with melted butter. This will give them a beautiful golden color as they bake. Place the baking dish in the preheated oven and bake for 20-25 minutes. Keep an eye on them; you want them to be golden brown and delicious!
Step 7: Adding the Garlic Herb Topping
After baking, remove the rolls from the oven. If you like, brush them with a little more melted butter for extra flavor. The aroma of garlic and herbs will fill your kitchen, making it hard to resist diving in right away. Serve these warm, and enjoy the delightful taste of your homemade Garlic Herb Dinner Rolls!
Variations of Garlic Herb Dinner Rolls Recipe
While the classic Garlic Herb Dinner Rolls are already a hit, there are many fun variations you can try. These twists not only add unique flavors but also cater to different dietary preferences. Let’s explore two delicious variations that will surely impress your family and friends!
Cheese-Stuffed Garlic Herb Dinner Rolls
If you love cheese, this variation is for you! Adding cheese to your Garlic Herb Dinner Rolls creates a gooey, melty surprise in every bite. To make these cheese-stuffed rolls, simply follow the original recipe but with a twist:
- Before shaping the dough into balls, take 1/2 cup of shredded mozzarella or cheddar cheese.
- Flatten each piece of dough slightly and place a tablespoon of cheese in the center.
- Carefully fold the dough around the cheese and shape it into a ball.
Continue with the second rise and baking steps as usual. The result? Soft, fluffy rolls with a cheesy center that will delight everyone at the table!
Whole Wheat Garlic Herb Dinner Rolls
For a healthier option, consider making Whole Wheat Garlic Herb Dinner Rolls. This variation is perfect for those looking to add more whole grains to their diet. Here’s how to make them:
- Replace half of the all-purpose flour with whole wheat flour. So, use 1 cup of all-purpose flour and 1 cup of whole wheat flour.
- Keep the rest of the ingredients the same, as the flavors of garlic and herbs will still shine through.
Whole wheat flour adds a nutty flavor and a denser texture, making these rolls a wholesome choice. They are just as delicious and pair wonderfully with soups and salads!
These variations of Garlic Herb Dinner Rolls allow you to customize your baking experience. Whether you choose the cheesy delight or the wholesome whole wheat option, you’re sure to create rolls that everyone will love!
Cooking Note for Garlic Herb Dinner Rolls Recipe
When it comes to baking Garlic Herb Dinner Rolls, a few cooking notes can make a big difference in your results. Understanding the process and paying attention to details will help you achieve the best possible outcome. Here are some essential tips to keep in mind:
First, always measure your ingredients accurately. Using a kitchen scale can help ensure precision, especially with flour. Too much flour can lead to dense rolls, while too little can make them too sticky. If you’re using measuring cups, spoon the flour into the cup and level it off with a knife for the best results.
Next, the temperature of your water is crucial. Using water that is too hot can kill the yeast, while water that is too cold may not activate it properly. Aim for a temperature around 110°F, which is warm to the touch but not scalding. This will help your dough rise beautifully.
Additionally, the rising times can vary based on your kitchen’s temperature. If your kitchen is cooler, the dough may take longer to rise. Conversely, in a warm environment, it may rise faster. Keep an eye on the dough and look for it to double in size rather than strictly adhering to the time guidelines.
Lastly, don’t rush the baking process. Each oven is different, so check your rolls a few minutes before the suggested baking time. You want them to be golden brown on top and sound hollow when tapped on the bottom. This ensures they are fully cooked and have that perfect fluffy texture.
By following these cooking notes, you’ll be well on your way to creating delicious Garlic Herb Dinner Rolls that are sure to impress. Happy baking!
Serving Suggestions for Garlic Herb Dinner Rolls Recipe
Garlic Herb Dinner Rolls are not just a side dish; they can enhance your entire meal experience. Their delightful flavor and soft texture make them a versatile addition to various dishes. Here are some fantastic serving suggestions to help you enjoy these rolls to the fullest!
Pairing with Soups and Salads
One of the best ways to enjoy Garlic Herb Dinner Rolls is by pairing them with soups and salads. The warm, fluffy rolls are perfect for dipping into a hearty soup. Imagine enjoying a bowl of creamy tomato soup or a rich chicken noodle soup, with a roll to soak up every last drop. The garlic and herb flavors complement the savory notes of the soup beautifully.
Additionally, these rolls can elevate a fresh garden salad. Serve them alongside a crisp Caesar salad or a vibrant mixed greens salad. The rolls add a satisfying element to the meal, making it more filling and enjoyable. You can even tear off a piece of the roll and use it to scoop up salad ingredients, creating a delightful bite!
Serving with Dips and Spreads
Garlic Herb Dinner Rolls also shine when served with dips and spreads. Their soft texture makes them ideal for dipping into various sauces. Consider serving them with a bowl of olive oil and balsamic vinegar for a simple yet delicious appetizer. Just tear off a piece of the roll, dip it, and savor the flavors!
For a more indulgent option, pair the rolls with creamy spreads like garlic butter or herb-infused cream cheese. These spreads enhance the garlic and herb flavors in the rolls, creating a delightful combination. You can also serve them with hummus or spinach dip for a fun twist. The possibilities are endless!
In summary, Garlic Herb Dinner Rolls are incredibly versatile. Whether you’re enjoying them with soups, salads, or dips, they are sure to be a hit at your dining table. So, don’t hesitate to get creative and explore different pairings that suit your taste!
Tips for Perfect Garlic Herb Dinner Rolls Recipe
Common Mistakes to Avoid
When baking Garlic Herb Dinner Rolls, a few common mistakes can lead to less-than-perfect results. Avoiding these pitfalls will help you achieve the fluffy, flavorful rolls you desire. Here are some tips to keep in mind:
- Using Old Yeast: Always check the expiration date on your yeast. Old yeast may not activate properly, leading to dense rolls. Fresh yeast is key for a good rise.
- Over-Kneading the Dough: While kneading is important, overdoing it can make the rolls tough. Knead just until the dough is smooth and elastic.
- Skipping the Rises: Don’t rush the rising process. Each rise is crucial for developing the texture. Allow the dough to double in size as instructed.
- Not Preheating the Oven: Always preheat your oven before baking. This ensures even cooking and helps the rolls rise properly in the oven.
- Ignoring the Color: Instead of relying solely on time, check the color of your rolls. They should be golden brown on top and sound hollow when tapped.
By avoiding these common mistakes, you’ll be well on your way to baking perfect Garlic Herb Dinner Rolls every time!
Storing Leftover Rolls
If you happen to have leftover Garlic Herb Dinner Rolls, storing them properly will keep them fresh and delicious. Here are some simple tips for storing your rolls:
- Room Temperature: If you plan to eat the rolls within a day or two, store them in an airtight container at room temperature. This will keep them soft and tasty.
- Refrigeration: For longer storage, you can refrigerate the rolls. However, this may cause them to dry out. Wrap them tightly in plastic wrap or place them in a sealed bag.
- Freezing: To keep the rolls for an extended period, freeze them. Place the cooled rolls in a freezer-safe bag, removing as much air as possible. They can be frozen for up to three months.
- Reheating: When you’re ready to enjoy the leftover rolls, reheat them in the oven at 350°F for about 10 minutes. This will restore their softness and warmth.
By following these storage tips, you can enjoy your Garlic Herb Dinner Rolls even after the initial baking. They’ll still taste fresh and delightful!
Breakdown of Time for Garlic Herb Dinner Rolls Recipe
Understanding the time required for each step in the Garlic Herb Dinner Rolls recipe can help you plan your baking session effectively. Here’s a detailed breakdown of the time you’ll need for preparation, cooking, and the total time involved in making these delicious rolls.
Prep Time
The prep time for Garlic Herb Dinner Rolls is approximately 20-30 minutes. This includes gathering your ingredients, mixing the dry and wet components, and kneading the dough. It’s a straightforward process, and with a little organization, you can have everything ready in no time!
Cooking Time
Once your rolls are shaped and have completed their second rise, the cooking time is about 20-25 minutes. During this time, the rolls will bake to a beautiful golden brown. Keep an eye on them to ensure they don’t overbake, as you want them to be soft and fluffy inside.
Total Time
In total, you can expect the entire process to take around 2 hours. This includes the time for both rises, which are essential for achieving that perfect texture. The first rise takes about 1 hour, and the second rise takes an additional 30 minutes. So, while the active time is relatively short, the waiting periods are crucial for the best results.
By planning your time wisely, you can enjoy the delightful experience of baking Garlic Herb Dinner Rolls without feeling rushed. Happy baking!
Nutritional Information for Garlic Herb Dinner Rolls Recipe
Understanding the nutritional content of your Garlic Herb Dinner Rolls can help you make informed choices about your meals. These rolls are not only delicious but also provide a good balance of nutrients. Here’s a breakdown of the key nutritional information per serving:
Calories
Each Garlic Herb Dinner Roll contains approximately 150 calories. This makes them a satisfying addition to your meal without being overly heavy. They can fit well into a balanced diet, especially when paired with healthy sides like salads or soups.
Protein
In terms of protein, each roll offers about 4 grams. While this may not seem like a lot, it contributes to your daily protein intake. Pairing these rolls with protein-rich foods, such as chicken or beans, can enhance your meal’s overall nutritional value.
Sodium
Each roll contains around 200 milligrams of sodium. This is a moderate amount, making it suitable for most diets. However, if you are watching your sodium intake, consider adjusting the salt in the recipe or pairing the rolls with low-sodium dishes.
Overall, Garlic Herb Dinner Rolls are a tasty and nutritious option for any meal. They provide a good source of energy and can be enjoyed in moderation as part of a healthy diet. Enjoy baking and savoring these delightful rolls!
FAQs about Garlic Herb Dinner Rolls Recipe
Can I make Garlic Herb Dinner Rolls ahead of time?
Absolutely! You can prepare Garlic Herb Dinner Rolls ahead of time, which is perfect for busy schedules. To do this, follow the recipe up to the point of shaping the rolls. After shaping, place them in a greased baking dish and cover them tightly with plastic wrap. You can refrigerate them overnight. When you’re ready to bake, simply let them come to room temperature for about 30 minutes before proceeding with the second rise and baking. This way, you can enjoy fresh rolls without the hassle of making them on the day of your meal!
How do I store leftover Garlic Herb Dinner Rolls?
If you have leftover Garlic Herb Dinner Rolls, storing them properly will keep them fresh and delicious. For short-term storage, place the rolls in an airtight container at room temperature. This will help maintain their softness for up to two days. If you want to keep them longer, consider refrigerating them. Just wrap them tightly in plastic wrap or place them in a sealed bag to prevent drying out. For even longer storage, you can freeze the rolls. Place cooled rolls in a freezer-safe bag, removing as much air as possible. They can be frozen for up to three months!
Can I freeze Garlic Herb Dinner Rolls?
Yes, you can freeze Garlic Herb Dinner Rolls! Freezing is a great way to preserve their freshness. After baking and cooling the rolls, place them in a freezer-safe bag. Make sure to remove as much air as possible to prevent freezer burn. When you’re ready to enjoy them, simply take out the desired number of rolls and let them thaw at room temperature. For a warm, fresh taste, reheat them in the oven at 350°F for about 10 minutes. This will restore their soft texture and delicious flavor!
Conclusion on Garlic Herb Dinner Rolls Recipe
In conclusion, Garlic Herb Dinner Rolls are a delightful addition to any meal. Their soft, fluffy texture combined with the rich flavors of garlic and fresh herbs makes them irresistible. Whether you’re serving them at a family dinner, a holiday gathering, or simply enjoying them with a bowl of soup, these rolls are sure to impress.
By following the simple steps outlined in this recipe, you can create your own batch of delicious rolls that will fill your kitchen with a warm, inviting aroma. The variations, such as cheese-stuffed or whole wheat options, allow you to customize the recipe to suit your taste and dietary preferences.
Remember to take your time during the preparation and rising stages. Patience is key to achieving that perfect fluffy texture. With a little practice, you’ll master the art of baking Garlic Herb Dinner Rolls, making them a staple in your home.
So, gather your ingredients, roll up your sleeves, and get ready to enjoy the delightful experience of baking. Your family and friends will thank you for these delicious rolls that are sure to become a favorite at your table. Happy baking!