As I wandered through my childhood memories, I stumbled upon a snack that never failed to bring a smile— the Fried Peanut Butter and Jelly Sandwich. This crispy delight takes the nostalgic goodness of our favorite childhood sandwich and transforms it into a warm, gooey treat that feels like a comforting hug. With just a handful of ingredients and quick prep time, it’s the perfect solution for those cravings that hit between meals or when you need a little culinary pick-me-up. Plus, it’s endlessly customizable—switch up the bread, nut butter, or jelly to suit your taste. Are you curious to whip up your own delicious version?

Why Will You Love This Sandwich?
Nostalgic Comfort: This crispy Fried Peanut Butter and Jelly Sandwich takes you back to childhood, offering the perfect blend of warmth and sweetness.
Quick and Easy: Made in minutes, it’s an ideal snack when you’re short on time but craving something delicious.
Customizable Delight: Swap out different nut butters or jellies to create your perfect flavor combination—from classic grape to decadent chocolate hazelnut.
Crowd-Pleasing Appeal: Perfect for kids and adults alike, it’s a wonderful treat that will definitely impress anyone gathered around the table.
Perfect Pairing: Enjoy with fresh fruit or a warm bowl of soup for a satisfying meal. Can’t get enough? Check out Garlic Butter Chicken for another delightful dish!
Fried Peanut Butter and Jelly Sandwich Ingredients
For the Sandwich
- Bread – Use your favorite bread, like white, whole grain, or even gluten-free for a healthier twist.
- Peanut Butter – Adds that signature creaminess; almond or cashew butter are great alternatives if you want to switch it up.
- Jelly – Choose any fruit flavor you adore for sweetness; opt for sugar-free varieties if you’re watching your sugar intake.
- Butter – Ensures a golden, crispy crust; feel free to use margarine or a non-dairy substitute for vegan options.
Enjoy creating your own crispy Fried Peanut Butter and Jelly Sandwich, and let the nostalgia flow with every bite!
Step‑by‑Step Instructions for Fried Peanut Butter and Jelly Sandwich
Step 1: Spread the Ingredients
Begin by laying out two slices of your chosen bread on a clean surface. Evenly coat one slice with your favorite peanut butter, spreading it right to the edges for maximum creaminess. On the second slice, generously apply the jelly, ensuring an even layer that captivates with sweetness. This delicious duo sets the stage for your Fried Peanut Butter and Jelly Sandwich.
Step 2: Assemble the Sandwich
Carefully place the slice with peanut butter on top of the one with jelly, aligning them so the coated sides are facing each other. Gently press them together, allowing the gooey goodness to slightly meld. This combination creates a delightful filling that promises warmth and nostalgic charm when fried.
Step 3: Butter the Outer Sides
Take a soft butter stick or a spatula and generously spread butter on the outer sides of the sandwich. This step is crucial for achieving that golden-brown crust during frying. Make sure the butter coats the sandwich evenly, giving it that extra crispy texture that complements the warm, oozy center of the Fried Peanut Butter and Jelly Sandwich.
Step 4: Heat the Skillet
Place a non-stick skillet over medium-high heat and allow it to warm for about 2 minutes. Once adequately heated, carefully place your sandwich in the skillet. Listen for that satisfying sizzle as it begins to cook. This preheating step is key to ensuring your sandwich fries evenly and reaches the perfect level of crispiness.
Step 5: Fry the First Side
Cook the sandwich for 3-4 minutes until the bottom side turns a lovely golden brown. Use a spatula to gently lift the sandwich and peek underneath; the ideal color indicates it’s time to flip. This ensures a beautifully crispy exterior, so take a moment to savor the delightful aroma wafting from the skillet.
Step 6: Flip and Cook the Other Side
With a steady hand, flip the Fried Peanut Butter and Jelly Sandwich over to cook the other side. Allow it to fry for another 3-4 minutes, monitoring the color until it matches the beautifully crispy hue of the first side. The visual contrast is an enticing signal that your sandwich is nearly ready to be enjoyed!
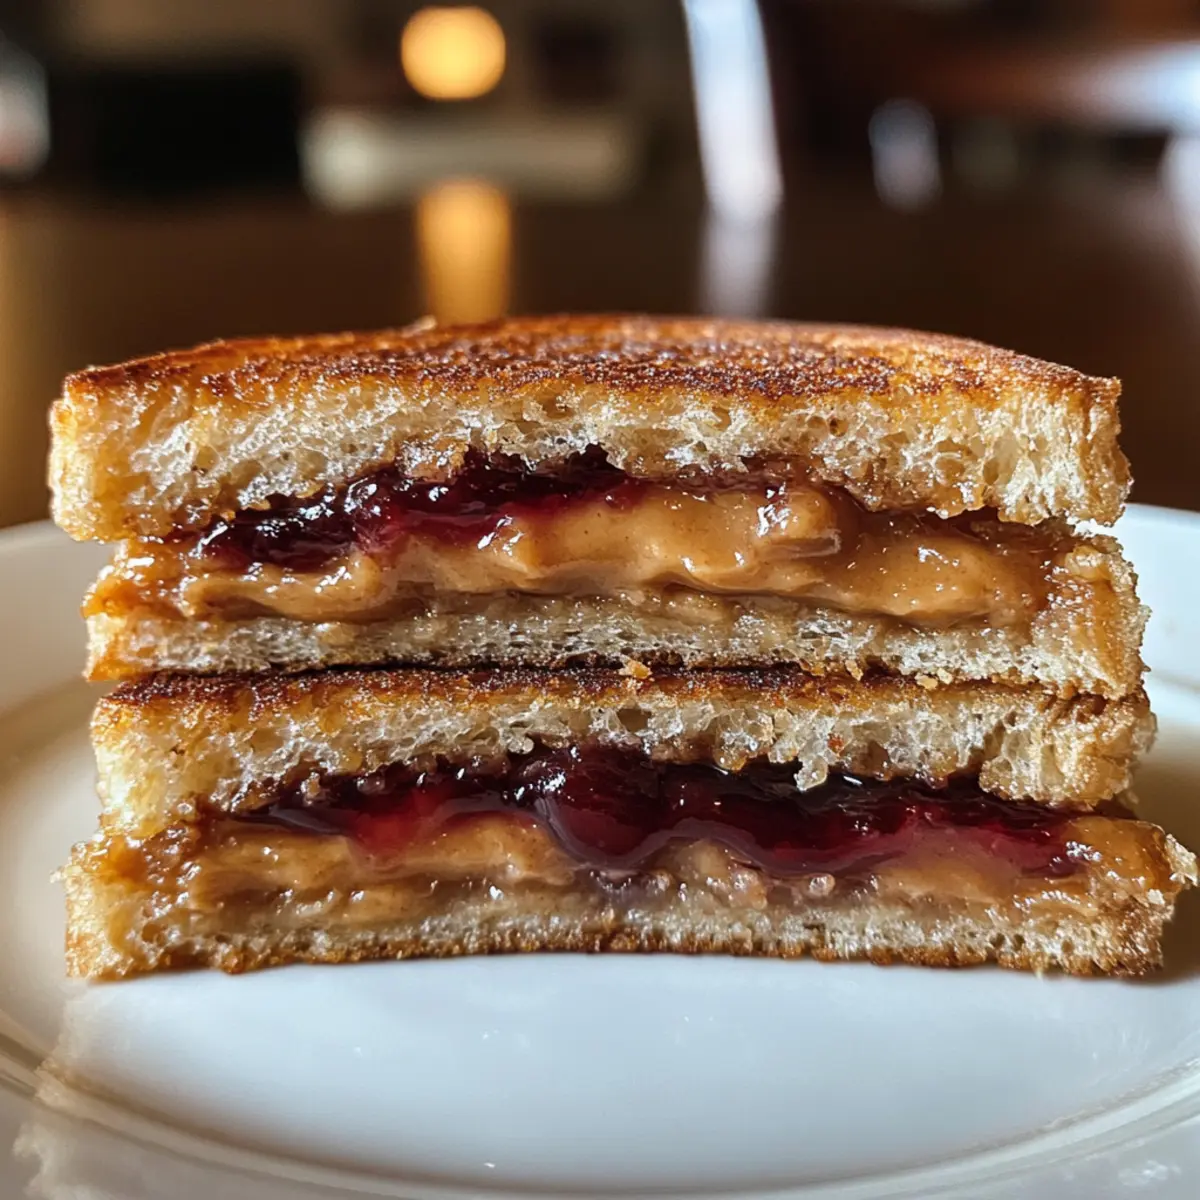
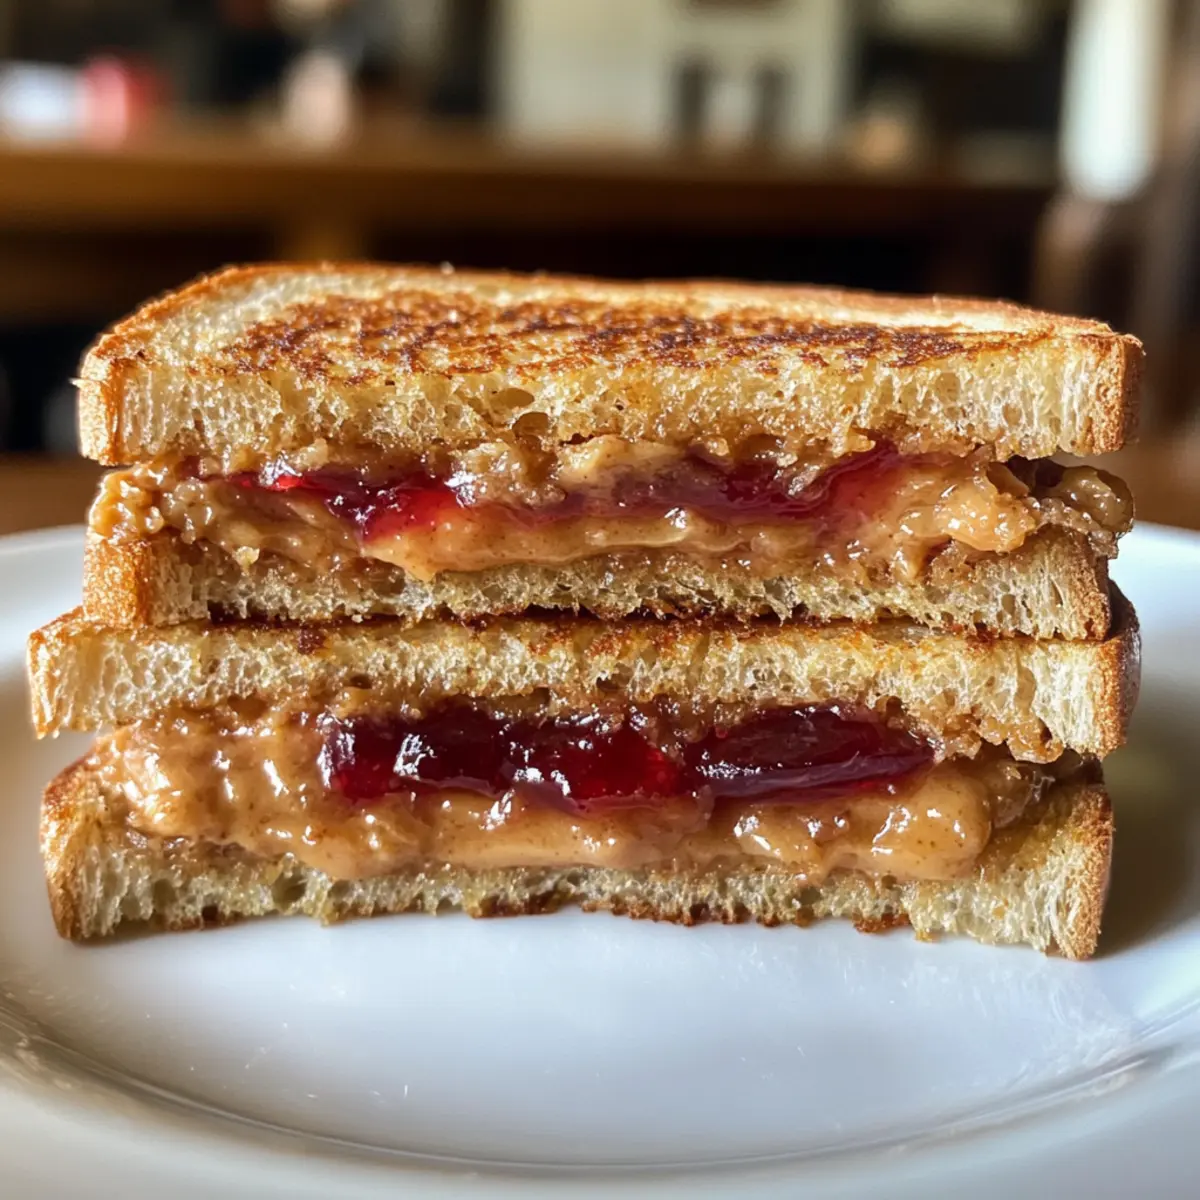
Step 7: Serve the Sandwich
Once both sides are perfectly golden and crispy, carefully remove the sandwich from the skillet with a spatula. Allow it to cool for a minute, then slice it in half for easy handling. The warm, gooey filling will eagerly reveal itself, showcasing the deliciousness that awaits in your Fried Peanut Butter and Jelly Sandwich.

What to Serve with Crispy Fried Peanut Butter and Jelly Sandwich
Create the perfect meal to complement this nostalgic treat, and indulge in comforting flavors that evoke cherished memories.
-
Fresh Fruit Salad: A vibrant mix of seasonal fruits adds a refreshing contrast to the richness of the sandwich. The natural sweetness pairs beautifully with your crispy delight.
-
Tomato Soup: The warmth and savory essence of a classic tomato soup balances the sweetness of the sandwich, providing a cozy, heartwarming meal experience. The dip factor is pure delight!
-
Sweet Potato Fries: Crispy roasted sweet potato fries bring a slight sweetness and a savory crunch that harmonizes with the gooey peanut butter filling, making for a perfectly satisfying combo.
-
Chocolate Milkshake: A thick, creamy milkshake is the ultimate indulgence that takes you back to childhood. The luscious flavors offer a decadent finish alongside your cozy sandwich.
-
Honeydew Melon Slices: The refreshing juiciness of honeydew melon offers a lighter side that directly complements the comfort food; its delicate flavor cleanses the palate nicely.
-
Cinnamon Sugar Flatbread: Craving something sweet? Serve warm flatbread dusted with cinnamon sugar alongside your sandwich for an extra comforting and cozy feel.
Pair these delightful options with your fried peanut butter and jelly sandwich for a meal that’s nostalgic and satisfying!
Variations for Fried Peanut Butter and Jelly Sandwich
Get ready to delight in customizing your Fried Peanut Butter and Jelly Sandwich for a whole new experience!
-
Nut Butter Swap: Use almond butter or cashew butter for a nutty twist that adds a unique flavor profile.
-
Jelly Variety: Experiment with different jellies or spreads like strawberry, raspberry, or even chocolate hazelnut for a decadent change.
-
Bread Selection: Switch things up by using brioche or sourdough bread for a more gourmet experience.
-
Add Bananas: Slice fresh bananas into the sandwich before frying for a deliciously sweet and creamy addition.
-
Cinnamon Twist: Sprinkle a dash of cinnamon into the peanut butter before spreading for a warm, fragrant flavor that complements the sweetness.
-
Healthier Option: Try using whole grain or gluten-free bread for a nutritious take that doesn’t sacrifice taste.
-
Savory Surprise: Add a sprinkle of sea salt on top of the jelly layer to enhance the sweet and salty contrast that makes this sandwich so appealing.
-
Chocolate Drizzle: Drizzle melted chocolate over the assembled sandwich before frying for an indulgent treat that satisfies any sweet tooth.
Whichever variation you choose, each brings its own charm to this classic treat! And if you’re in the mood for more delicious recipes, don’t miss out on trying this delightful Garlic Butter Chicken or a comforting plate of Garlic Butter Pork. Enjoy creating your perfect sandwich!
How to Store and Freeze Fried Peanut Butter and Jelly Sandwich
Fridge: Store any leftover Fried Peanut Butter and Jelly Sandwich in an airtight container for up to 2 days. Reheat in a skillet over low heat to maintain crispiness.
Freezer: For longer preservation, freeze assembled (but unfried) sandwiches. Wrap tightly in plastic wrap or foil, then place in a freezer bag. They can be fried directly from frozen, adding a few minutes to cooking time.
Reheating: To reheat a refrigerated sandwich, place it in the skillet over low heat, flipping periodically until heated through, keeping that crispy texture intact.
Room Temperature: Avoid leaving the sandwich at room temperature for more than 2 hours to ensure food safety, especially if it contains jelly.
Expert Tips for the Best Fried Peanut Butter and Jelly Sandwich
-
Preheat the Skillet: Ensure your skillet is thoroughly preheated before cooking the sandwich for an even golden crust that’s perfectly crispy.
-
Don’t Overstuff: Stick to a balanced amount of peanut butter and jelly; overloading can lead to oozing and messy cooking, detracting from that ideal Fried Peanut Butter and Jelly Sandwich experience.
-
Choose Smart Substitutes: Experiment with different breads and nut butters to tailor the sandwich to your preferences, making it a personalized delight everyone can enjoy.
-
Monitor Heat Levels: Keep the heat moderate; too high can burn the bread while leaving the filling cold. Your goal is a crisp, warm sandwich that’s just right.
-
Serve Immediately: Enjoy while warm for the ultimate experience—this will ensure that the gooey interior and the crispy exterior harmonize beautifully with every bite!
Make Ahead Options
These Crispy Fried Peanut Butter and Jelly Sandwiches are a fantastic option for meal prep! You can assemble the sandwiches up to 24 hours in advance; simply spread the peanut butter and jelly on the bread but hold off on frying. For the best results, wrap them tightly in plastic wrap or store them in an airtight container to prevent the bread from becoming soggy. When you’re ready to enjoy this delightful treat, just butter the outside and fry them in a hot non-stick skillet for about 3-4 minutes per side. This way, you’ll have a warm, crispy snack ready with minimal effort on busy days!
Fried Peanut Butter and Jelly Sandwich Recipe FAQs
What type of bread is best for the sandwich?
Absolutely, you can use any bread you like! White bread gives a classic taste, while whole grain offers a healthier crunch. For those looking for gluten-free options, I recommend trying gluten-free bread or even brioche for a more decadent twist.
How should I store leftover Fried Peanut Butter and Jelly Sandwiches?
You can store any leftovers in an airtight container in the fridge for up to 2 days. When ready to enjoy, reheat the sandwich in a skillet over low heat to retain its delicious crispiness.
Can I freeze assembled sandwiches?
Yes! To freeze, wrap the assembled (but unfried) sandwiches tightly in plastic wrap or foil, then place them in a freezer bag. They can remain frozen for up to 3 months. When you’re ready to fry, simply cook them directly from frozen, but be sure to add an extra couple of minutes to the cooking time.
What should I do if the sandwich oozes filling while frying?
Very! If you find your sandwich overflowing, it might be due to using too much peanut butter or jelly. To troubleshoot, stick to a balanced amount on each side and ensure the edges are well pressed together to minimize spillage. Also, keep a moderate heat; this will help the filling heat through without forcing it out.
Are there any dietary considerations for the Fried Peanut Butter and Jelly Sandwich?
Yes, this sandwich can be made to accommodate various dietary needs! Substitute peanut butter with almond or cashew butter for nut allergies, and use margarine or a non-dairy butter alternative to make it vegan. If sugar is a concern, opt for sugar-free jelly variations that taste just as sweet.
Can children eat this sandwich?
Absolutely! This sandwich is a hit with kids! Just be cautious with any nut allergies, and consider cutting the sandwich into smaller pieces for little hands to manage easily. For a fun twist, let them customize their own filling combinations—it’s a delicious and exciting way for kids to engage in food!
Crispy Fried Peanut Butter and Jelly Sandwich You'll Love
Ingredients
Equipment
Method
- Spread peanut butter on one slice of bread; spread jelly on the second slice.
- Assemble the sandwich with the peanut butter and jelly sides facing each other.
- Spread butter on the outer sides of the sandwich.
- Heat the skillet over medium-high heat and place the sandwich into the skillet.
- Cook for 3-4 minutes until golden brown, then flip and repeat on the other side.
- Remove from skillet, cool for a minute, then slice in half to serve.