The kitchen was abuzz with laughter as I fumbled to make my very first Easter Poke Cake. Who knew a simple dessert could create such a joyful frenzy? This easy and colorful Easter Poke Cake is perfect for any spring celebration, inviting everyone—whether you’re a seasoned baker or a curious newbie—to join in on the fun. With its eye-catching pastel swirls, luscious vanilla pudding, and fluffy Cool Whip, this cake not only dazzles the eyes but also delights the taste buds, making it a crowd-pleaser at Easter brunch and potlucks. What’s more, it’s a breeze to whip up, leaving you more time to enjoy the company of family and friends. Ready to dive into this colorful creation that’s bound to brighten your festivities? Let’s get started!
Why is this cake a must-try?
Colorful and Fun: This Easter Poke Cake brings a burst of vibrancy to your table with its stunning pastel swirls that are fun to create and even more delightful to eat.
Easy to Prepare: With just a few simple steps and minimal baking skills required, this cake invites everyone to join in the kitchen fun!
Versatile Flavors: Want to switch things up? You can easily swap in different pudding flavors, like lemon or pistachio, for a unique twist that keeps dessert exciting.
Perfect for Sharing: Whether it’s an Easter brunch or family potluck, this cake is bound to be a showstopper that both kids and adults adore! Pair it with some fresh fruit or ice cream for an extra refreshing contrast.
Make-Ahead Magic: You can whip this up a day in advance and simply decorate it before serving—talk about a time-saving dessert! Ready to sweeten your spring celebrations? Check out this Easter Punch Seasonal to pair with your cake!
Easter Poke Cake Ingredients
For the Cake
• White Cake Mix – Provides the structure and base of the cake. Note: Opt for a gluten-free cake mix if needed.
• Eggs – Adds moisture and helps bind the cake together. Note: Can be replaced with applesauce for a vegan alternative.
• Oil – Contributes to the cake’s moistness. Note: Can substitute with melted coconut oil for a lighter flavor.
• Water – Assists in combining the ingredients and maintaining texture.
For the Colorful Swirls
• Gel Food Coloring – Used to create vibrant pastel colors; enhances visual appeal. Note: Natural food dyes can be used for healthier options.
For the Pudding Filling
• Instant Vanilla Pudding Mix – Adds richness and flavor, helping create a moist cake texture.
• Cold Milk – Essential for preparing pudding; can use almond or soy milk as a substitute.
For the Topping
• Cool Whip – Provides a fluffy topping; easily customizable for flavor and color. Note: Can use whipped cream for a homemade touch.
• Easter Sprinkles (optional) – Decorative element that adds festive flair.
This delightful Easter Poke Cake brings more than just flavor to your table; it’s a celebration in itself!
Step‑by‑Step Instructions for Easter Poke Cake
Step 1: Preheat and Prepare
Begin by preheating your oven to 350°F (175°C). While the oven warms, prepare a 9×13-inch baking dish—either grease it well or line it with parchment paper for easy removal. This first step sets the stage for our colorful and delightful Easter Poke Cake, ensuring it bakes evenly and comes out perfectly!
Step 2: Mix the Cake Batter
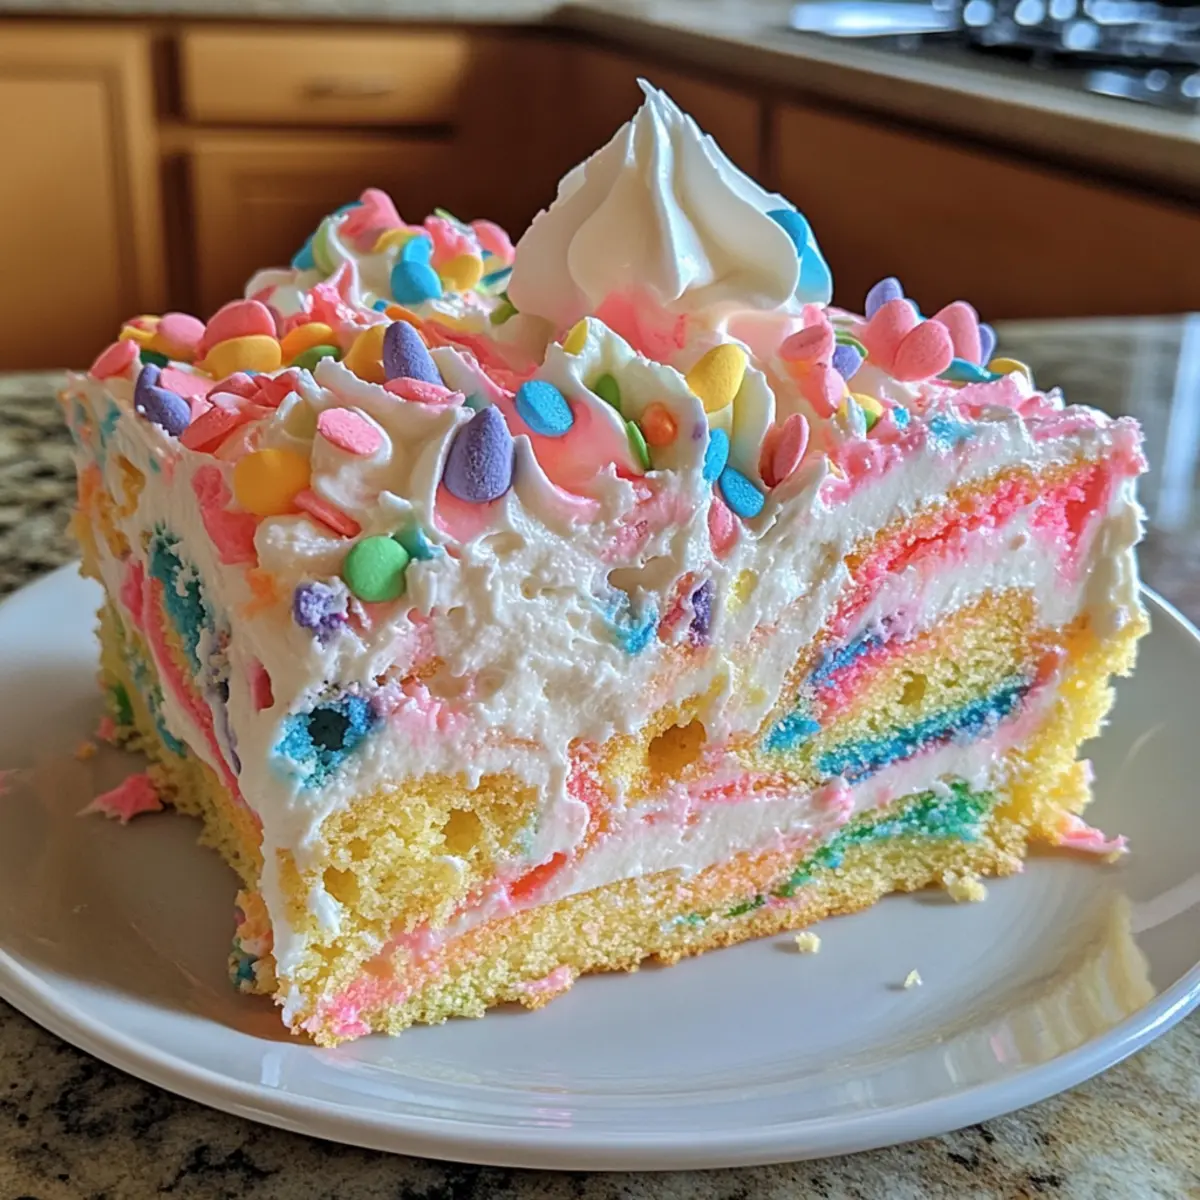
In a large mixing bowl, combine the white cake mix, eggs, oil, and water according to the package instructions. Mix on medium speed for about 2 minutes until the batter is smooth and free of lumps. The batter should be thick but pourable, which is essential for creating the beautiful pastel swirls that make our Easter Poke Cake so inviting.
Step 3: Color the Batter
Divide the prepared cake batter into 3–4 smaller bowls, depending on how many colors you want to create. Add gel food coloring to each bowl, stirring gently until your desired pastel shades are achieved. Aim for vibrant hues that will pop against the white cake base. This variety of colors is what brings our Easter Poke Cake to life!
Step 4: Create Swirls
Spoon the colored batters into the prepared baking dish, alternating the colors to create a fun, lively pattern. Once all colors are in the pan, take a butter knife and gently swirl through the batter to achieve a marbled effect. Be careful not to overmix. Bake for 28–32 minutes, or until a toothpick inserted into the center comes out clean, to ensure your cake is perfectly baked.
Step 5: Cool and Poke
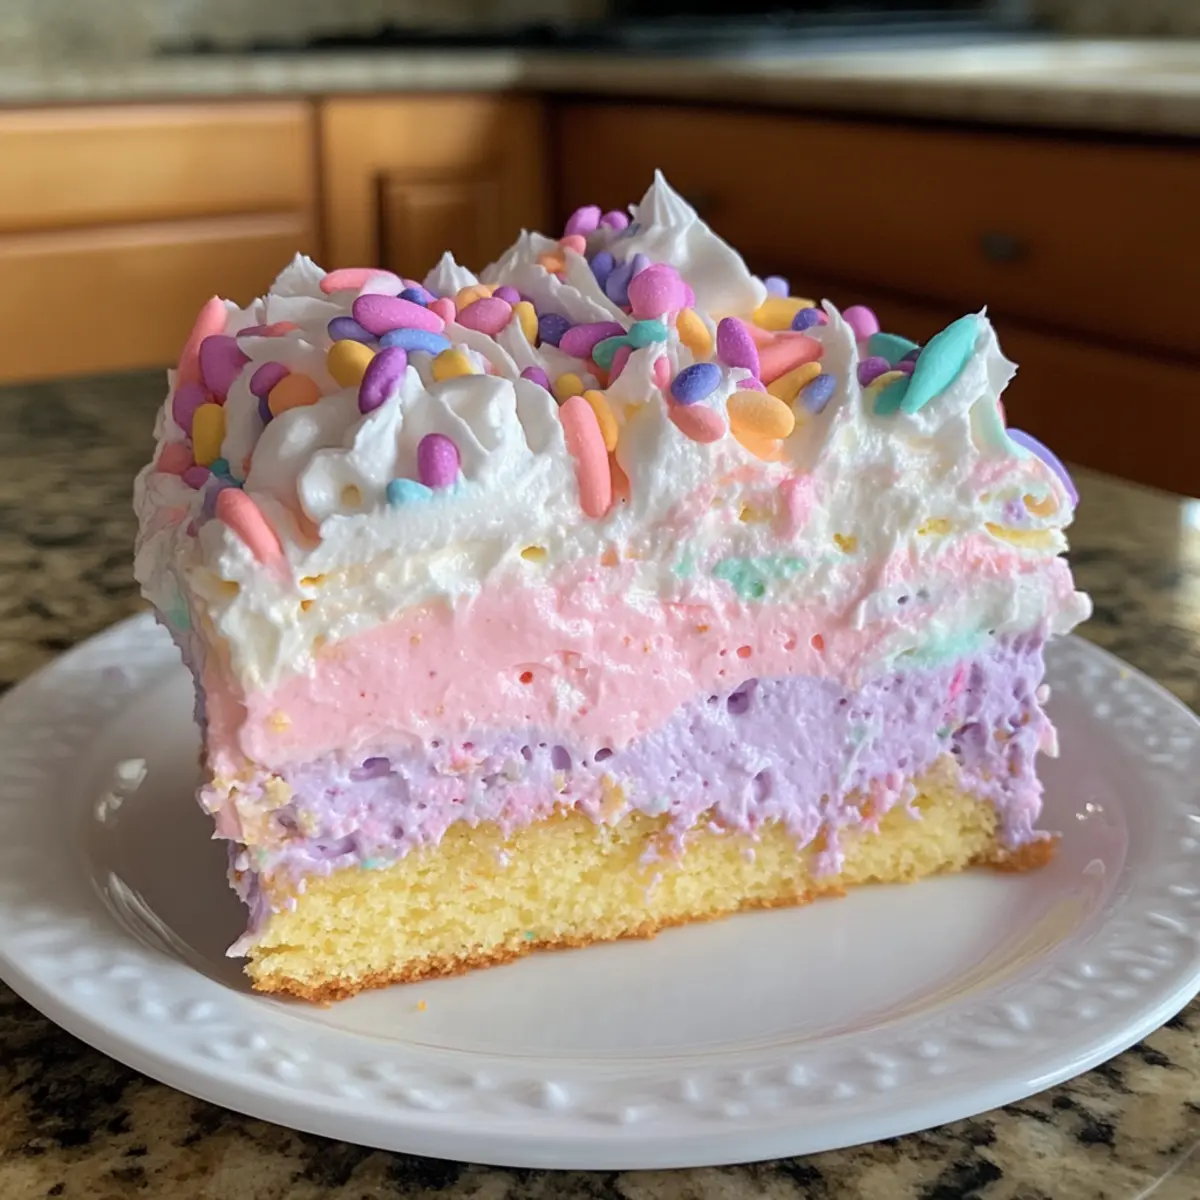
After baking, allow the cake to cool in the pan for 15–20 minutes. Once it’s cool enough to handle, use a wooden spoon handle to poke holes into the cake—about an inch apart. This is essential for our Easter Poke Cake as it allows the pudding filling to seep into the cake, creating that moist and flavorful texture we crave.
Step 6: Prepare the Pudding
In a mixing bowl, whisk together the instant vanilla pudding mix and cold milk until it thickens, which usually takes about 2 minutes. The pudding should be creamy and smooth. Pour this evenly over the cake, ensuring it seeps into the holes you’ve poked. This step adds a luscious layer of flavor that enhances our Easter Poke Cake beautifully.
Step 7: Chill the Cake
Cover the cake with plastic wrap and refrigerate for at least 2 hours, though overnight is preferable. This chilling time allows the pudding to set and the flavors to meld, making every bite of your Easter Poke Cake a truly delightful experience. As it chills, the anticipation builds!
Step 8: Top with Cool Whip
Once the cake has chilled, remove it from the refrigerator and spread a generous layer of Cool Whip evenly over the top. The creamy topping adds a lovely texture and flavor, complementing the sweet pudding-filled cake. Feel free to get creative with your presentation at this stage—the fluffier, the better!
Step 9: Add Decorations
If desired, sprinkle Easter-themed sprinkles or fresh fruit over the Cool Whip layer for a festive touch. This extra decoration not only enhances the visual appeal of the Easter Poke Cake but also adds a special charm that makes it perfect for spring celebrations.
Step 10: Serve and Enjoy
Keep the Easter Poke Cake refrigerated until it’s time to serve. When ready, slice it into squares and present it on a beautiful platter. Each slice reveals the fun, colorful layers, inviting everyone to dig in and savor the delightful flavors of this seasonal treat.

Easter Poke Cake Variations & Substitutions
Customize your Easter Poke Cake with these exciting twists that can add delightful flavors and textures to your creation!
-
Citrus Burst: Swap the vanilla pudding for lemon pudding for a tangy twist that brightens up every bite. The sunny flavors will give your cake a refreshing lift!
-
Nutty Delight: Use pistachio pudding in place of vanilla for a nutty flavor that’s sure to impress. This nutty infusion adds a creamy richness that’s absolutely delicious.
-
Fruit-Filled: Top your cake with vibrant fresh fruit, like strawberries or blueberries, for added freshness. Not only do they bring color, but they also introduce a juicy contrast that elevates the sweet experience!
-
Chocolate Indulgence: For chocolate lovers, consider using chocolate cake mix as a base. The rich flavor pairs beautifully with the creamy vanilla pudding, providing a decadent surprise in every slice.
-
Whipped Topping Upgrade: If you prefer a homemade touch, substitute Cool Whip for freshly whipped cream made from heavy whipping cream and a touch of sugar. This adds a delightful richness and elevates the overall indulgence.
-
Dairy-Free Option: Use almond or soy milk instead of regular milk for the pudding, and opt for a dairy-free whipped topping. This adjustment ensures that everyone can enjoy your sweet creation, regardless of dietary needs!
-
Seasonal Sprinkles: Elevate the visual appeal by using themed sprinkles that reflect different holidays, such as hearts for Valentine’s or stars for a summer gathering. Fun, playful designs will keep your cake festive throughout the year!
-
Creamy Layers: Add a layer of cream cheese or mascarpone beneath the Cool Whip for added depth and richness. This creamy addition creates a delightful contrast in flavors and textures that everyone will love!
For those craving drinks to complement your cake, consider pairing it with a refreshing Easter Punch Seasonal for a festive touch, or create a light spritzer to balance the sweetness. Explore all the delightful options and let your creativity shine!
Expert Tips for Easter Poke Cake
-
Swirl with Care: Use a gentle hand while swirling the batter to maintain the pastel colors. Avoid overmixing, or you’ll lose the beautiful marbled effect.
-
Pudding Consistency: Ensure the pudding is pourable before spreading it over the cake. If it’s too thick, it won’t seep into the holes as intended, impacting the moisture of your Easter Poke Cake.
-
Chill for Flavor: For best results, chill the cake overnight. This allows the pudding to set properly and melds the flavors together for a richer taste.
-
Top at the Right Time: Add any toppings, like fruit or sprinkles, just before serving. This keeps them fresh and visually appealing, enhancing the cake’s festive presentation.
-
Make Substitutions: Experiment with pudding flavors such as lemon or pistachio for a unique twist. Choose any alternative ingredients that suit your dietary needs while maintaining the cake’s delightful essence.
Make Ahead Options
These Easter Poke Cake preparations are a game-changer for busy home cooks! You can bake and poke holes in the cake up to 24 hours in advance, allowing it to soak up the delicious pudding filling without sacrificing flavor. Just make sure to refrigerate the cake after adding the pudding to maintain its moist texture. When you’re ready to serve, simply spread the Cool Whip on top and add any festive decorations. For best results, complete these final steps just before your gathering to keep everything fresh and eye-catching. Preparing your Easter Poke Cake ahead of time ensures that you’ll have more moments to enjoy with loved ones!
Storage Tips for Easter Poke Cake
Fridge: Store the Easter Poke Cake in an airtight container in the refrigerator. It stays fresh for up to 3-4 days, ensuring you can enjoy its delightful flavors for several days.
Freezer: If you want to save leftovers, wrap individual slices tightly in plastic wrap followed by foil. The cake can be frozen for up to 1 month, preserving its moist texture.
Reheating: For best results, thaw the frozen slices in the fridge overnight. Serve chilled straight from the refrigerator or let it sit at room temperature for a bit before enjoying.
Serving After Storage: Always refresh the visual appeal by adding fresh sprinkles or fruit before serving. This will keep your Easter Poke Cake looking as delightful as it tastes!
What to Serve with Easter Poke Cake?
Elevate your delightful Easter Poke Cake experience with these charming pairings that enhance both flavors and textures.
-
Fresh Berries: Juicy strawberries and blueberries add a burst of freshness, beautifully complementing the cake’s sweetness. Their vibrant colors also bring a lovely touch of nature to your dessert table!
-
Vanilla Ice Cream: Creamy vanilla ice cream offers a rich contrast to the light, fluffy cake, creating a decadent bite. Imagine the soothing, cold ice cream melting into the pastel layers with every scoop!
-
Whipped Cream: A dollop of extra whipped cream on the side amplifies the airy texture and is perfect for those who enjoy a creamier dessert experience. Pairing it with the cake makes for a delightful spoonful!
-
Lemonade Spritzer: A refreshing lemonade spritzer adds a zesty sparkle to your meal, balancing the sweetness of the cake while refreshing your palate. The perfect drink to sip alongside your festive dessert!
-
Fruit Salad: A colorful array of seasonal fruit offers a light, refreshing counterpart to the cake’s richness. Consider adding mint for an extra layer of flavor that brings spring to your table!
-
Mint Tea: A warm cup of mint tea rounds out your dessert with a comforting note, wrapping up the meal beautifully. The herbal aroma and subtle sweetness are delightful after a sweet treat like cake.
-
Easter Punch: An Easter-themed punch with fruity flavors adds a festive touch and is a delightful option for both kids and adults. It creates a joyful atmosphere around the dining table!
These pairing ideas will surely add a delightful harmony to your festive gathering, making your Easter celebrations even more special!
Easter Poke Cake Recipe FAQs
What type of cake mix should I use for the Easter Poke Cake?
I recommend using a white cake mix as it provides the perfect base for the colorful swirls. However, if you or someone you’re serving has dietary restrictions, feel free to opt for a gluten-free cake mix to ensure everyone can enjoy this festive treat!
How should I store the Easter Poke Cake after making it?
The cake should be stored in an airtight container in the refrigerator to keep it fresh. It stays good for 3 to 4 days, allowing you to enjoy this delicious cake across several gatherings. It’s best served chilled!
Can I freeze the Easter Poke Cake?
Absolutely! To freeze, wrap individual slices tightly in plastic wrap, then layer them in aluminum foil to prevent freezer burn. The cake can be frozen for up to 1 month. When you’re ready to enjoy, simply thaw it in the refrigerator overnight for the best texture.
What if I have leftover pudding mixture?
If you find yourself with leftover pudding mixture, don’t worry! You can store it in an airtight container in the fridge for up to 3 days. Use it to create delightful mini parfaits with fresh fruit and whipped cream, or enjoy it as a snack!
Can I make substitutions for dietary needs?
Very! Swap out the eggs for unsweetened applesauce for a vegan option, and use almond or soy milk instead of regular milk for lactose intolerance. You can also experiment with different pudding flavors, like lemon or pistachio, to suit various tastes while maintaining that moist, flavorful cake texture.
How do I know if my cake is baked properly?
Great question! Perform a toothpick test about 5 minutes before the suggested baking time ends—insert a toothpick into the center of the cake. If it comes out clean or with just a few moist crumbs, your Easter Poke Cake is good to go!

Delightful Easter Poke Cake with Creamy Colors and Flavors
Ingredients
Equipment
Method
- Preheat your oven to 350°F (175°C) and prepare a 9x13-inch baking dish by greasing or lining it with parchment paper.
- In a large mixing bowl, combine the white cake mix, eggs, oil, and water according to the package instructions. Mix on medium speed for about 2 minutes until smooth.
- Divide the batter into 3–4 smaller bowls and add gel food coloring to each, stirring gently to achieve desired pastel shades.
- Spoon the colored batters into the prepared baking dish, alternating colors. Gently swirl with a knife to create a marbled effect. Bake for 28–32 minutes.
- Allow the cake to cool in the pan for 15–20 minutes, then poke holes about an inch apart using a wooden spoon handle.
- In a mixing bowl, whisk together instant vanilla pudding mix and cold milk until thickened. Pour this over the cake, ensuring it seeps into the holes.
- Cover the cake with plastic wrap and refrigerate for at least 2 hours, preferably overnight.
- Spread a layer of Cool Whip over the chilled cake and get creative with your presentation.
- If desired, add Easter-themed sprinkles or fresh fruit on top just before serving.
- Serve the cake cold by slicing it into squares and enjoying the vibrant layers.