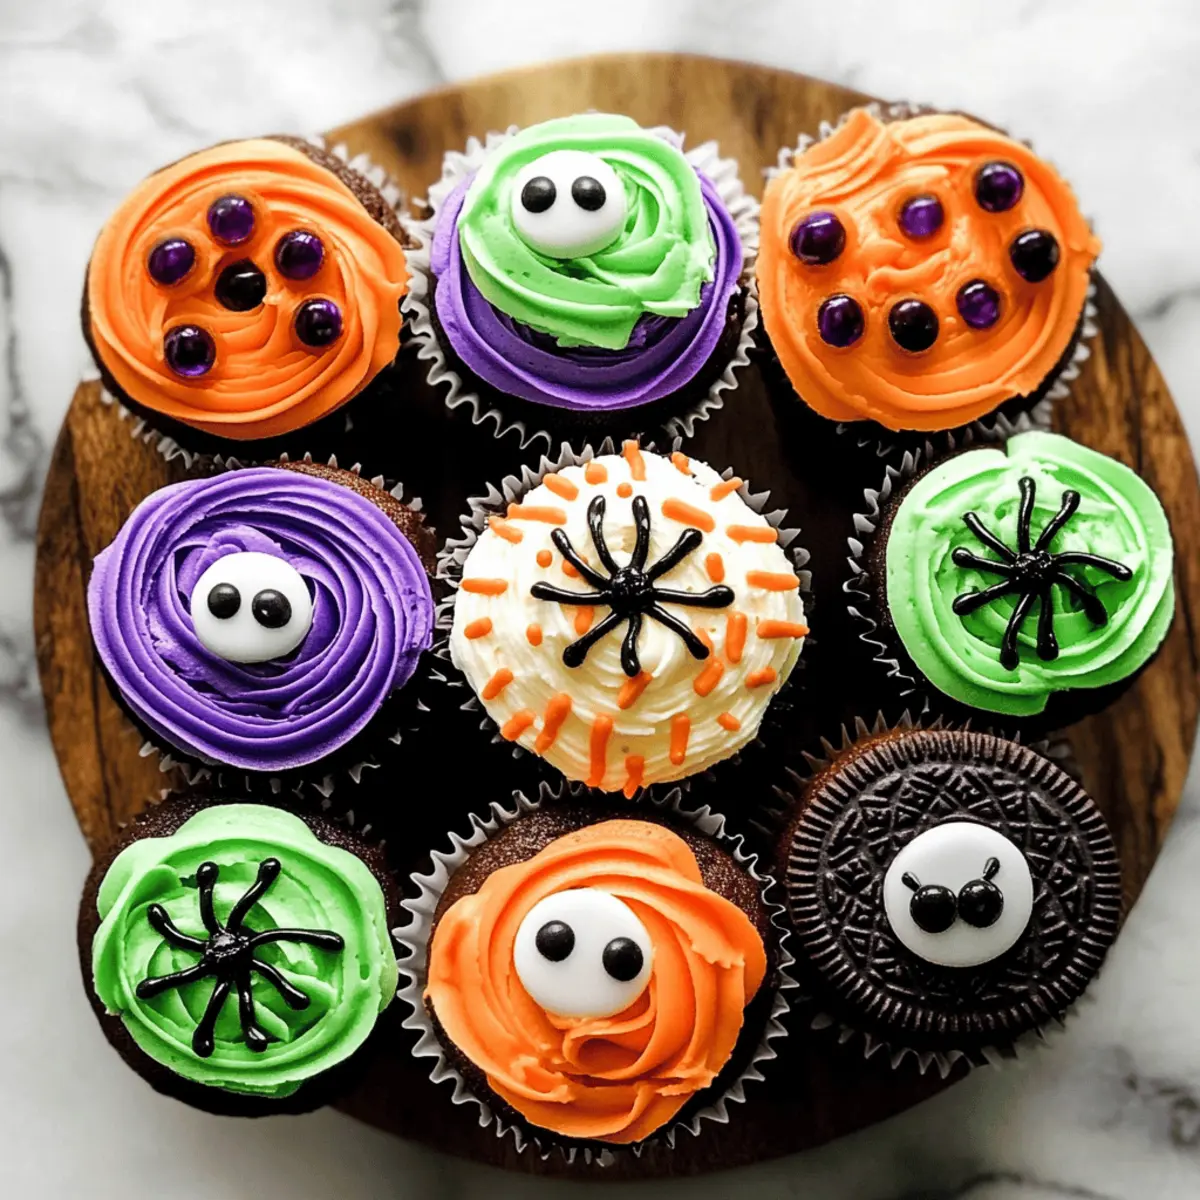
As the sun sets and Halloween draws near, I find myself haunted by a desire for something sweet and whimsical. That’s where these Decorated Halloween Cupcakes come in, transforming a simple baking session into a spooky delight perfect for any festive gathering. With beginner-friendly designs featuring playful monsters, grin-inducing jack-o’-lanterns, and creepy crawly spiders, these cupcakes are not only a visual feast but also a chance to unleash your creativity. To top it off, the buttery vanilla frosting provides a sweet touch that’s simply irresistible, whether you’re celebrating with family or bringing treats to a party. Ready to dive into the fun of decorating? Let’s bring these spooky treats to life!
Why Are These Cupcakes a Halloween Must-Make?
Endless Creativity: Each design allows you to unleash your imagination, whether you’re crafting spooky monsters or cheerful jack-o’-lanterns.
Safe for All Skills: This recipe is perfect for beginners, ensuring everyone can join in the festive fun!
Crowd Pleaser: They’re not just visually appealing; the delightful flavors will have everyone coming back for more.
Time-Saving Treats: You can bake and freeze your cupcakes ahead of time, giving you more freedom to focus on decorating. For some tips on effective decorating techniques, check out more of our baking hacks.
Versatile Flavors: Feel free to swap in your favorites like pumpkin spice or chocolate, making this recipe endlessly customizable!
Decorated Halloween Cupcakes Ingredients
For the Cupcakes
• Cupcake Base – Any flavor works; pumpkin, vanilla, or chocolate are highly recommended.
For the Vanilla Buttercream Frosting
• Unsalted Butter – Room temperature butter creates a creamy, rich base for your frosting.
• Powdered Sugar – Essential for sweetness and stability; sifted helps avoid lumps.
• Vanilla Extract – Adds a delightful flavor, making your frosting irresistible!
• Milk – Use to adjust the consistency; a splash will help if the frosting is too thick.
For the Decorating Supplies
• Gel Food Coloring – Brightens your frosting perfectly for fun, spooky designs; brands like Americolor work wonders.
• Candy Eyeballs – A whimsical touch for monsters and spiders, making them extra fun!
• Mini Oreo Cookies – Ideal for creating spider designs; they’re both cute and tasty!
With these ingredients ready, you’ll be well on your way to crafting delightful Decorated Halloween Cupcakes that bring smiles to every face!
Step‑by‑Step Instructions for Decorated Halloween Cupcakes
Step 1: Prepare Cupcakes
Begin by preheating your oven to 350°F (175°C). Line a muffin tin with cupcake liners, then mix your preferred cupcake batter until well combined. Pour the batter into the liners, filling each about two-thirds full, and bake for 18–20 minutes or until a toothpick inserted into the center comes out clean. Allow the cupcakes to cool in the pan for 5 minutes before transferring them to a wire rack to cool completely.
Step 2: Make Buttercream Frosting
While your cupcakes are cooling, prepare the vanilla buttercream frosting. In a large mixing bowl, beat 1 cup of room-temperature unsalted butter until creamy, then gradually add 4 cups of sifted powdered sugar and 2 tablespoons of milk. Mix until smooth and fluffy, about 3–5 minutes. Once ready, set a small amount aside for later tinting and decorating.
Step 3: Color Frosting
Divide the remaining frosting into separate bowls, depending on how many colors you intend to use for your Decorated Halloween Cupcakes. Using gel food coloring, tint each bowl with your desired hues—orange for jack-o’-lanterns, green for stems, and black for spider webs. Mix well until the colors are vibrant and consistent, adjusting as needed for the specific designs.
Step 4: Decorate Cupcakes
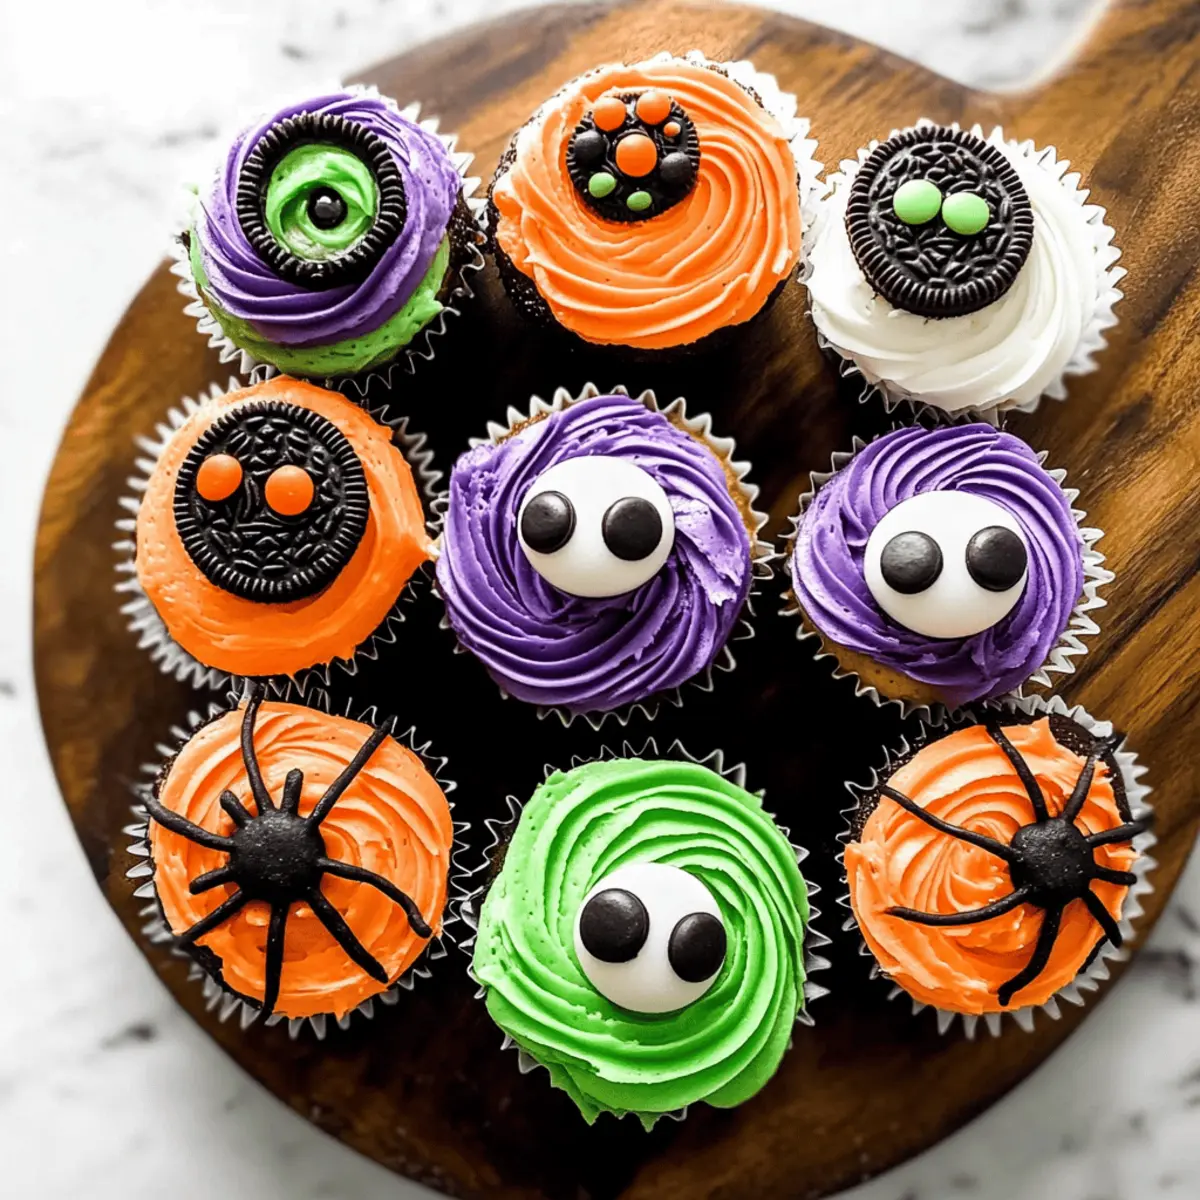
Start decorating your cooled cupcakes with the tinted frosting. For the monster cupcakes, use a piping bag fitted with a star nozzle to create vibrant swirls and add large candy eyeballs for a fun touch. For jack-o’-lanterns, pipe orange frosting around the edges and add green frosting for the stem and small black features to complete their faces.
Step 5: Create Spider Designs
Spread a layer of white frosting evenly on the cupcakes designated for spiders. Use black frosting in a piping bag to create a web pattern on top. To create the spiders, carefully place mini Oreo cookies in the center of the cupcakes, and finish off with candy eyeballs for a spooky touch that brings your Halloween cupcakes to life.
Step 6: Chill if Necessary
If you’re making your Decorated Halloween Cupcakes ahead of time, pop them in the refrigerator for about 30 minutes to ensure the frosting sets. This will help maintain their freshness and stability. Apply any added candy decorations just before serving for optimum visual appeal and taste, ensuring these festive treats stay delightful for your gatherings.
What to Serve with Decorated Halloween Cupcakes?
These delightful cupcakes can be part of a spook-tacular feast that sets the mood for your Halloween gathering.
-
Crispy Apple Slices: Fresh, crunchy apples provide a sweet contrast, adding a delightful touch of natural flavor alongside the sugary treats.
-
Spooky Cheese Platter: A mix of tangy cheeses and crackers shaped like ghosts or pumpkins adds a savory element, balancing the sweetness perfectly.
-
Pumpkin Soup Shooters: Creamy and cozy, a small cup of pumpkin soup adds festive color and warmth, inviting guests to indulge more.
-
Ghoulish Vegetable Crudités: A colorful array of fresh veggies with a ghostly ranch dip encourages a healthy, crunchy side while still keeping with the Halloween theme.
-
Mocktail Mummy Punch: A fruity, fizzy drink garnished with mummy-like fruit skewers brings a fun, refreshing element to your spooky spread.
-
Haunted Hot Chocolate: Rich hot cocoa topped with whipped cream ghosts creates a warm finish to the meal, perfect for chilling autumn nights.
-
Ghostly Cake Pops: These sweet treats bring extra whimsy and fun to the dessert table, ensuring everyone has something delicious and thematic to enjoy.
-
Vampire Blood (Pomegranate Juice): Served in unique glasses, this drink adds an exciting and spooky twist, enhancing the Halloween atmosphere.
Make Ahead Options
These Decorated Halloween Cupcakes are perfect for those busy Halloween preparations! You can bake the cupcakes up to 3 days in advance and store them in an airtight container at room temperature. For the frosting, prepare it ahead of time and refrigerate it for up to 24 hours. Just before you’re ready to serve, re-whip the frosting for optimal texture, then color and decorate the cupcakes. Remember, add candy details just before serving to maintain their vibrancy and appeal. By prepping in advance, you’ll save precious time and ensure these delightful treats are just as delicious and festive when it’s time to enjoy them!
How to Store and Freeze Decorated Halloween Cupcakes
Airtight Container: Keep your decorated Halloween cupcakes in an airtight container at room temperature for up to 3 days to maintain their freshness and vibrant appearance.
Refrigeration: For longer storage, place the cupcakes in the fridge for up to a week. Be sure to keep them covered to prevent drying out.
Freezing: If you want to prepare ahead of time, freeze un-decorated cupcakes for up to 3 months. Allow them to thaw completely before adding frosting and decorations.
Reheating Tip: To enjoy your cupcakes slightly warm, microwave them for 10–15 seconds; just ensure to keep the frosting from melting too much!
Tips for the Best Decorated Halloween Cupcakes
-
Cool Completely: Always ensure the cupcakes are fully cooled before decorating; warm cupcakes can cause the frosting to melt and lose shape.
-
Consistent Frosting: If your buttercream is too thick, add a splash of milk to achieve a smooth, pipeable consistency ideal for your decorated Halloween cupcakes.
-
Gel Food Coloring: Utilize gel food coloring for vibrant hues that enhance your spooky designs without thinning out the frosting.
-
Practice Makes Perfect: If you’re new to piping, practice on parchment paper first. This helps avoid mistakes on your actual cupcakes.
-
Storage Secrets: Keep your decorated cupcakes in an airtight container at room temperature for optimal freshness, especially if you’re preparing them a day or two in advance.
Variations & Substitutions for Decorated Halloween Cupcakes
Feel free to sprinkle some creativity into your baking with these fun twists and swaps!
-
Cupcake Flavors: Experiment with vanilla, pumpkin spice, or rich chocolate for a delightful surprise.
-
Frosting Options: Try cream cheese frosting for a tangy finish; great for a spooky touch, though slightly less stable.
-
Gummy Treats: Switch up decorations by using gummy worms or bats for a chewier candy option that adds a playful flair.
-
Nutty Crunch: Incorporate chopped nuts into the batter for an added crunch, making every bite more exciting.
-
Spice It Up: Add a pinch of cinnamon or nutmeg to the frosting for a warm, fall flavor that enchants the palate.
-
Vegan Twist: Use dairy-free butter and a plant-based milk alternative to enjoy these cupcakes without compromising on taste.
-
Gluten-Free Fun: Substitute regular flour with gluten-free all-purpose flour, ensuring everyone can join in the holiday sweetness!
-
Hot & Spicy: For a daring touch, mix a little cayenne pepper into your frosting for a surprising kick that pairs well with chocolate base cupcakes.
Feel encouraged to mix and match these variations, and if you need more inspiration, don’t forget to explore our collection of baking hacks to take your decorating skills to the next level!
Decorated Halloween Cupcakes Recipe FAQs
What type of cupcakes can I use for decorating?
You can use any flavor for your decorated Halloween cupcakes! Popular choices include pumpkin, vanilla, or chocolate. Each flavor adds a delightful touch that complements the whimsical decorations.
How should I store my decorated cupcakes?
Keep your decorated Halloween cupcakes in an airtight container at room temperature for up to 3 days to maintain their freshness. If you plan on enjoying them later, refrigerate them for up to a week, always making sure they’re covered well to prevent drying out.
Can I freeze decorated cupcakes?
Absolutely! You can freeze un-decorated cupcakes for up to 3 months. Simply let them cool completely, then wrap tightly in plastic wrap or place them in an airtight container. When you’re ready to enjoy them, thaw the cupcakes at room temperature and decorate them fresh for the best taste and appearance.
What if my buttercream frosting is too thick?
If your buttercream frosting is too thick and difficult to pipe, don’t worry! Simply add a splash of milk, about 1 teaspoon at a time, until you reach your desired consistency. Beat it well after each addition until the frosting becomes smooth and easily pipeable!
Are there any dietary considerations for these cupcakes?
Since this recipe doesn’t contain any common allergens in its base ingredients, you can consider it safe for most people. However, if you’re catering to someone with allergies, check the labels on your gel food coloring and any candy used for potential allergens. Always good to be mindful of everyone enjoying your treats!
How can I ensure my cupcakes are visually appealing?
The key to visually stunning decorated Halloween cupcakes lies in the details! Always ensure your cupcakes are fully cooled before decorating to prevent melting frosting. Use gel food coloring for vibrant hues, and practice piping techniques on parchment paper first if you’re new to it. Don’t hesitate to let your creativity shine with fun designs!

Festive Decorated Halloween Cupcakes That Wow Every Kid
Ingredients
Equipment
Method
- Preheat your oven to 350°F (175°C). Line a muffin tin with cupcake liners. Mix your preferred cupcake batter until well combined. Pour into liners, filling each two-thirds full, and bake for 18–20 minutes or until a toothpick comes out clean. Allow to cool for 5 minutes before transferring to a wire rack.
- In a mixing bowl, beat the unsalted butter until creamy. Gradually add sifted powdered sugar and milk, mixing until smooth and fluffy for about 3–5 minutes. Set aside some frosting for tinting.
- Divide the remaining frosting into bowls according to the number of colors. Tint with gel food coloring for your desired design.
- Decorate cooled cupcakes using piped frosting for monsters and jack-o'-lanterns.
- Spread white frosting on spider-design cupcakes, pipe black frosting for web patterns, and place mini Oreo cookies and candy eyeballs to finish.
- If preparing ahead, refrigerate for 30 minutes to set the frosting.