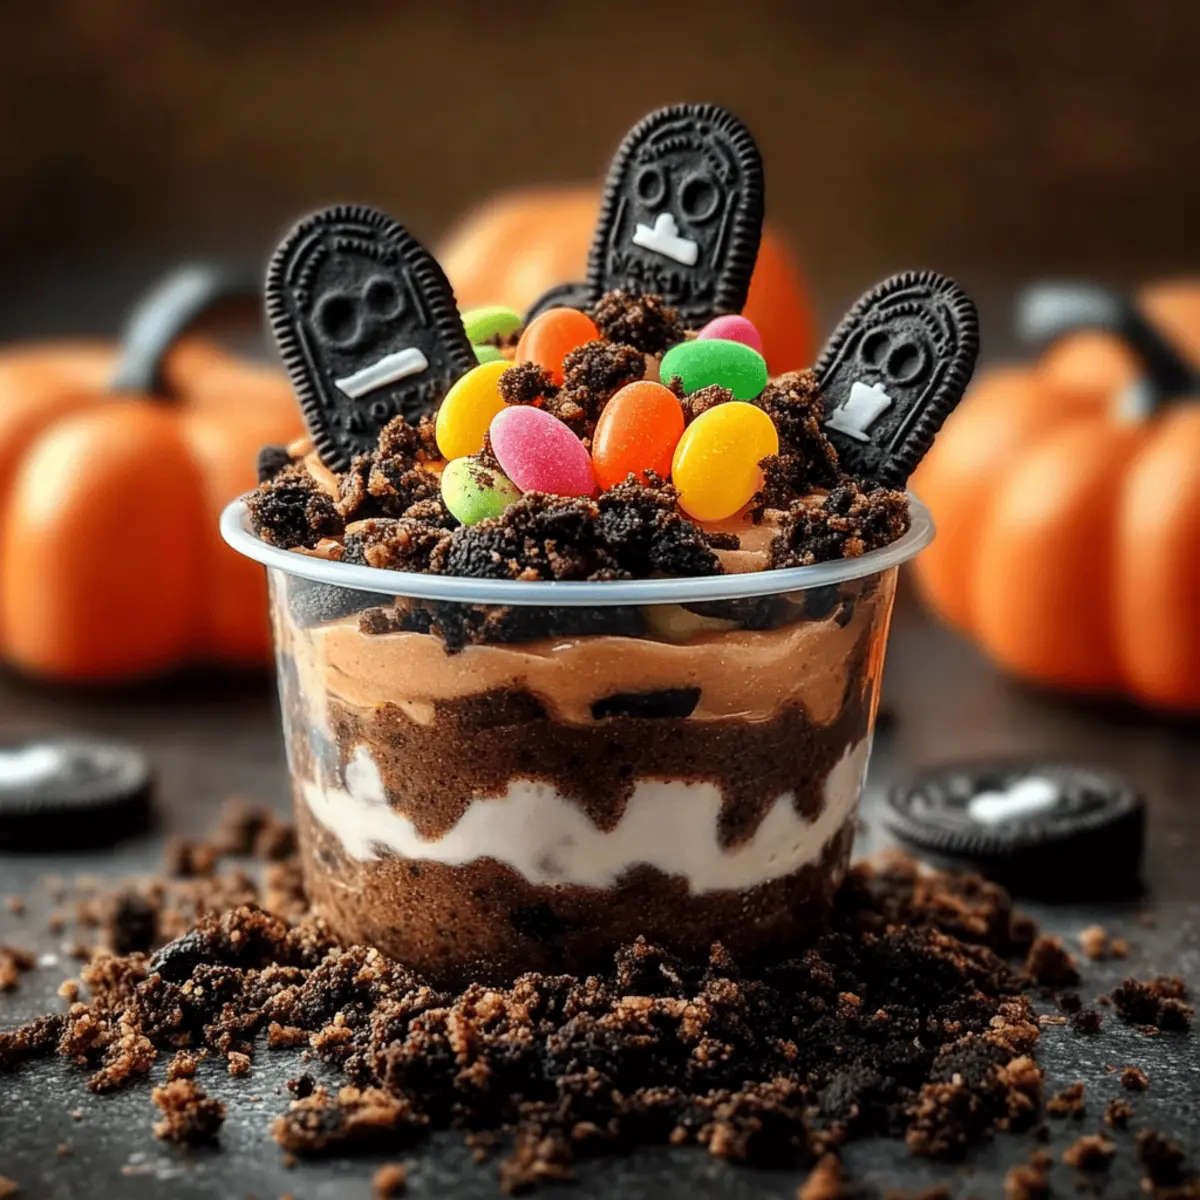
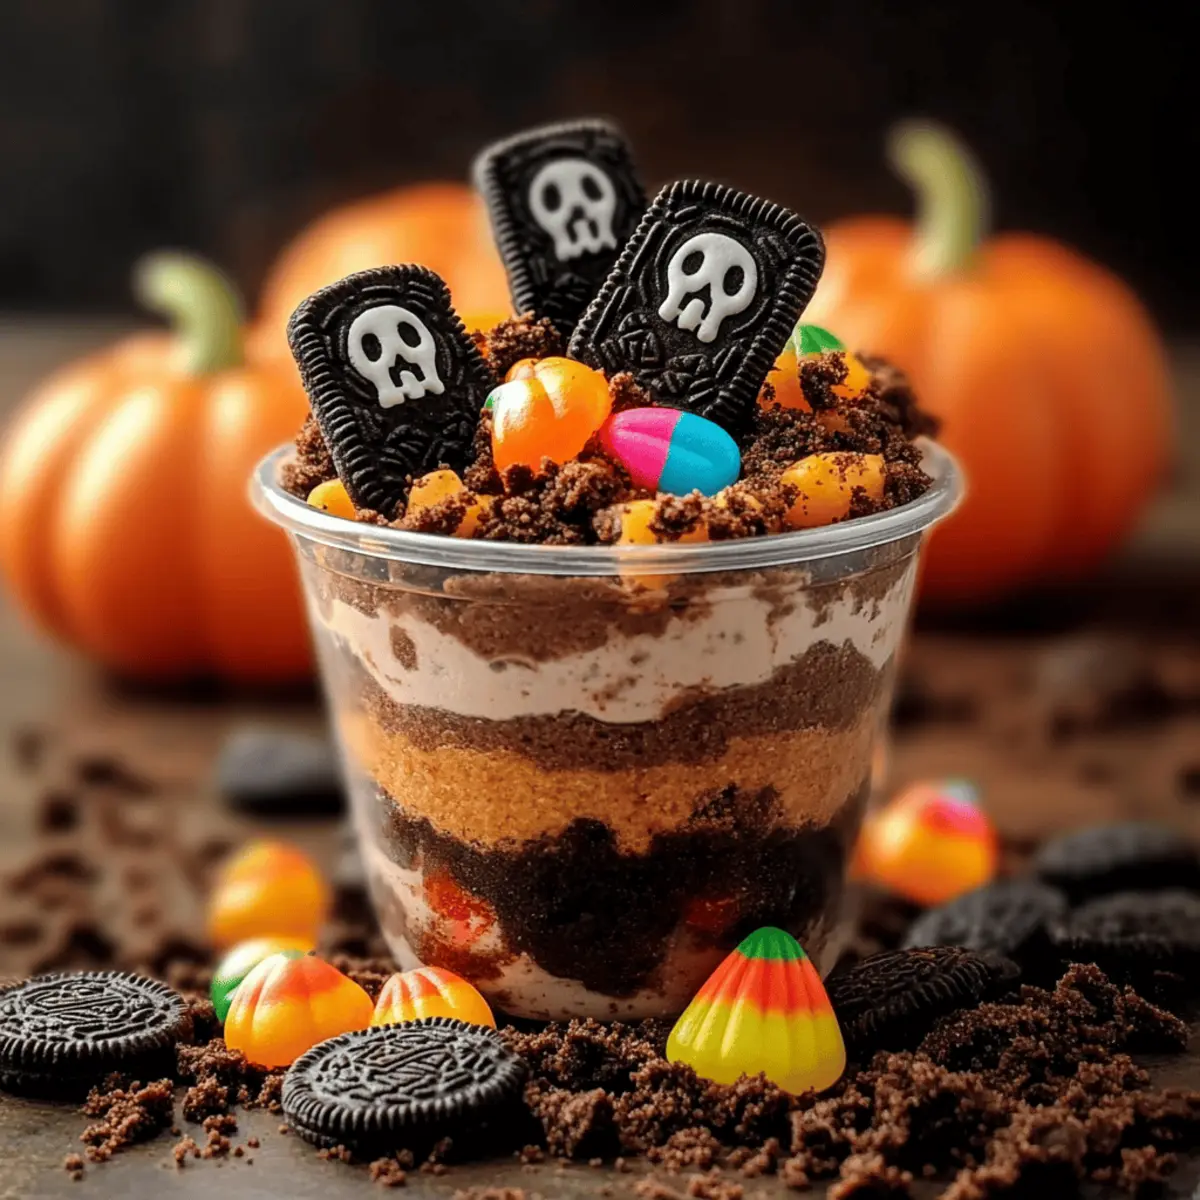
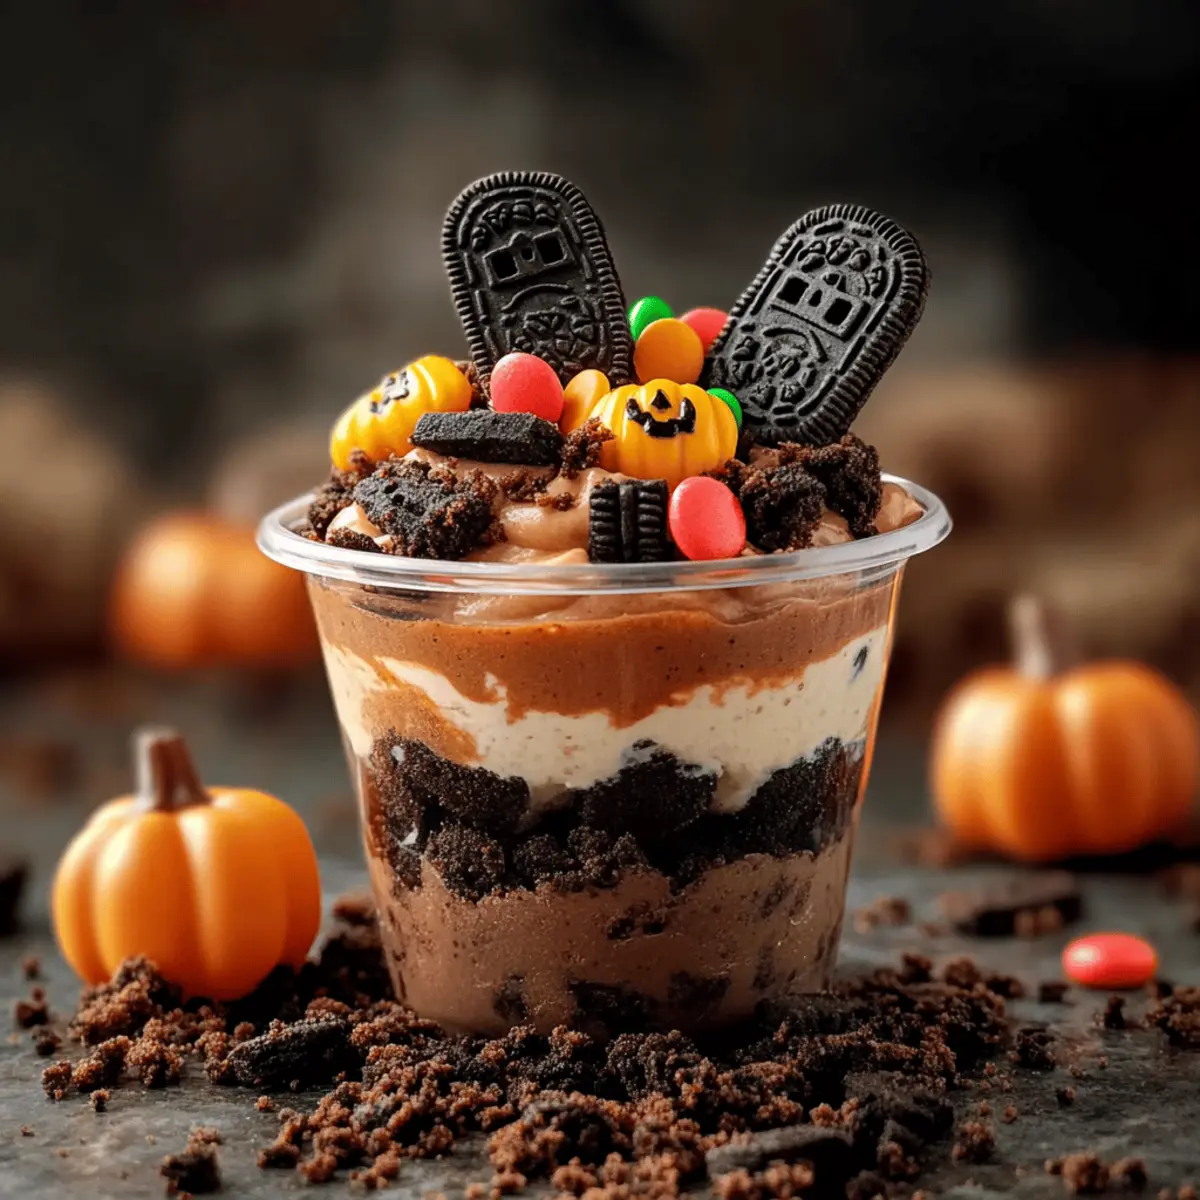
“Mom, can we make something spooky for Halloween?” My son’s beaming face filled with excitement sparked a flurry of ideas in my mind. That’s when we decided to whip up some Graveyard Pudding Cookie Cups—easy-to-make, deliciously creamy treats perfect for a festive family gathering. In just 25 minutes, you can turn simple ingredients into a whimsical dessert that not only delights the taste buds but is also a visually fun centerpiece for any Halloween celebration. With layered crushed Oreos resembling dirt and playful decorations like gummy worms and cookie tombstones, these treat cups bring a touch of spooky charm that kids (and adults!) will adore. Ready to create your own little graveyard masterpiece? Let’s dive into this frightfully fun recipe!
Why Are Graveyard Pudding Cookie Cups So Fun?
Easy-to-Make: With only basic ingredients and minimal prep time, these spooky treats are simple enough for kids to help with.
Visually Appealing: The layered design, topped with eerie decorations, turns dessert into a fun activity for Halloween parties.
Flavorful Layers: Creamy chocolate pudding mingled with crunchy Oreo “dirt” delights every palate.
Kid-Friendly Fun: Decorate with candy pumpkins and googly eyes that not only taste good but also spark imagination!
Make Ahead: Prep these in advance, ensuring you have more time to enjoy the festivities. For other delightful desserts, check out Soft Chewy Chocolate Chip Cookies and Chocolate Protein Pudding.
Graveyard Pudding Cookie Cups Ingredients
For the Pudding Layer
• Chocolate Instant Pudding Mix – Provides the rich chocolate flavor that makes these Graveyard Pudding Cookie Cups a hit.
• Milk – Helps to hydrate the pudding mix; try almond milk for a unique twist!
• Cool Whip – Adds a light, fluffy texture to the pudding; substitute with fresh whipped cream if you prefer.
For the “Dirt” Layer
• Oreo Cookies (crushed) – Creates a crumbly texture that resembles dirt; gluten-free Oreos can be used if needed.
For Decoration
• Milano Double Chocolate Cookies – These make spooky tombstones; personalize with “RIP” using black frosting or edible markers.
• Black Frosting or Edible Marker – Used for decorating the Milano cookies to add a fun touch.
• Candy Pumpkins – A colorful addition that brings festive flair to the dessert.
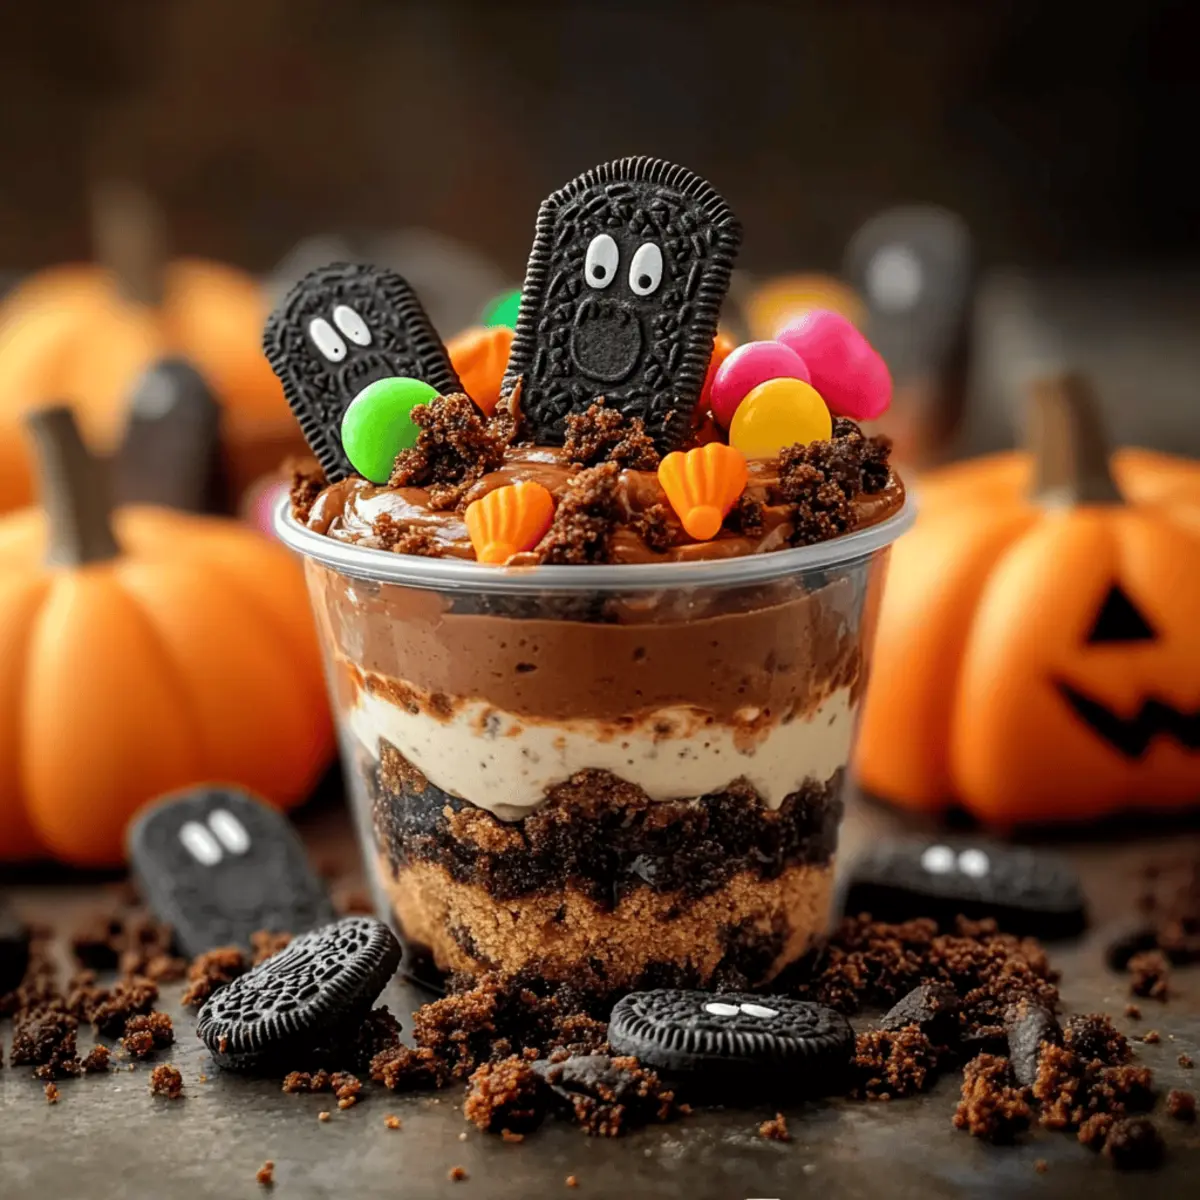
• Googly Eyes (edible) – Offer a whimsical and fun look to your pudding cups.
• Gummy Worms (optional) – Add an extra spooky touch that kids will love!
Get ready to dive into a recipe that’s sure to bring smiles and a spooky atmosphere to your Halloween celebrations!
Step‑by‑Step Instructions for Graveyard Pudding Cookie Cups
Step 1: Prepare the Tombstones
Begin by decorating the Milano Double Chocolate Cookies to create spooky tombstones. Use black frosting or an edible marker to write “RIP” on each cookie. Set them aside to allow the frosting to set while you move on to the pudding layers.
Step 2: Make the Pudding Mix
In a large mixing bowl, whisk together the chocolate instant pudding mix and 2 cups of cold milk for about 2 minutes until it thickens. The mixture should have a smooth consistency and firm texture. Once thickened, gently fold in 1 cup of Cool Whip until fluffy, creating a light and creamy pudding for your Graveyard Pudding Cookie Cups.
Step 3: Crush the Oreos
Using a food processor or a zip-lock bag and a rolling pin, crush the Oreo cookies into fine crumbs. You’re aiming for a texture resembling dirt, so make sure there are no large pieces remaining. This crushed Oreo layer will provide a delicious “dirt” finish to your spooky dessert.
Step 4: Assemble the Cups
Grab clear drinking cups to showcase the layers of your Graveyard Pudding Cookie Cups. Start by adding a layer of crushed Oreos to the bottom. Next, press some googly eyes against the sides of the cups for a fun surprise, then spoon in a layer of the creamy pudding you prepared. Repeat the layers until the cups are nearly full, finishing with an Oreo layer on top.
Step 5: Add the Decorations
Once you’ve added the final layer of crushed Oreos, it’s time to complete your spooky scene! Insert the decorated Milano cookies into the pudding to stand up as tombstones. Scatter the candy pumpkins on top for an extra pop of color, and if you like, add gummy worms for an added spooky effect.
Step 6: Chill Before Serving
Place the assembled Graveyard Pudding Cookie Cups into the refrigerator for at least 30 minutes. This chilling time allows the pudding to set and the flavors to meld beautifully, ensuring a delightful treat when you’re ready to serve. When chilling is complete, they’ll be ready to amaze your guests!
What to Serve with Graveyard Pudding Cookie Cups
When the eerie excitement of Halloween fills the air, create a delightful spread that complements these charming dessert cups.
-
Witches’ Brew Punch: This fun, bubbling drink with green sherbet and lemon-lime soda adds a playful touch, quenching thirst while keeping the spooky spirit alive.
-
Monster Mini Pizzas: Made with bagel halves topped with colorful veggies and cheese, these savory bites provide a delightful contrast to the sweetness of the pudding cups.
-
Spooky Veggie Platter: Arrange a variety of colorful vegetables in fun shapes with a ghostly dip made of ranch dressing that adds crunch and balances the sweetness of the pudding cups.
-
Chocolate-Covered Pretzels: The salty crunch of pretzels dipped in chocolate enhances the sweet flavors and adds an unexpected twist to your candy spread.
-
Candy Corn Cupcakes: Light, fluffy cupcakes topped with vibrant frosting and candy corn offer a festive Halloween theme and pair wonderfully with the graveyard cups.
-
Freaky Fruit Salad: A mix of grapes, oranges, and apples, dressed with a fun twist of lime, adds freshness and helps cleanse the palate after enjoying the rich dessert.
-
Ghostly Ice Cream Cones: Scoop marshmallow-flavored ice cream into cones topped with ghostly whipped cream, creating a fun, playful dessert that children will love.
Remember, a festive table filled with these delicious accompaniments will make your Halloween gathering an unforgettable treat for everyone!
Expert Tips for Graveyard Pudding Cookie Cups
-
Blend Gently: When folding in the Cool Whip, do so gently to maintain airiness. This ensures your pudding layer stays light and fluffy.
-
Clear Cups: Using clear cups not only showcases the fun layers but also adds a visual appeal that enhances the overall excitement of the Graveyard Pudding Cookie Cups.
-
Prep Ahead: For a stress-free experience, prepare the pudding cups a day in advance and add the tombstone decorations just before serving to keep them fresh and appealing.
-
Spooky Extras: Feel free to add edible eyes or other fun decorations to make your cups even more lively. This allows kids to express their creativity while assembling.
-
Storage Advice: These delightful treats can be kept in the fridge for up to 24 hours, but they’re best enjoyed fresh to maintain texture.
Make Ahead Options
Graveyard Pudding Cookie Cups are perfect for meal prep, saving you valuable time on the day of your spooky celebration. You can prepare the pudding layer and crush the Oreos up to 24 hours in advance; simply store them separately in the refrigerator to maintain freshness. When you’re ready to serve, assemble the cups by layering the Oreo crumbs, pudding, and decorations, which ensures that they look and taste just as delightful. To prevent the Oreos from becoming soggy, wait until you’re ready to serve before adding them as the top layer and inserting the Milano cookie tombstones. With these make-ahead tips, you’ll have a fun and festive treat with minimal last-minute effort!
Graveyard Pudding Cookie Cups Variations
Feel free to let your creativity shine as you customize these spooky treats with these fun twists!
- Dairy-Free: Use almond milk and dairy-free whipped topping instead of traditional ingredients to create a delightful alternative for lactose-intolerant friends.
- Flavored Pudding: Swap in vanilla or butterscotch pudding for a unique taste twist that’s still both creamy and delicious.
- Gluten-Free: Opt for gluten-free Oreo cookies and Milano cookies, ensuring everyone can enjoy this Halloween treat without worry.
- Add Spice: Mix in a sprinkle of cinnamon or pumpkin spice to the pudding for a warm, cozy flavor that brings a touch of autumn to your dessert.
- Mini Versions: Use small glass cups for cute bite-sized treats that are perfect for parties; the kids will love them!
- Candy Bones: Incorporate candy bones around the edges of the pudding for an extra spooky touch that fits the Halloween theme wonderfully.
- Fruit Layer: Add a layer of mashed bananas or pureed pumpkin to the pudding for a fruity twist that balances the sweetness.
- Chocolate Drizzle: Drizzle melted chocolate on top before serving for a decadent finishing touch that elevates the dessert experience.
Your Graveyard Pudding Cookie Cups can be as unique as your Halloween spirit! For more fun dessert ideas, don’t forget to check out Soft Chewy Chocolate Chip Cookies and Chocolate Protein Pudding. Enjoy creating your spooky masterpieces!
How to Store and Freeze Graveyard Pudding Cookie Cups
Fridge: Keep your Graveyard Pudding Cookie Cups in an airtight container in the fridge for up to 24 hours for the best texture and flavor.
Make Ahead: Prepare the pudding cups in advance, but add decorations right before serving to maintain visual appeal and freshness.
Freezer: While not typically recommended due to the creamy texture, you can freeze assembled cups for up to 1 month. Just be aware that thawing may alter the layers.
Reheating: These desserts are best served chilled and do not require reheating, allowing the flavors to shine through in every spooky bite!
Graveyard Pudding Cookie Cups Recipe FAQs
How do I choose ripe ingredients for my Graveyard Pudding Cookie Cups?
Absolutely! For the best flavor, use fresh milk and ensure your Cool Whip is well within its expiration date. If you’re using canned or boxed ingredients, always check for any signs of spoilage before using.
What’s the best way to store leftover Graveyard Pudding Cookie Cups?
You can keep your Graveyard Pudding Cookie Cups in an airtight container in the fridge for up to 24 hours. This way, the cookies stay crisp while the pudding maintains its creamy texture. Just remember to add decorations like the Milano tombstones right before serving to keep them looking fresh!
Can I freeze my Graveyard Pudding Cookie Cups?
While it’s not ideal, you can freeze the assembled cups for up to 1 month. To do this, wrap each cup tightly in plastic wrap and then place them in a freezer-safe container. When you’re ready to enjoy, let them thaw in the fridge overnight. Keep in mind that thawing may affect the texture of the pudding layer, but the flavors should still be delightful!
What if my pudding doesn’t thicken properly?
Very! If your pudding mix isn’t thickening after whisking, try letting it sit for a few minutes after mixing; sometimes, it just needs a little patience. If it’s still runny after a few minutes, you can whisk in a bit more pudding mix, letting it thicken further. Make sure to keep whisking until you achieve a smooth consistency.
Are there any dietary considerations I should be aware of?
Yes! Always check that the cookies and candies you use are nut-free if allergies are a concern. You can use gluten-free Oreos or dairy-free milk to make these treats suitable for different diets. It’s always best to inform your guests about potential allergens to ensure everyone can enjoy these spooky fun treats!
Graveyard Pudding Cookie Cups: Spooky Fun for Halloween
Ingredients
Equipment
Method
- Begin by decorating the Milano Double Chocolate Cookies to create spooky tombstones. Use black frosting or an edible marker to write 'RIP' on each cookie. Set them aside to allow the frosting to set while you move on to the pudding layers.
- In a large mixing bowl, whisk together the chocolate instant pudding mix and 2 cups of cold milk for about 2 minutes until it thickens. Gently fold in 1 cup of Cool Whip until fluffy, creating a light and creamy pudding.
- Using a food processor or a zip-lock bag and a rolling pin, crush the Oreo cookies into fine crumbs. Ensure there are no large pieces remaining.
- Grab clear drinking cups to showcase the layers. Start with a layer of crushed Oreos, press some googly eyes against the sides, then spoon in a layer of the creamy pudding. Repeat until the cups are nearly full, finishing with an Oreo layer on top.
- Insert the decorated Milano cookies into the pudding to stand up as tombstones. Scatter the candy pumpkins on top for color, and add gummy worms if desired.
- Place the assembled cups into the refrigerator for at least 30 minutes to allow the pudding to set and flavors to meld.