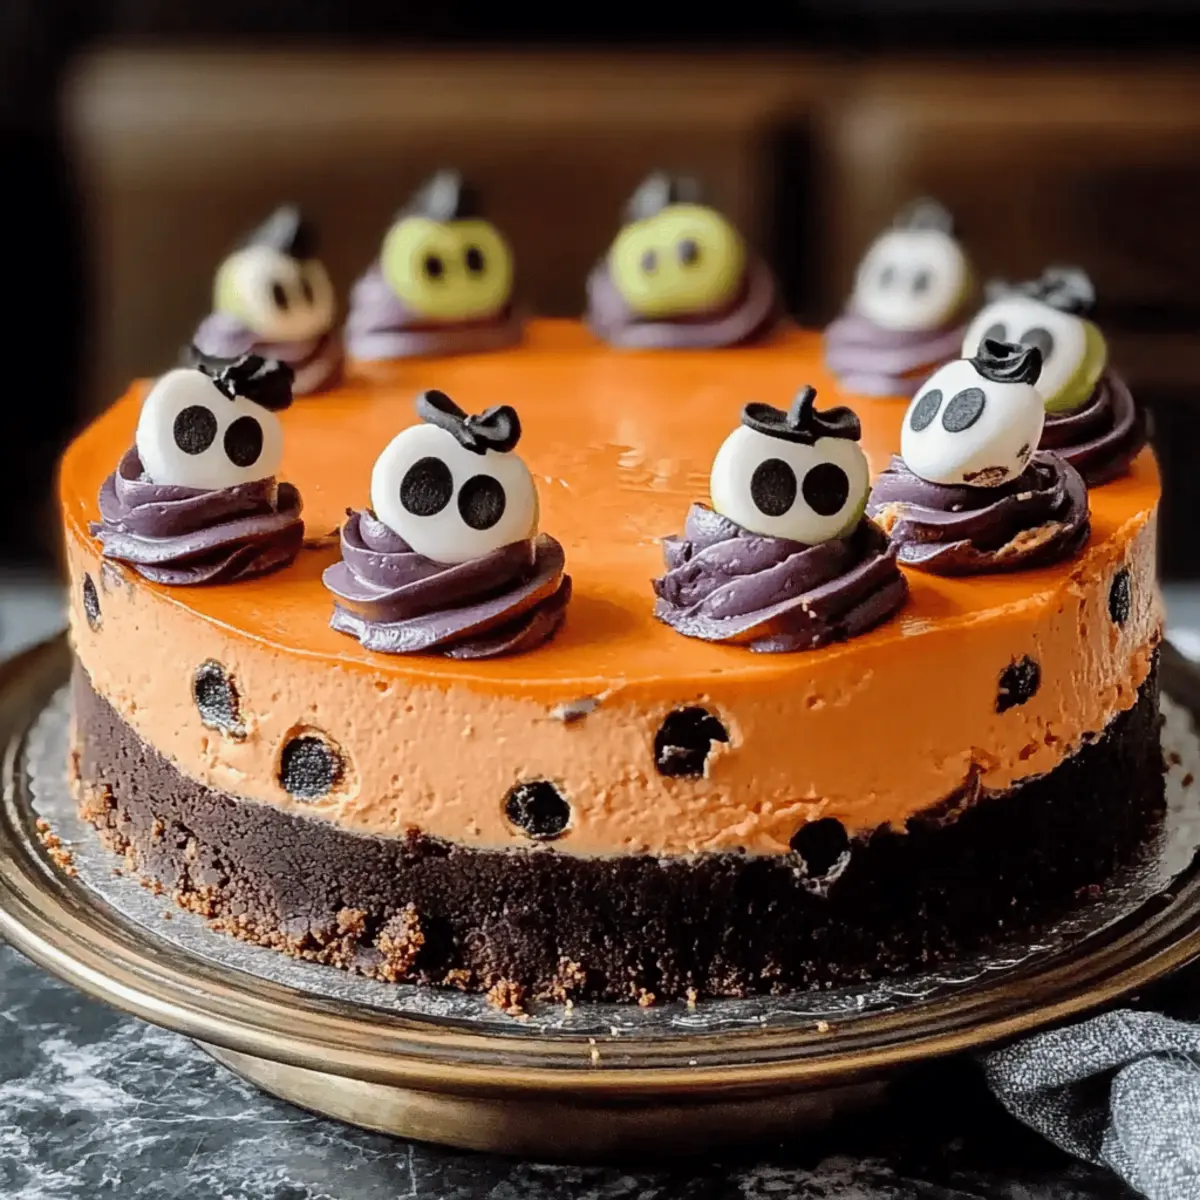
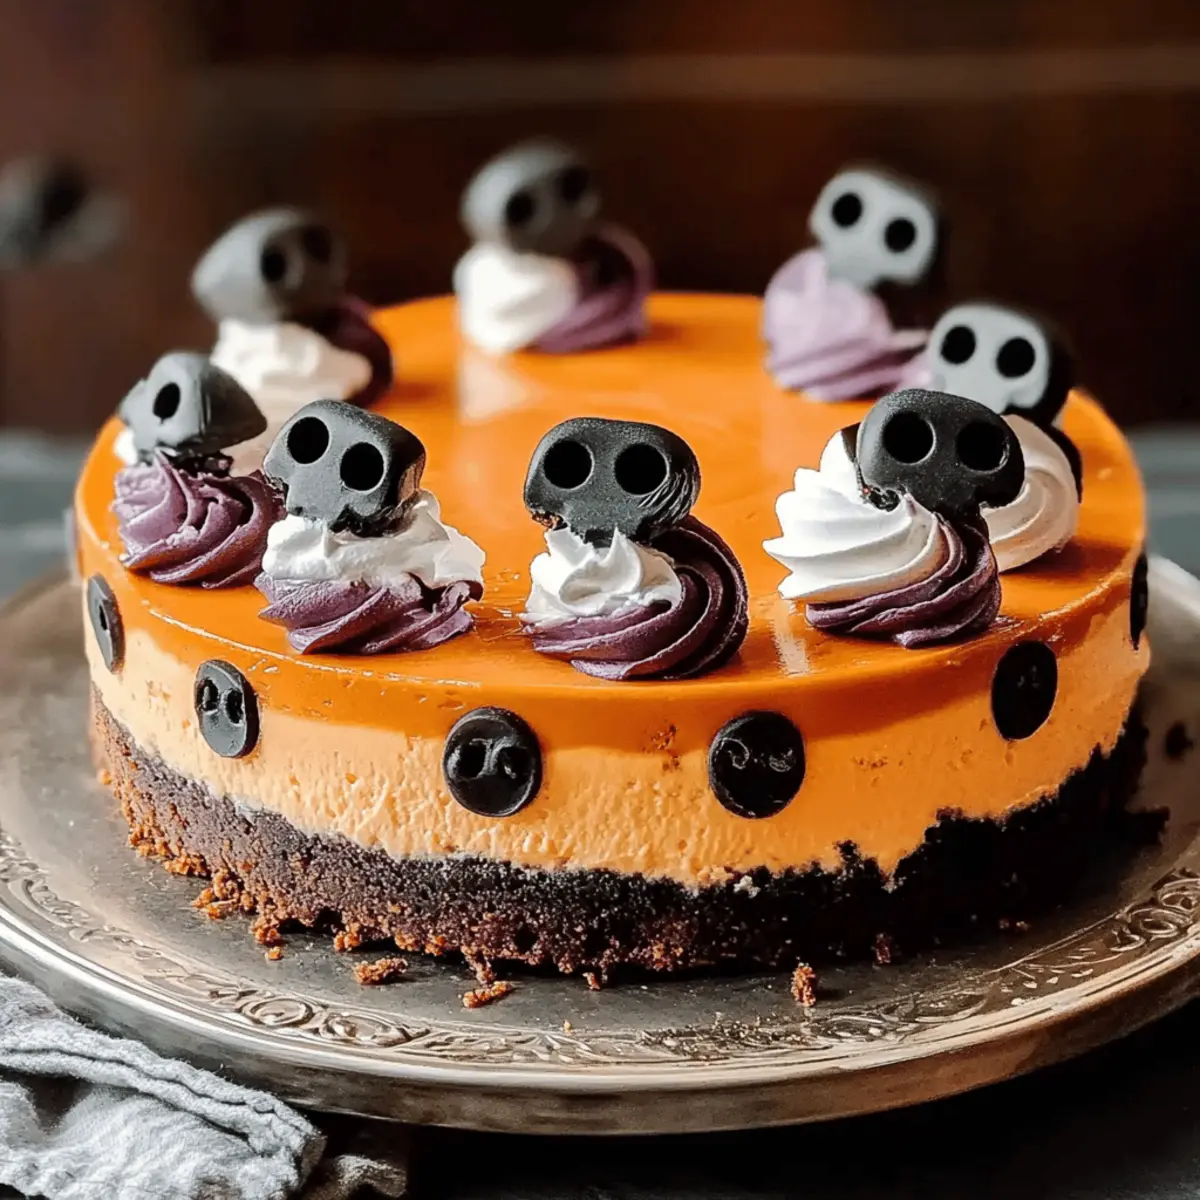
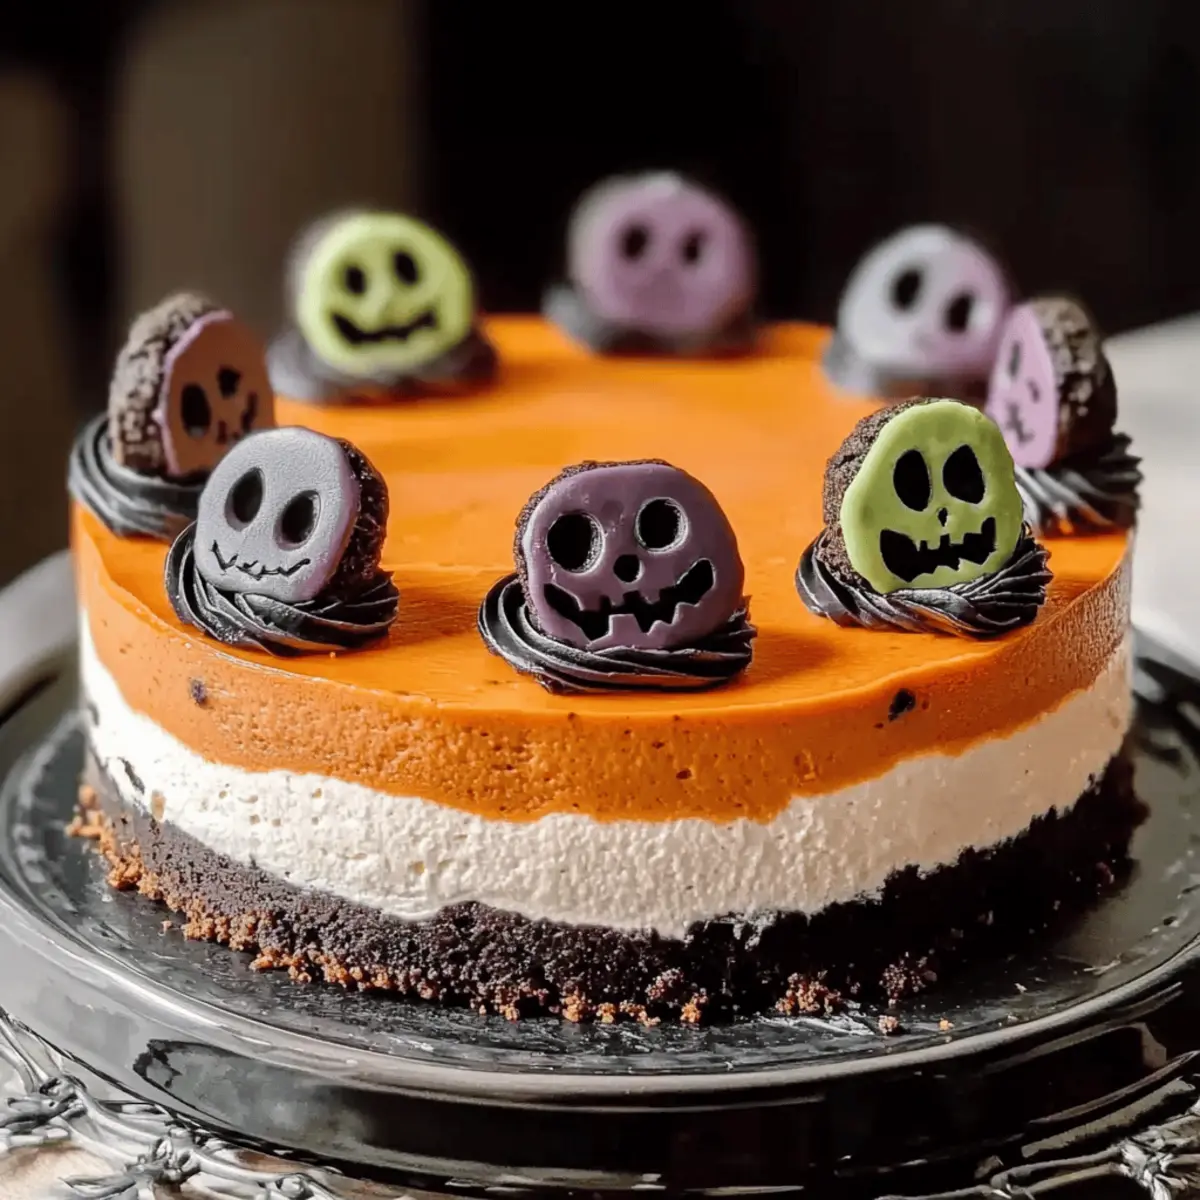
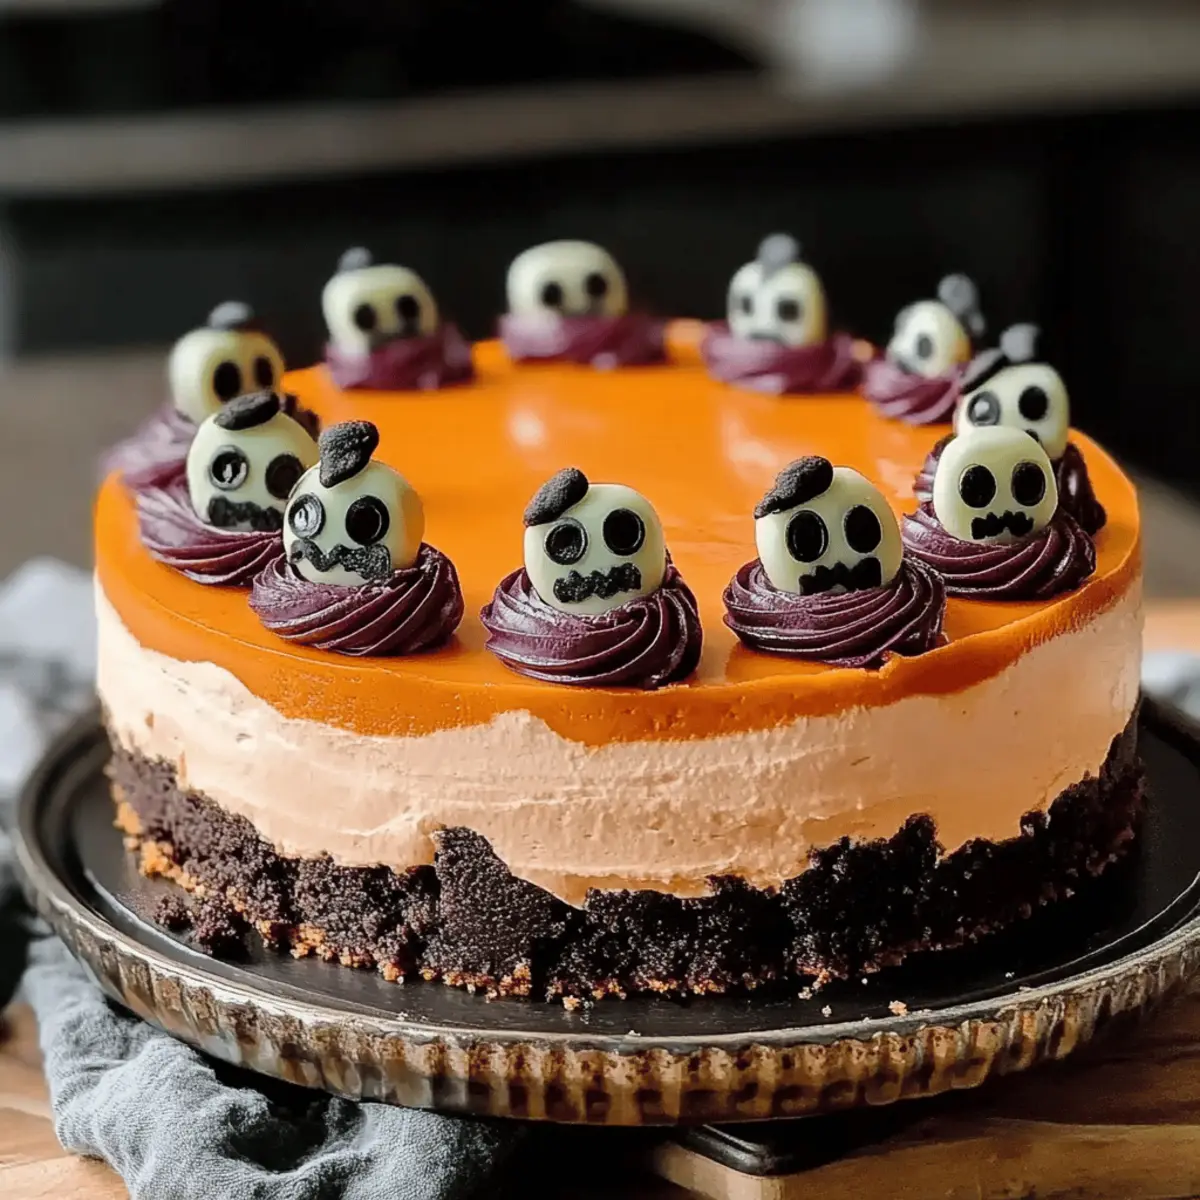
The air is tinged with a hint of autumn, and I can already hear the giggles of kids dressed as ghosts and goblins. Halloween isn’t just about costumes and spooky decorations—it’s also the perfect opportunity to whip up an unforgettable Halloween Cheesecake. This creamy, colorful dessert features vibrant swirls of orange, purple, green, and black, delightfully contrasted by a crunchy chocolate cookie crust. Not only does it make a stunning centerpiece for your Halloween gathering, but its easy prep means you can spend more time enjoying the festivities and less time in the kitchen. Whether you’re hosting a party or simply want to treat your family, this cheesecake promises to be a crowd-pleaser. Ready to become the star of your Halloween feast? Let’s dive into this enchanting recipe!
Why is this Halloween Cheesecake irresistible?
Unforgettable Presentation: Be prepared for oohs and aahs! This cheesecake is a feast for the eyes, showcasing vibrant colors that capture the spirit of Halloween.
Simple and Fun: Baking this treat is a joyous experience, and you don’t need to be a pastry chef to impress.
Creamy Indulgence: Each bite offers a dreamy, silky texture, balanced with a crunchy chocolate crust, making it utterly satisfying.
Versatile Delight: Customize it for different occasions—swap colors or add unique flavors for a twist!
Ideal for Gatherings: This spooky dessert is perfect for parties, classroom celebrations, or family dinners, ensuring there are smiles all around.
Make-Ahead Magic: Prepping it ahead of time gives you peace of mind during busy festivities, and it tastes even better after an overnight chill!
Halloween Cheesecake Ingredients
For the Crust
- Chocolate Sandwich Cookies – Crushed cookies provide a delightful, crunchy base. Regular Oreo cookies can be a tasty substitution.
- Unsalted Butter – Melted butter binds the crust ingredients together for perfect consistency.
For the Filling
- Cream Cheese – Softened cream cheese creates a rich, creamy base; ensure it’s at room temperature for easy mixing.
- Granulated Sugar – Sweetens the filling, balancing flavors; consider using a sugar substitute for fewer calories.
- Large Eggs – Essential for stability and structure; room temperature eggs help achieve a smooth batter.
- Vanilla Extract – Adds a delightful depth of flavor; feel free to swap for vanilla bean paste or almond extract.
- Sour Cream – Provides moisture and a slight tang; full-fat Greek yogurt is a great alternative.
- All-Purpose Flour – Helps firm up the cheesecake; can be replaced with gluten-free flour for a gluten-free option.
For the Vibrant Swirls
- Gel Food Coloring – Essential for those iconic Halloween colors; choose black, orange, purple, and green for a stunning look. Make sure to use gel for vibrant results without affecting the batter.
For the Toppings (Optional)
- Halloween Sprinkles – Add a festive touch that’s both fun and colorful.
- Candy Eyeballs – Perfect for creating a spooky vibe on your dessert!
- Chocolate Ganache – Drizzle on top for an extra layer of richness; it complements the cheesecake beautifully.
Enjoy making this Halloween Cheesecake that will not only taste fantastic but also make a striking impression at your Halloween gathering!
Step‑by‑Step Instructions for Halloween Cheesecake
Step 1: Preheat the Oven
Begin by preheating your oven to 325°F (160°C). While it warms up, prepare a 9-inch springform pan by greasing it lightly and lining the bottom with parchment paper. This ensures easy removal of your creamy Halloween Cheesecake after baking.
Step 2: Make the Crust
In a mixing bowl, crush the chocolate sandwich cookies into fine crumbs. Combine the crumbs with melted unsalted butter until fully blended. Press this mixture firmly into the bottom of the prepared pan, creating an even layer. Bake for 8-10 minutes, until set, then allow it to cool completely.
Step 3: Prepare the Filling
In a large mixing bowl, beat the softened cream cheese with granulated sugar until smooth and creamy, taking about 2 minutes. Next, add in the room temperature eggs one at a time, mixing each addition until just incorporated. Blend in the vanilla extract, sour cream, and flour, ensuring no lumps remain in your batter for a silky texture.
Step 4: Color the Batter
Divide the cheesecake filling into four separate bowls. Using gel food coloring, tint each portion with vibrant Halloween colors: orange, purple, green, and black. Stir gently to achieve uniform colors while keeping the colors distinct for those gorgeous swirls in your Halloween Cheesecake.
Step 5: Layer the Colors
Spoon dollops of the colored batters onto the cooled crust, alternating the colors for a festive look. Once all the colors are added, take a knife or skewer and gently swirl them together for a marbled effect, being careful not to blend them too much to preserve the vibrant hues.
Step 6: Bake the Cheesecake
Place the cheesecake in the preheated oven and bake for 40-45 minutes. You’ll know it’s done when the edges are set while the center still jiggles slightly. This slight jiggle will ensure a creamy texture once cooled.
Step 7: Cool and Chill
After baking, turn off the oven and let the Halloween Cheesecake cool inside for about 1 hour. This gradual cooling helps prevent cracks. Afterward, transfer it to a wire rack to cool further before placing it in the refrigerator to chill for at least 4 hours, or overnight for optimal flavor.
Step 8: Decorate and Serve
Once chilled, it’s time to get creative! Decorate your cheesecake with festive Halloween sprinkles, candy eyeballs, or a drizzle of rich chocolate ganache. Slice and serve your stunning Halloween Cheesecake chilled, impressing your guests with its vibrant appearance and decadent taste.
Halloween Cheesecake Variations & Substitutions
Feel free to adjust this Halloween Cheesecake to suit your tastes or dietary needs—let your creativity shine!
-
Graham Cracker Crust: Substitute chocolate cookies with crushed graham crackers for a lighter flavor; it’s a classic twist!
-
Seasonal Flavor: Add pumpkin spice or cinnamon to the filling for a warm, autumnal depth, enhancing that cozy Halloween vibe each bite.
-
Mini Cheesecakes: Pour the batter into muffin tins for bite-sized delights that are perfect for trick-or-treaters or party favors. These will be an enchanting addition to any dessert spread.
-
Dairy-Free Option: Swap cream cheese with a non-dairy cream cheese alternative, and use coconut butter instead of unsalted butter for an equally creamy result.
-
Color Customization: Use blue and pink for a vibrant spring-themed cheesecake or other colors; just let your imagination lead the way—who says it needs to be Halloween to enjoy such beauty?
-
Gluten-Free: Replace all-purpose flour with a gluten-free blend to ensure that everyone can enjoy a slice of this creamy goodness without worry.
-
Heat Factor: For a kick, add a pinch of chili powder or cayenne pepper to the filling; it creates an unexpected and delightful contrast to the sweetness.
-
Flavored Extracts: Swap vanilla for almond extract or lemon zest; it adds a unique twist that pairs beautifully with the creaminess of the cheesecake. Take your taste buds on a new adventure!
For more seasonal inspiration, feel free to check out our delicious pumpkin cheesecake or explore the delightful nuances of flavored extracts that can transform your baking!
Storage Tips for Halloween Cheesecake
Fridge: Store your Halloween Cheesecake in the refrigerator, covered, for up to 5 days to maintain its freshness and creamy texture.
Freezer: Wrap the cheesecake tightly in plastic wrap and aluminum foil, then freeze for up to 2 months. Thaw it overnight in the refrigerator before serving.
Reheating: If you prefer it slightly warmer, allow it to sit at room temperature for about 30 minutes before slicing, enhancing the flavors of your rich Halloween Cheesecake.
Make-Ahead: Prepare the cheesecake up to 2 days in advance. Just wait to apply any decorations until shortly before serving to keep it looking its spookiest!
Expert Tips for Halloween Cheesecake
-
Use Room Temperature Ingredients: Ensure cream cheese and eggs are at room temperature for a smoother batter, avoiding lumps that can lead to a less creamy Halloween cheesecake.
-
Avoid Overmixing: When adding flour, mix gently to prevent incorporating too much air, which can lead to cracks in your cheesecake.
-
Perfect Color Swirls: Use gel food coloring for vibrant hues without affecting the batter’s consistency. Liquid dyes can thin the batter, losing those bright, spooky colors.
-
Cooling Is Key: Allow ample cooling time after baking to prevent cracks. Transfer the cheesecake to a wire rack for even cooling.
-
Chill Overnight: For best flavor and texture, chill the cheesecake overnight. This allows the flavors to meld beautifully, making each slice even more delicious!
What to Serve with Scary Halloween Cheesecake?
The perfect Halloween gathering deserves a delicious spread to complement this vibrant cheesecake, enticing taste buds and creating festive unity.
-
Pumpkin Spice Latte: This cozy beverage adds a seasonal touch and warm spices that dance beautifully with the cheesecake’s creamy texture.
-
Spooky Candy Apples: Their crunchy exterior and sweet caramel flavor provide a delightful contrast to the smooth cheesecake. Plus, they make a kid-friendly treat that steals the show!
-
Ghostly Chocolate Mousse: Light and airy, this dessert is a rich indulgence that adds variety to your dessert table, balancing out the cheesecake’s density.
-
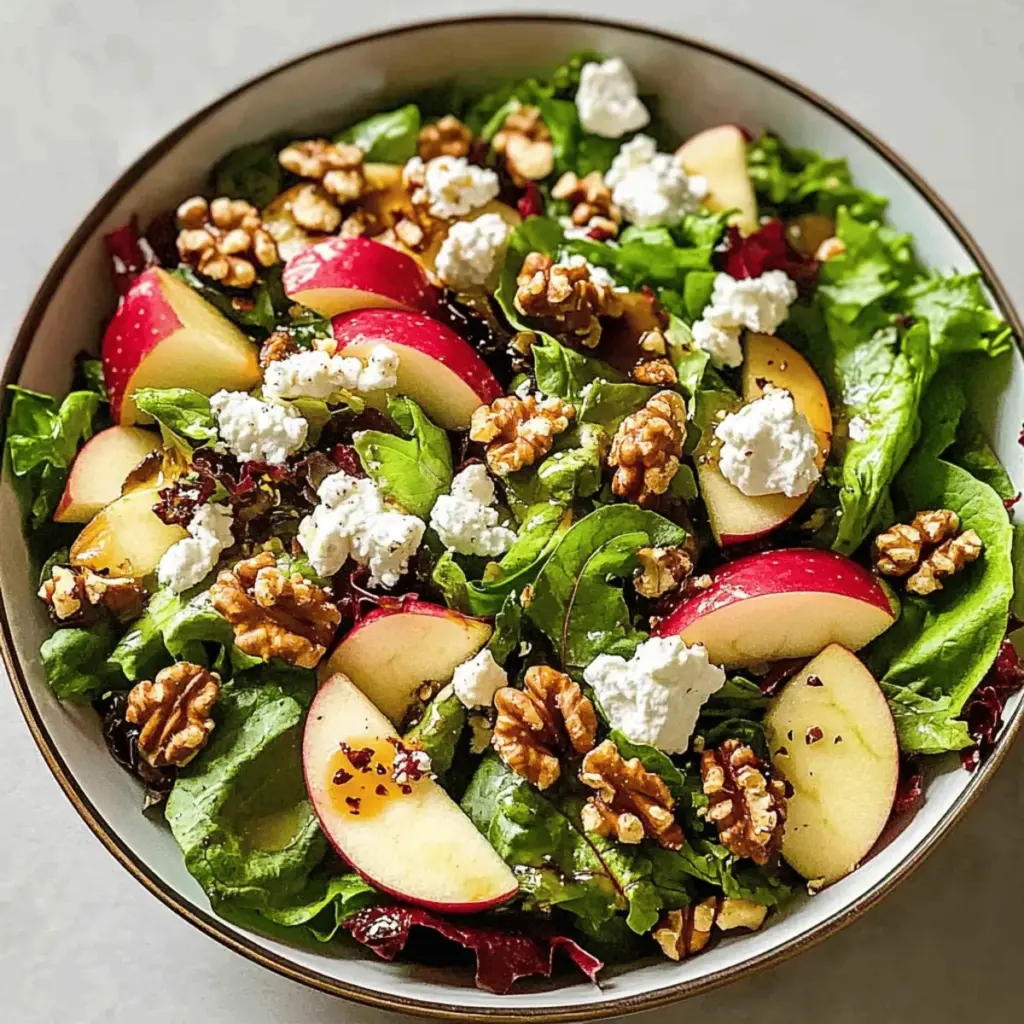
Candy Corn Salad: A fun, colorful mix of fruit and candy corn offers a refreshing and playful contrast, inviting both kids and adults to dive right in.
-
Cut-out Sugar Cookies: Decorated in spooky shapes, these cookies can be a fun activity for the kids or a charming addition to your dessert platter.
-
Halloween-themed Punch: A fizzy fruit punch in a vibrant color not only amplifies the festiveness but also quenches thirst, making your gathering even more enjoyable.
Make Ahead Options
These Halloween Cheesecake preparations are a fantastic time-saver for busy home cooks! You can make the cheesecake up to 2 days in advance by following the initial baking and chilling instructions, which allows the flavors to deepen and the texture to set beautifully. Allow the cheesecake to cool completely after baking, then refrigerate it covered tightly—this helps maintain its creamy consistency. When you’re ready to serve, simply decorate it with sprinkles, candy eyeballs, or ganache to keep the toppings fresh and vibrant. With these make-ahead tips, you’ll have more time to enjoy the festivities while still impressing your guests with this delightful Halloween Cheesecake!
Halloween Cheesecake Recipe FAQs
What type of chocolate cookies should I use for the crust?
Absolutely! You can use any chocolate sandwich cookies, with Oreos being a popular choice for their rich flavor and perfect crunch. If you’d like a lighter crust, feel free to substitute chocolate cookies with graham crackers for a different taste and texture.
How should I store leftover Halloween Cheesecake?
Store your Halloween Cheesecake in the refrigerator, covered, for up to 5 days. This will help maintain its incredible creamy texture and vibrant swirls. Just be sure to keep it well-covered to prevent it from absorbing any other odors from your fridge!
Can I freeze Halloween Cheesecake?
Yes, indeed! Wrap the cheesecake tightly in plastic wrap followed by aluminum foil to prevent freezer burn. It can be frozen for up to 2 months. When you’re ready to enjoy it, simply thaw in the refrigerator overnight for the best taste and texture.
What should I do if my cheesecake cracks while baking?
If your cheesecake cracks, don’t worry—this can happen! An easy way to prevent cracks is to ensure you know when to stop mixing: after adding the flour, mix just until combined. Additionally, allow the cheesecake to cool slowly in the oven after baking as this gradual cooling helps minimize cracks.
Are there any dietary considerations for this recipe?
Absolutely! This Halloween Cheesecake is vegetarian-friendly, but be mindful of the ingredients if you have allergies. Cream cheese and eggs are the main allergens to watch out for. For a gluten-free version, simply substitute the all-purpose flour with a gluten-free flour blend. Always double-check labels if you’re serving guests with specific dietary needs.
Vibrant Halloween Cheesecake That Wows Every Guest
Ingredients
Equipment
Method
- Preheat your oven to 325°F (160°C) and prepare a 9-inch springform pan by greasing it and lining the bottom with parchment paper.
- In a bowl, crush chocolate sandwich cookies and mix with melted butter. Press this mixture into the prepared pan and bake for 8-10 minutes.
- Beat the softened cream cheese with sugar until smooth. Add eggs one by one, mixing until incorporated, then blend in vanilla, sour cream, and flour.
- Divide the filling into four bowls and tint each with different gel food colors: orange, purple, green, and black.
- Spoon dollops of the colors onto the cooled crust, alternating the colors, then swirl gently with a knife.
- Bake in the oven for 40-45 minutes until the edges are set. The center should jiggle slightly.
- Let the cheesecake cool in the oven for about 1 hour, then transfer to a wire rack to cool completely before refrigerating for at least 4 hours.
- Decorate the chilled cheesecake with sprinkles, candy eyeballs, or ganache, then slice and serve.